Credit Card Credit in QuickBooks Online- Instructions
Creating a Credit Card Credit in QuickBooks Online: Video
This video lesson, titled “Entering Credit Card Credits,” shows you how to create a credit card credit in QuickBooks Online. This video lesson on entering credit card credits in QuickBooks Online is from our complete QuickBooks Online tutorial, titled “Mastering QuickBooks Online Made Easy.”
Overview of Creating a Credit Card Credit in QuickBooks Online
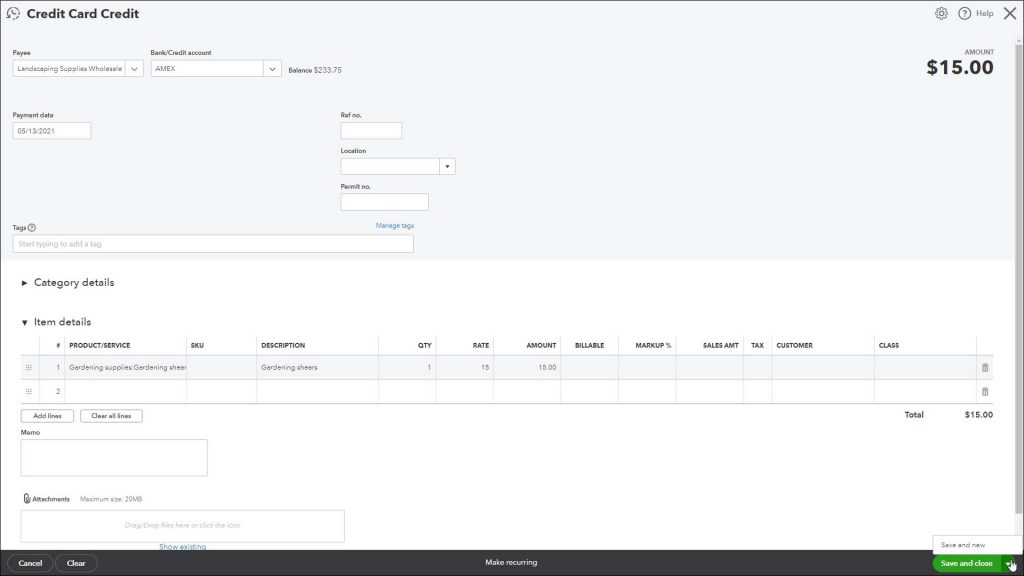
You create a credit card credit in QuickBooks Online to record a return to a business credit card. To enter a credit card credit in QuickBooks Online, click the “+ New” button in the Navigation Bar. Then click the “Credit Card Credit” link under the “Vendors” heading in the menu that appears to open the “Credit Card Credit” window.
In the “Credit Card Credit” window, select the vendor from whom you made the purchase from the “Payee” drop-down. Select the credit card account you used from the “Bank/Credit account” drop-down.
Then enter the appropriate “Category details” or “Item details,” depending for which account or items you are receiving the credit. Make sure to enter the same account or item information as when you paid the original expense or paid the bill using the credit card, to correctly reflect the credit to the related account or accounts.
When finished, click the “Save and close” button to save the credit card credit and close the page. Alternatively, to enter another “Credit Card Credit” instead, select the “Save and new” choice from the drop-down button to save the current transaction and open a new blank “Credit Card Credit” window.
A picture of a user entering a credit card credit in QuickBooks Online.
Instructions on How to Enter a Credit Card Credit in QuickBooks Online
- To enter a credit card credit in QuickBooks Online, click the “+ New” button in the Navigation Bar.
- Then click the “Credit Card Credit” link under the “Vendors” heading in the menu that appears to open the “Credit Card Credit” window.
- Select the vendor from whom you made the purchase by using the “Payee” drop-down.
- Select the credit card account you used from the “Bank/Credit account” drop-down.
- Then enter the appropriate “Category details” or “Item details,” depending for which account or items you are being credited. Make sure to enter the same account or item information as when you paid the original expense or paid the bill using the credit card, to correctly reflect the credit to the related account or accounts.
- To save the credit card credit and close the page when finished, click the “Save and close” button.
- Alternatively, to enter another “Credit Card Credit” instead, select the “Save and new” choice from the drop-down button to save the current transaction and open a new blank “Credit Card Credit” window.

