Crop Images in Photoshop Elements- Instructions
Crop Images in Photoshop Elements: Video Lesson
This video lesson, “Learn How to Crop Photos in Adobe Photoshop Elements 2023: A Training Tutorial,” shows how to crop images in Photoshop Elements. This video lesson on how to crop images in Photoshop Elements is from our complete Photoshop Elements tutorial, titled “Mastering Photoshop Elements Made Easy v.2023.”
Crop Images in Photoshop Elements: Overview
You can crop images in Photoshop Elements to trim away unnecessary parts of an image. Doing this enhances the image’s composition. You can crop images in Photoshop Elements by using the “Crop Tool” in the Toolbox. This tool has the most cropping options available.
To crop images in Photoshop Elements, first click the “Crop Tool” in the Toolbox. Then select the “Crop Tool” in the Tool Options Bar. The “Crop Tool,” “Cookie Cutter Tool” and “Perspective Crop Tool” share the same button in the Toolbox in Photoshop Elements.
In the Tool Options Bar, then set the tool’s options. To select a crop overlay, click either the “None,” “Rule of Thirds” or “Grid” buttons in the “Grid Overlay” section. If you select one of these overlays, other than “None”, it appears onscreen as you crop your image. To change the pixel resolution of the cropped image, type a value into the “Resolution” field. Then select either “Pixels/Inch” or “Pixels/Centimeter” from the adjacent drop-down.
To constrain your cropping area, use the “Show Crop Preset Options” drop-down. To restrict the crop area to a selected size or ratio, select one of the pre-set aspect ratios, like 3 x 5 or 4 x 6. Selecting the “Use Photo Ratio” choice restricts the crop area to the current image’s size ratio. To create a custom cropping area size, choose “No Restriction” from the drop-down. Then enter your own width and height values into the adjacent “W” and “H” fields below the drop-down. To freely select a cropping area, select the “No Restriction” choice and do not enter a height or width.
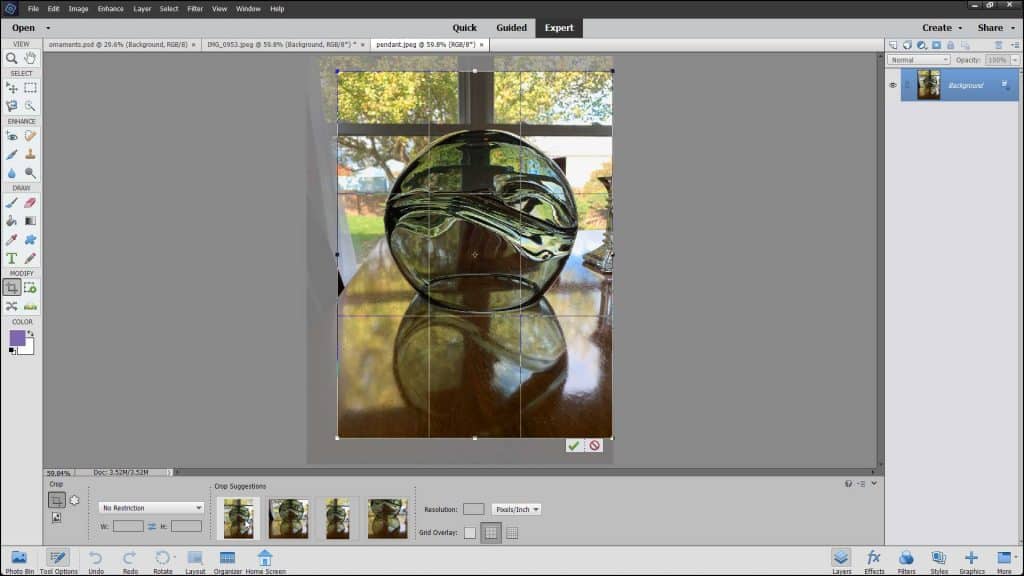
Crop Images in Photoshop Elements- Instructions: A picture of a suggested crop area applied to an image in Photoshop Elements.
You can also select from some suggested cropping areas, shown in the “Crop Suggestions” area towards the right end of the Tool Options Bar. To select a suggested cropping area to crop images in Photoshop Elements, click it to select it. The cropping area is then automatically selected in the image. Below the cropping area in the image, you can then click the green checkmark button for “Commit” to apply the crop or click the “Cancel” button to cancel the crop.
Alternatively, to crop images in Photoshop Elements by manually creating a cropping area, click and drag over the area to keep in the image. As you click and drag, a dashed line appears around the perimeter of the crop area. After you release your mouse button, the crop area appears onscreen and shows any grid overlay you selected.
If you chose to draw a cropping area that can be resized, you will also see resizing handles appear at the corners and sides of the crop area. To resize the crop area, hover your mouse pointer over one of these handles until your cursor turns into a double-pointed arrow. Then click and drag the handle to change the size of the crop area. If you chose to constrain the proportions of the image, the other side will adhere to the constraint setting. The area that appears inside the crop area border is what you will keep. You can also move the crop area by clicking and dragging inside the crop area to move it around the image.
Two buttons also appear at the bottom-right corner of the crop area. You can click the “Cancel” button to cancel cropping the image or click the “Commit” button to finish cropping the image.
Crop Images in Photoshop Elements: Instructions
- To crop images in Photoshop Elements, click the “Crop Tool” in the Toolbox.
- Then select the “Crop Tool” in the Tool Options Bar.
- Then set the tool’s options within the Tool Options Bar.
- To select a crop overlay, click either the “None,” “Rule of Thirds” or “Grid” button in the “Grid Overlay” section of the Tool Options Bar
- To change the pixel resolution of the cropped image, type a value into the “Resolution” field.
- Then select either “Pixels/Inch” or “Pixels/Centimeter” from the adjacent drop-down menu.
- To constrain your cropping area, use the “Show Crop Preset Options” drop-down to select one of the pre-set aspect ratios.
- To restrict the crop area to a selected size or ratio, select one of the pre-set aspect ratios.
- Selecting the “Use Photo Ratio” choice restricts the crop area to the current image’s size ratio.
- To create a custom cropping area size, choose “No Restriction” from the drop-down.
- Then enter your own width and height values into the adjacent “W” and “H” fields below the drop-down.
- To freely select a cropping area, select the “No Restriction” choice and do not enter a height or width.
- To crop images in Photoshop Elements by selecting a suggested cropping area from the “Crop Suggestions” section of the Tool Options Bar, click a suggested cropping area to automatically select it within the image.
- Below the cropping area in the image, then either click the green checkmark button for “Commit” to apply the crop or click the “Cancel” button to cancel it.
- Alternatively, to crop images in Photoshop Elements by manually creating a cropping area, click and drag over the area to keep in the image.
- As you click and drag, a dashed line appears around the perimeter of the crop area.
- After you release your mouse button, the crop area appears onscreen and shows any grid overlay you selected.
- If you chose to draw a cropping area that can be resized, then you will also see resizing handles appear at the corners and sides of the crop area.
- To resize the crop area, hover your mouse pointer over one of these handles until your cursor turns into a double-pointed arrow.
- Then click and drag the handle to change the size of the crop area.
- If you chose to constrain the proportions of the image, the other side will adhere to the constraint setting.
- The area that appears inside the crop area border is what you will keep.
- To move the crop area, click and drag inside the crop area to move it around the image.
- Two buttons also appear at the bottom-right corner of the crop area.
- You can click the “Cancel” button to cancel cropping the image or click the “Commit” button to finish cropping the image.

