Custom 3D Maps in Excel – Instructions
Custom 3D Maps in Excel: Video Lesson
This video lesson, titled “Custom 3D Maps,” shows you how to create custom 3D maps in Excel. This video lesson is from our complete Excel tutorial, titled “Mastering Excel Made Easy v.2019 and 365.”
Custom 3D Maps in Excel: Overview
You can easily create custom 3D maps in Excel. When you create a new scene in a 3D Maps tour, it is associated with a map. By default, the “World Map” is used for most scenes. However, you can also create custom 3D maps from image files, if desired.
Custom 3D Maps in Excel: Create a New Custom Map
One way to create a new, custom map from a saved image file is to click the “Home” tab of the Ribbon in the 3D Maps window. Then click the “New Scene” drop-down button in the “Scene” button group. Then select the “New Custom Map” choice from the drop-down menu. Alternatively, to create a new, custom map for the currently selected scene, click the scene whose map you want to change in the Tour Editor pane. Then click the “Scene Options” button in the “Scene” button group to open the “Scene Options” window. Then click the “Change” button in the “Scene Options” window. Finally, click the “New Custom Map” choice in the “Change Map Type” window that then appears.
Custom 3D Maps in Excel: Set New Custom Map Options
In the “Custom Map Options” window that opens, type a name for the new custom map into the “Give the custom map a name” field. Then click the “Browse for the background picture” button to open a dialog box. This dialog box lets you select and open the image file for the map. After selecting it, you can then edit the X and Y coordinates used by the map in the “X” and “Y” sections. For each axis, you can input the “Min,” “Max,” “Scale %,” and “Offset %” values. You can check the “Flip Axis” checkbox to flip the origin point (coordinates 0,0) on the map, if needed. To swap the X and Y axis, check the “Swap the X and Y axis” checkbox.
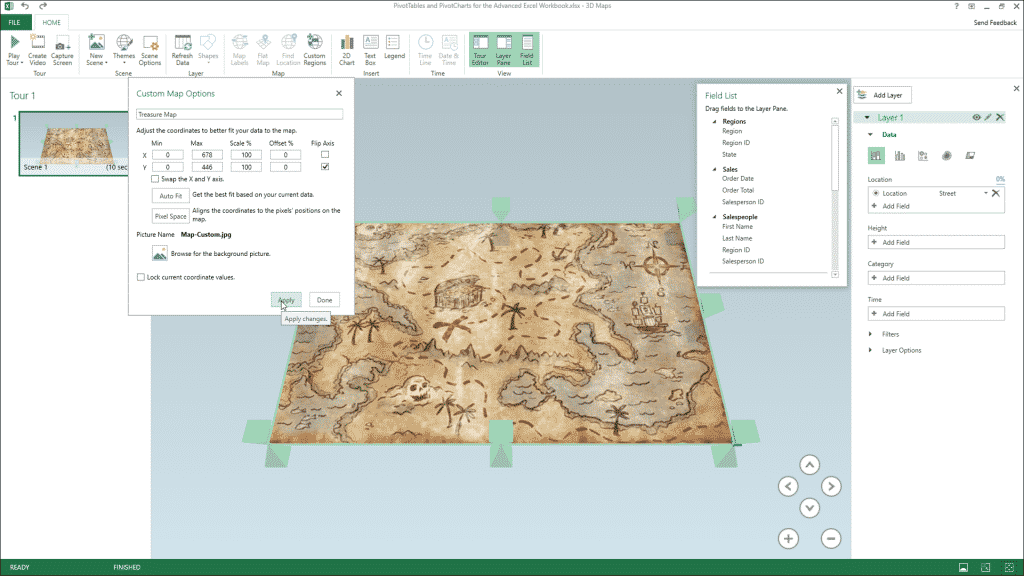
Custom 3D Maps in Excel – Instructions: A picture of a user setting the custom map options for a custom 3D map in Excel.
Alternatively, to get the best fit based on your current Excel data, click the “Auto Fit” button to automatically adjust the X and Y coordinate data. Clicking the “Pixel Space” button aligns the coordinates to the pixels’ positions on the map, instead. To lock the values of the current coordinates, check the “Lock current coordinate values” checkbox. When finished, click the “Apply” button to apply the changes to the custom map and then click the “Done” button to close the dialog box.
Custom 3D Maps in Excel: Add Data to the Custom Map
If you need to add data from an Excel worksheet to a map, you can minimize the 3D Maps window to return to its worksheet. Then select the table or range to map in the Excel workbook. Then click the drop-down part of the “3D Map” button in the “Tours” button group on the “Insert” tab of the Ribbon. Finally, select the “Add Selected Data to 3D Maps” command from the button’s drop-down menu to add the data to the workbook’s data model. Note that you can also use the workbook’s data model to manage the data for 3D Maps, as well, just as you can for the Power Pivot add-in.
After adding the data to the data model, if needed, then restore the 3D Maps window again. Then add the fields that contain the x-coordinates and the y-coordinates to the “Location” field in the Layer Pane. Then use each field’s adjacent drop-down to choose the “X Coordinate” and “Y Coordinate” data type, if needed. Finally, continue to map the values and dates, as normal.
Custom 3D Maps in Excel: Selecting, Deleting and Editing Custom Maps
After creating the new, custom 3D Map, you can select it as a map type from the “New Scene” drop-down button in the “Scene” button group on the “Home” tab of the Ribbon in the 3D Maps window. If you want to delete the custom map, you can click the “Delete custom map” button, which looks like an “X,” and which appears in the upper-right corner of the map choice in this button’s drop-down menu. These same options also appear when viewing the “Change Map Type” dialog box, which you can open by clicking the “Change” button in the “Scene Options” dialog box. Also note that you can click the “Edit custom map” button, which looks like a cog icon, in the lower-right corner of the map choice within the “Change Map Type” dialog box to also edit the custom map, if needed.
Custom 3D Maps in Excel: Instructions
Custom 3D Maps in Excel: Instructions on How to Create a New Custom Map
- To create a new, custom map from a saved image file, click the “Home” tab of the Ribbon in the 3D Maps window.
- Then click the “New Scene” drop-down button in the “Scene” button group.
- Then select the “New Custom Map” choice from the drop-down menu.
- Alternatively, to create a new, custom map for the currently selected scene, click the scene whose map you want to change in the Tour Editor pane.
- Then click the “Scene Options” button in the “Scene” button group to open the “Scene Options” window.
- Then click the “Change” button in the “Scene Options” window and click the “New Custom Map” choice in the “Change Map Type” window that then appears.
Custom 3D Maps in Excel: Instructions on How to Set New Custom Map Options
- In the “Custom Map Options” window that opens after performing either action, type a name for the new custom map into the “Give the custom map a name” field.
- Then click the “Browse for the background picture” button to open a dialog box.
- Use this dialog box to select and open the image file for the map.
- After selecting that file, then edit the X and Y coordinates used by the map in the “X” and “Y” sections.
- For each axis, you can input the “Min,” “Max,” “Scale %,” and “Offset %” values.
- You can check the “Flip Axis” checkbox to flip the origin point (coordinates 0,0) on the map, if needed.
- To swap the X and Y axis, check the “Swap the X and Y axis” checkbox.
- Alternatively, to get the best fit based on your current Excel data, click the “Auto Fit” button to automatically adjust the X and Y coordinate data.
- Alternatively, clicking the “Pixel Space” button aligns the coordinates to the pixels’ positions on the map, instead.
- To lock the values of the current coordinates, check the “Lock current coordinate values” checkbox.
- When finished, click the “Apply” button to apply the changes to the custom map and then click the “Done” button to close the dialog box.
Custom 3D Maps in Excel: Instructions on How to Add Data to the Custom Map
- If you need to add data from an Excel worksheet to a map, you can minimize the 3D Maps window to return to its worksheet.
- Then select the table or range to map in the Excel workbook.
- Then click the drop-down part of the “3D Map” button in the “Tours” button group on the “Insert” tab of the Ribbon.
- Finally, select the “Add Selected Data to 3D Maps” command from the button’s drop-down menu to add the data to the workbook’s data model.
- Note that you can also use the workbook’s data model to manage the data for 3D Maps, as well, just as you can for the Power Pivot add-in.
- After adding the data to the data model, if needed, then restore the 3D Maps window again.
- Then add the fields that contain the x-coordinates and the y-coordinates to the “Location” field in the Layer Pane.
- Then use each field’s adjacent drop-down to choose the “X Coordinate” and “Y Coordinate” data type, if needed.
- Finally, continue to map the values and dates, as normal.
Custom 3D Maps in Excel: Instructions on Selecting, Deleting and Editing Custom Maps
- After creating the new, custom 3D Map, you can select it as a map type from the “New Scene” drop-down button in the “Scene” button group on the “Home” tab of the Ribbon in the 3D Maps window.
- To delete the custom map, click the “Delete custom map” button, which looks like an “X,” and which appears in the upper-right corner of the map choice in this button’s drop-down menu.
- These same options also appear when viewing the “Change Map Type” dialog box, which you can open by clicking the “Change” button in the “Scene Options” dialog box.
- To edit the custom map, if needed, click the “Edit custom map” button, which looks like a cog icon, in the lower-right corner of the map choice within the “Change Map Type” dialog box.

