Custom Font Schemes in Publisher- Instructions
Custom Font Schemes in Publisher: Video Lesson
This video lesson, titled “Creating a Custom Font Scheme,” shows how to create, apply, and delete custom font schemes in Publisher. This video is from our complete Publisher tutorial, titled “Mastering Publisher Made Easy v.2019 and 365.”
Custom Font Schemes in Publisher: Overview
You can create custom font schemes in Publisher to use in your publications. To create custom font schemes in Publisher, click the “Page Design” tab in the Ribbon. Then click the “Fonts” drop-down button in the “Schemes” button group. Then select the “Create New Font Scheme…” command from the drop-down menu that appears to open the “Create New Font Scheme” dialog box.
In the “Create New Font Scheme” dialog box, click the drop-down button next to the “Heading font:” and “Body font:” drop-downs to select a custom heading and body font for your custom font scheme. You can then enter a name for your custom font scheme into the “Font scheme name:” text box. Then click the “Save” button to save your custom font scheme.
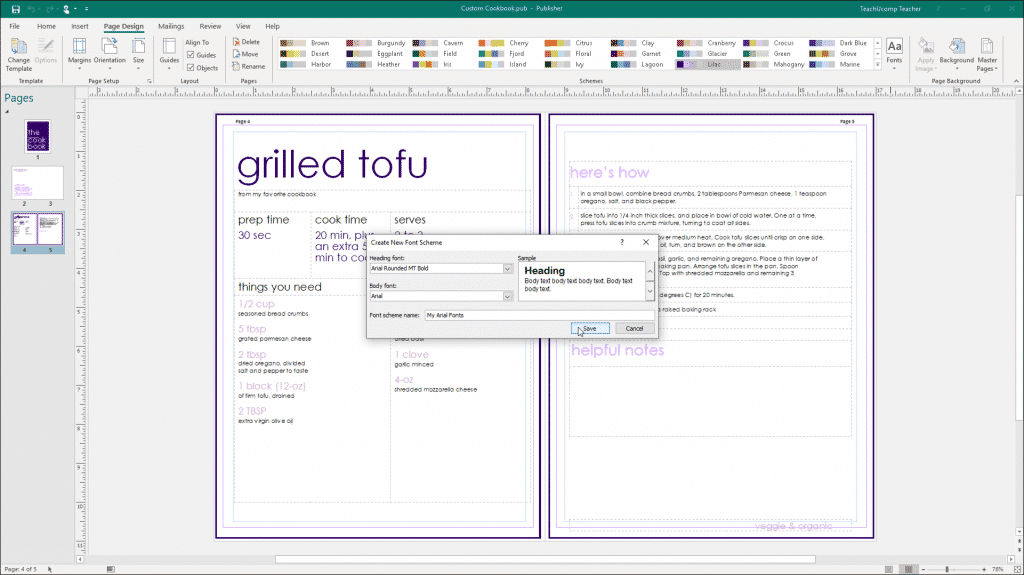
Custom Font Schemes in Publisher- Instructions: A picture of the “Create New Font Scheme” dialog box in Publisher.
To apply custom font schemes in Publisher, click the “Page Design” tab within the Ribbon. Then click the “Fonts” button in the “Schemes” button group. Then choose the custom font scheme to apply from the choices shown.
To delete custom font schemes in Publisher, click the “Fonts” button in the “Schemes” button group. Then right-click the custom font scheme to delete from the drop-down menu that appears. Then choose the “Delete Scheme” command from the pop-up menu that appears. Click the “Yes” button in the confirmation dialog box that appears to delete the custom font scheme.
Custom Font Schemes in Publisher: Instructions
- To create custom font schemes in Publisher, click the “Page Design” tab in the Ribbon.
- Then click the “Fonts” drop-down button in the “Schemes” button group.
- Then select the “Create New Font Scheme…” command from the drop-down menu that appears to open the “Create New Font Scheme” dialog box.
- In the “Create New Font Scheme” dialog box, click the drop-down button next to the “Heading font:” and “Body font:” drop-downs to select a custom heading and body font for your font scheme.
- Then enter a name for your custom font scheme into the “Font scheme name:” text box.
- Then click the “Save” button to save your custom font scheme.
- To apply custom font schemes in Publisher, click the “Page Design” tab within the Ribbon.
- Then click the “Fonts” button in the “Schemes” button group.
- Then choose the custom font scheme to apply from the choices shown.
- To delete custom font schemes in Publisher, click the “Fonts” button in the “Schemes” button group.
- Then right-click the custom font scheme to delete from the drop-down menu that appears.
- Then choose the “Delete Scheme” command from the pop-up menu that appears.
- Click the “Yes” button in the confirmation dialog box that appears to delete the custom font scheme.