Detail Adjustments in Camera Raw in Photoshop: Video
This video lesson, titled “Learn How to Make Detail Adjustments in Camera Raw in Adobe Photoshop: A Training Tutorial,” shows how to apply detail adjustments in Camera Raw in Photoshop. This video lesson is from our complete Photoshop tutorial, titled “Mastering Photoshop Made Easy.”
Overview:
After making basic tonal adjustments to an image, if needed, you can then make detail adjustments in Camera Raw in Photoshop, if needed. To make detail adjustments to camera raw images in Photoshop, click the “Edit” button in the toolbar at the right side of the Camera Raw dialog box, if needed. Then click the “Detail” tab in the Edit panel that appears to the left of the toolbar to expand it, if needed.
As noted at the bottom of the expanded “Manual Noise Reduction” section of this panel, you should change the magnification level of the preview image to 100% or greater to accurately preview the changes you make to these settings. The detail settings are “Sharpening” and “Noise Reduction.” The “Noise Reduction” setting uses either the AI-assisted “Denoise…” enhancement or uses manual noise reduction you apply by clicking the “Manual Noise Reduction” section and then adjusting its sliders. To show or hide the detail adjustments for each manual detail setting, if needed, click the arrows to the right of the setting names.
How to Apply Sharpening in Camera Raw in Photoshop:
The first image detail setting you can adjust is the sharpness of the image. Adjusting these settings changes the edge definition in the camera raw image. The “Sharpening” slider increases the amount of edge definition when you slide it to the right. Setting this slider to a value of zero, or entering “0” into the adjacent field, turns off image sharpening.
The “Radius” slider adjusts the size of the details to which edge sharpening is applied. This should be set to a lower setting for an image with fine details. An image with larger details may be able to use a larger setting. However, using too large a setting will produce unnatural results within an image.
The “Detail” slider lets you adjust how much sharpening is applied to edges and to textures in the image. A lower setting will generally sharpen edges to remove blur in an image, while higher settings will emphasize textures in the image. The “Masking” slider controls the edge mask. When set to zero, everything in the image is sharpened. When set to 100, most of the sharpening occurs on the strongest edges in the image.
How to Automatically Remove Noise in Camera Raw in Photoshop:
The next detail setting you can adjust is the noise reduction. Adjusting the noise reduction settings adjusts the color saturation of the image to remove “noise.” Image noise are the additional, visible bits of colors that can appear in images, and which can degrade image quality.
To use AI-enhanced noise reduction, if available for your camera raw image, click the “Denoise…” button to open an “Enhance” dialog box. The preview of the enhanced image appears at the left side of this dialog box. To zoom out the preview, click the “Zoom out” button at the bottom of the preview. To zoom in again, click the area of the zoomed-out preview to magnify. If needed, to pan the image, click and drag the zoomed-in preview.
To adjust the amount of AI noise reduction to apply, click and drag the “Amount” slider under the “Denoise” checkbox at the right side of the “Enhance” dialog box. To apply the enhancement, which saves a copy of the file in the same folder location with the same file name, but with “-Enhanced-NR” added to the end of the file name, click the “Enhance” button. Alternatively, to cancel the noise reduction, click “Cancel.”
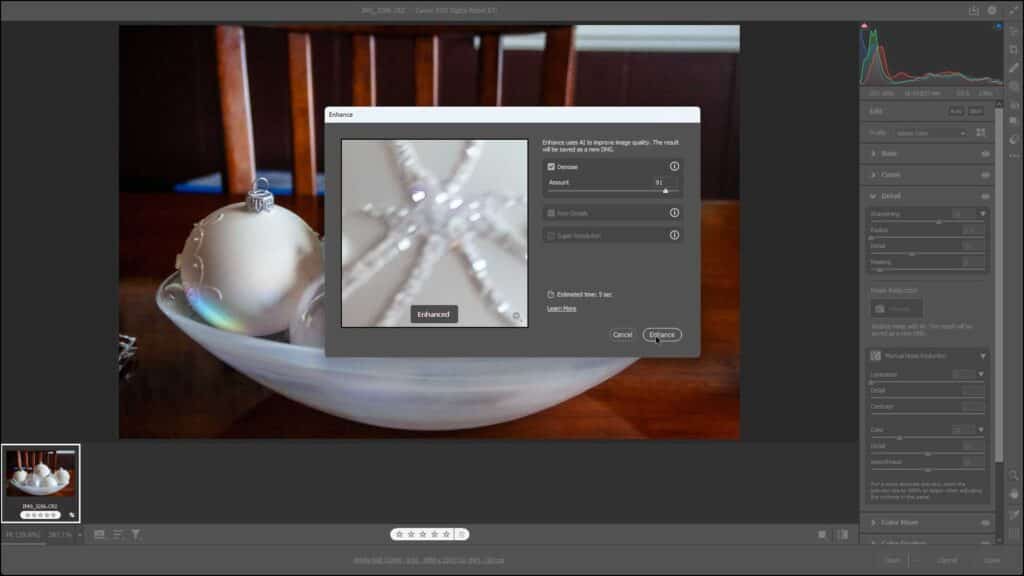
A picture of a user applying detail adjustments in Camera Raw in Photoshop to automatically remove noise.
How to Manually Remove Noise in Camera Raw in Photoshop:
Alternatively, to manually apply noise reduction, use the “Luminance” slider in the expanded “Manual Noise Reduction” section to adjust the grayscale noise in the image. After adjusting the “Noise Reduction” setting, its “Detail” and “Contrast” sliders then become available. The “Detail” slider lets you set the grayscale noise threshold. A higher setting preserves more details but may produce a noisier image. Lower values produce cleaner images but may lose some details. The “Contrast” slider controls the grayscale noise contrast. At higher settings, this may produce noisy blotches, but preserve contrast. Lower settings produce smoother results but reduce image contrast.
To manually adjust color noise in the image, then use the “Color” slider in the expanded “Manual Noise Reduction” section to adjust the color, or chroma, noise in the image. You can use the “Detail” slider to adjust the color noise threshold. When set to a higher value, this protects thin color edges, but can also produce color speckling. Lower values can remove color speckling but may result in color bleeding. You can use the “Smoothness” slider to help blend or blur the remaining color noise but be aware that over-applying this setting can sometimes desaturate the overall image.
How to Temporarily Hide Detail Adjustments in Camera Raw in Photoshop:
To temporarily hide all the white balance and basic adjustments in the preview image in camera raw after changing these settings, click and hold down on the “eye” icon in the upper-right corner of the “Basic” tab within the Edit panel. This temporarily hides the changes in the preview image while you hold down on this icon so you can see the changes to the camera raw preview image. Simply release the mouse button to restore the visibility of the changes.
Instructions on How to Make Detail Adjustments in Camera Raw in Photoshop:
- To make detail adjustments in Camera Raw in Photoshop, click the “Edit” button in the toolbar at the right side of the Camera Raw dialog box, if needed.
- Then click the “Detail” tab in the Edit panel that appears to the left of the toolbar to expand it, if needed.
- As noted at the bottom of the expanded “Manual Noise Reduction” section of this panel, you should change the magnification level of the preview image to 100% or greater to accurately preview the changes you make to these settings.
- The detail settings are “Sharpening” and “Noise Reduction.”
- The “Noise Reduction” setting uses either the AI-assisted “Denoise…” enhancement or manual noise reduction you apply by clicking the “Manual Noise Reduction” section and then adjusting its sliders.
- To show or hide the related detail adjustments for each manual detail setting, if needed, click the arrows to the right of the setting names.
Instructions on How to Apply Sharpness in Camera Raw in Photoshop:
- To increase or decrease the sharpness of the image, slide the “Sharpening” slider to the right or left, respectively.
- To turn off image sharpening, drag this slider to a value of zero, or enter “0” into the adjacent field.
- If needed, to adjust the size of the details to which edge sharpening is applied, use the “Radius” slider.
- To adjust how much sharpening is applied to image edges and textures, use the “Detail” slider.
- To decrease or increase the edge mask, slide the “Masking” slider to the left or right, respectively. At zero, everything in the image is sharpened. At 100, most of the sharpening occurs on the strongest edges in the image.
How to Use Automatic Noise Reduction in Camera Raw in Photoshop:
- To use AI-enhanced noise reduction, if available for your camera raw image, click the “Denoise…” button to open an “Enhance” dialog box.
- The preview of the enhanced image appears at the left side of this dialog box.
- To zoom out the preview, click the “Zoom out” button at the bottom of the preview.
- To zoom in again, click the area of the zoomed-out preview to magnify.
- If needed, to pan the image, click and drag the zoomed-in preview.
- To adjust the amount of AI noise reduction to apply, click and drag the “Amount” slider under the “Denoise” checkbox at the right side of the “Enhance” dialog box.
- To apply the enhancement, which saves a copy of the file in the same folder location with the same file name, but with “-Enhanced-NR” added to the end of the file name, click the “Enhance” button.
- Alternatively, to cancel the noise reduction, click “Cancel.”
Instructions on How to Manually Apply Noise Reduction in Camera Raw in Photoshop:
- Alternatively, to manually apply grayscale noise reduction, use the “Luminance” slider in the expanded “Manual Noise Reduction” section.
- After adjusting the “Noise Reduction” setting, its “Detail” and “Contrast” sliders then become available.
- To set the grayscale noise threshold, use the “Detail” slider. A higher setting preserves more details but may produce a noisier image. Lower values produce cleaner images but may lose some details.
- If needed, to control the grayscale noise contrast, use the “Contrast” slider. Higher settings may produce noisy blotches but preserve contrast. Lower settings produce smoother results but reduce image contrast.
- To adjust the color, or chroma, noise in the image, use the “Color” slider in the expanded “Manual Noise Reduction” section.
- To adjust the color noise threshold, use the “Detail” slider. Higher values protect thin color edges but can also produce color speckling. Lower values remove color speckling but may result in color bleeding.
- If needed, to help blend or blur the remaining color noise, use the “Smoothness” slider. Be aware that over-applying this setting can sometimes desaturate the overall image.
Instructions on How to Temporarily Hide Detail Adjustments:
- To temporarily hide all detail adjustments in the preview image after changing these settings, click and hold down on the “eye” icon in the upper-right corner of the “Detail” tab in the Edit panel.
- To restore the visibility of the changes, then release the mouse button.