General Settings in WordPress- Tutorial
General Settings in WordPress: Video Lesson
This video lesson, titled “General Settings,” shows you how to configure the general settings in WordPress 4.0. This video lesson is from our complete WordPress 4.0 training, titled “Mastering WordPress Made Easy v.4.0.”
General Settings in WordPress: Overview
The General Settings in WordPress allow you to set different general options for the WordPress site. To configure these general settings in WordPress, click the “Settings” button in the Navigation Bar of the WordPress Admin Panel to display the “General Settings” page to the right. This page contains options for changing the general settings in WordPress for your entire site. The fields on this screen also determine some of the basics of your site setup.
Type the name for your website into the “Site Title” field. Most themes display the site title at the top of every page, in the title bar of the browser, and as the identifying name for syndicated fields.
Type the site tagline, or site motto, into the “Tagline” field. This line will appear after the title. Most themes display the tagline. This should be short and concise and give a general idea of what your website is about.
The “WordPress Address (URL),” “Site Address (URL),” and “E-mail Address” fields should already be set up, as this is information that is required to set up WordPress. You will probably not need to change these settings. The URL fields are most often the same, but you can change the “Site Address (URL),” if needed. The site address can be different if you want the site homepage to be different from the directory into which you installed WordPress. The “E-mail Address” field is the default e-mail address to use for administrative purposes on the site.
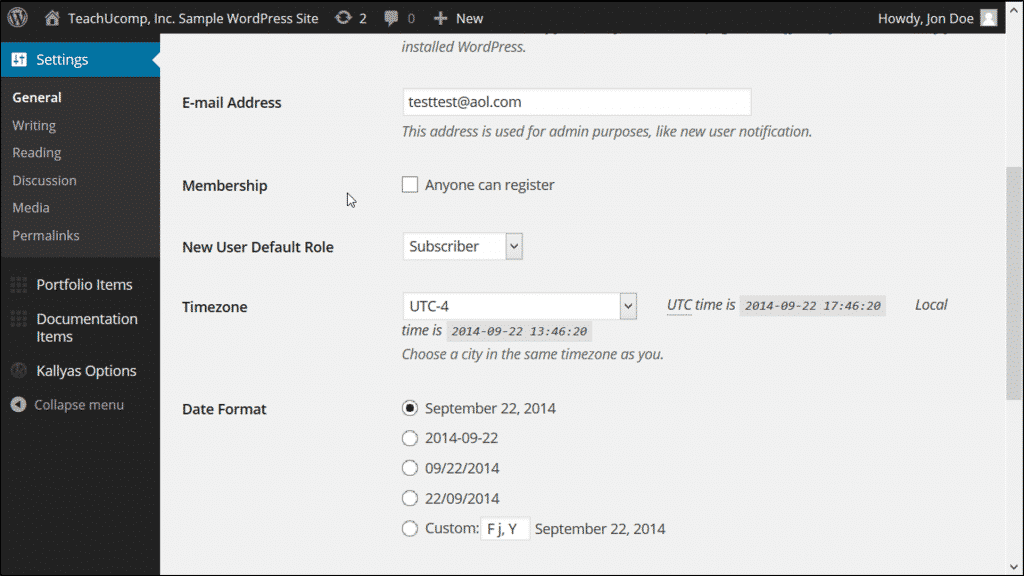
General Settings in WordPress- Tutorial: A picture of some of the settings shown within the “General” settings category in WordPress 4.0.
To allow site visitors to register themselves as users on your site, check the “Anyone can register” checkbox next to the “Membership” label. Then use the “New User Default Role” drop-down to select the default role to assign to new users when they register as members on the site. Choose either “Subscriber,” “Contributor,” “Author,” “Editor,” or “Administrator.”
You can choose a time zone for your site by choosing one from the “Timezone” drop-down. UTC means “Coordinated Universal Time.” Use the “UTC Timezone” drop-down to choose a city that is in the same time zone as you. To choose a date format for your website, select the desired option button choice in the “Date Format” section. To choose a time format for your website, select an option button choice in the “Time Format” section. Finally, use the “Week Starts On” drop-down to select on which day the week starts.
After you have finished changing your general settings in WordPress, click the “Save changes” button at the bottom of the “General Settings” page to save your general settings in WordPress.
General Settings in WordPress: Instructions
- To configure the general settings in WordPress, click the “Settings” button in the Navigation Bar of the WordPress Admin Panel to display the “General Settings” page to the right.
- Type the name for your website into the “Site Title” field.
- Type the site tagline, or site motto, into the “Tagline” field.
- The “WordPress Address (URL),” “Site Address (URL),” and “E-mail Address” fields should already be set up, as this is information that is required to set up WordPress. You will probably not need to change these settings.
- The URL fields are most often the same, but you can change the “Site Address (URL),” if needed. The site address can be different if you want the site homepage to be different from the directory into which you installed WordPress.
- The “E-mail Address” field is the default e-mail address to use for administrative purposes on the site.
- To allow site visitors to register themselves as users on your site, check the “Anyone can register” checkbox next to the “Membership” label.
- Then use the “New User Default Role” drop-down to select the default role to assign to new users when they register as members on the site.
- To choose a time zone for your site, use the “UTC Timezone” drop-down to choose a city that is in the same time zone as you.
- To choose a date format for your website, select the desired option button choice in the “Date Format” section.
- To choose a time format for your website, select an option button choice in the “Time Format” section.
- Use the “Week Starts On” drop-down to select on which day the week starts.
- After you have finished changing your general settings in WordPress, click the “Save changes” button at the bottom of the “General Settings” page to save your general settings in WordPress.
