Guided Edit Mode in Photoshop Elements – Instructions
How to Use Guided Edit Mode in Photoshop Elements: Video
This video lesson, titled “Learn How to Use Guided Edit Mode in Adobe Photoshop Elements 2023: A Training Tutorial,” shows how to use Guided Edit mode in Photoshop Elements. This lesson is from our complete Photoshop Elements tutorial, titled “Mastering Photoshop Elements Made Easy v.2023.”
Overview of How to Use Guided Edit Mode in Photoshop Elements:
Guided Edit mode in Photoshop Elements lets you make basic choices and have the program do the work for you. To use Guided Edit mode in Photoshop Elements, click “Guided” in the Shortcuts Bar.
Within Guided Edit mode in Photoshop Elements, select the image to use. You can choose the photo by making a choice from the “Photo Bin” below the work area. Use the dropdown above the Photo Bin to choose where to look for photos. After deciding which pictures appear in the Photo Bin, then click a picture to select it from the Photo Bin. Then choose one of the six categories listed below the Shortcuts Bar to start editing your image.
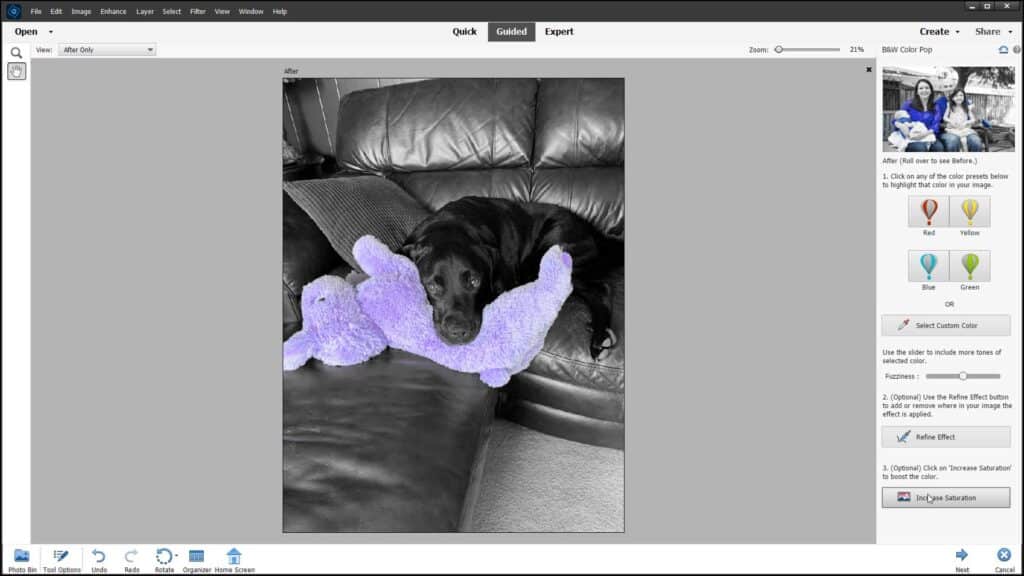
The categories for Guided Edit mode appear directly below the Shortcut Bar. The “Basics” lets you make basic adjustments to your image. This includes the “Brightness and Contrast” and “Sharpen” functions, for example. The “Color” category lets you make changes to the color of your image. For example, this includes the “Remove a Color Cast” function. Choosing “Black & White” lets you make all or some of the photo black and white. This category contains the “B&W Color Pop” function, for example.
The “Fun Edits” adds interest to photos using effects like “Puzzle Effect,” which turns an image into a jigsaw puzzle. The “Special Edits” category contains artistic effects, like “Orton Effect,” and “Restore Old Photo,” which is a repair function. The “Photomerge” choice in the category list lets you merge different photos together to create a new image. Each category contains at least four different functions that let you change the selected image. Simply click the function within the category that you want to apply to open the selected photo in the guided edit mode for that function.
A picture of a user editing a photo in Guided Edit mode in Photoshop Elements.
All the functions in Guided Edit mode let you make simple choices from a list of options. You will then be guided through the process of making the changes to your selected image. A panel then opens at the right side of the application window to walk you through the photo editing process.
Simply follow the instructions listed in the pane to complete the guided editing process. Guided Edit mode in Photoshop Elements lets you to create professional-looking photos without professional photo-editing skills.
Instructions on How to Use Guided Edit Mode in Photoshop Elements:
- To use Guided Edit mode in Photoshop Elements, click “Guided” in the Shortcuts Bar.
- Select the image to use and then choose from one of the six categories listed below the Shortcuts Bar.
- After selecting the category, then choose a function to perform on your image.
- Then follow the instructions in the pane that appears to edit your image.

