HDR Photo Merge in Lightroom Classic CC – Instructions
HDR Photo Merge in Lightroom Classic CC: Video Lesson
This video lesson, titled “Using HDR Photo Merge,” shows how to perform an HDR Photo Merge in Lightroom Classic CC. This video lesson is from our complete Lightroom Classic CC tutorial, titled “Mastering Lightroom Classic Made Easy v.CC.”
HDR Photo Merge in Lightroom Classic CC: Overview
You can use HDR Photo Merge in Lightroom Classic CC to merge multiple exposure-bracketed images into a single HDR image. HDR stands for “high dynamic range,” and refers to a photographic technique designed to produce a greater range of visible luminosity in images than is possible with standard photographic techniques. HDR images are typically created by combining at least two different exposures of the same photo into one image.
To perform an HDR Photo Merge in Lightroom Classic CC, click to select the photos to merge. Then select “Photo| Photo Merge| HDR” from the Menu Bar. The “HDR Merge Preview” dialog box then appears.
By default, Lightroom Classic CC applies checkmarks to both the “Auto Align” and “Auto Settings” features. The “Auto Settings” feature provides a good overall “starting point” for producing a final image that is evenly-toned. The “Auto Align” feature helps to reconcile differences between the images. If you shot the photos using a tripod, you may not need to use the “Auto Align” feature. You can uncheck these features if you don’t want to apply them.
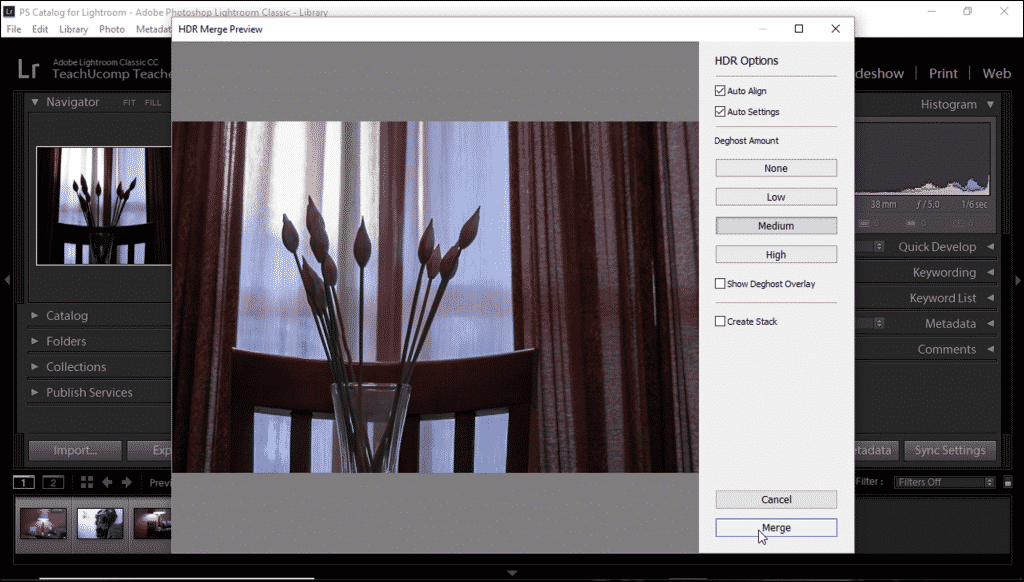
HDR Photo Merge in Lightroom Classic CC – Instructions: A picture of the “HDR Merge Preview” dialog box in Lightroom Classic CC.
As you work in the “HDR Merge Preview” dialog box, Lightroom Classic CC provides a preview image. Occasionally, you might notice that exposure-bracketed images appear unnatural or semi-transparent after being merged. To correct these unwanted effects, select one of the “Deghost Amount” options. The “Low” option resolves minor movement between frames. The “Medium” option cures moderate movement. Finally, the “High” option provides the maximum resolution of movement between frames. For best results, apply the lowest amount of deghosting necessary to obtain a clean image. If necessary, check the “Show Deghost Overlay” checkbox.
After making selections in the “HDR Merge Preview” dialog box, then click “Merge” to finish the HDR Photo Merge in Lightroom Classic CC. Lightroom Classic CC then creates the HDR image and adds it to your catalog.
HDR Photo Merge in Lightroom Classic CC: Instructions
- To perform an HDR Photo Merge in Lightroom Classic CC, click to select the photos to merge.
- Then select “Photo| Photo Merge| HDR” from the Menu Bar to open the “HDR Merge Preview” dialog box.
- To let Lightroom analyze and improve the tonal qualities of the HDR merge, check the “Auto Settings” checkbox in the dialog box.
- To reconcile small differences between the images, check the “Auto Align” checkbox.
- If you want to correct unwanted effects, like unnatural transparencies, select a “Deghost Amount” option. For best results, apply the lowest effective level of deghosting.
- To create the HDR image after making selections in the dialog box, click the “Merge” button.
