How to Create a New Document in WordPad in Windows 11 – Instructions
How to Create a New Document in WordPad in Windows 11: Video
This video lesson, titled “Starting WordPad and Creating a New Document,” shows how to start WordPad and create a new document in WordPad in Windows 11. This video lesson is from our complete Windows 11 tutorial, titled “Mastering Windows Made Easy v.11.”
How to Start WordPad in Windows 11
This lesson shows you how to create a new document in WordPad in Windows 11. While you have more flexibility creating documents if using a more sophisticated program like Microsoft Word, WordPad is included with Windows 11 to give all users the ability to create basic documents.
To start WordPad in Windows 11, click the Search button in the Windows taskbar to show the Search pane. Then click into the “Type here to search” field at the top of the Search pane and type “WordPad.” To open the WordPad app, then click the “WordPad” app in the search results listing. Alternatively, to pin the WordPad app to the “Pinned” section of the Start menu or pin it to the taskbar, right-click the app icon in the Search results and then click either the “Pin to Start” or “Pin to taskbar” buttons in the pop-up menu that appears to pin the app to either location for easier access in the future.
How to Create a New Document in WordPad in Windows 11
After you start WordPad in Windows 11, it automatically creates a new, blank document for you. To then create a new document in WordPad in Windows 11, if desired, start typing on your keyboard into the document window. To later create a new document in WordPad in Windows 11 when working in WordPad, if needed, click the “File” tab in the Ribbon of the WordPad window. Then click the “New” command in the drop-down menu that appears. If you have unsaved changes in the current document, you are prompted whether to save those changes in a confirmation message box that appears. Click the desired response button in this message box to continue.
In a WordPad document, the blinking insertion mark cursor shows where the text you type into the document will appear. When the cursor comes to the end of a line, the text will wrap automatically down to the next line. Unlike a typewriter, you do not need to press the “Enter” key to create a new line of text within a paragraph. To begin a new paragraph in WordPad, press the “Enter” key on your keyboard.
To create uppercase letters in WordPad, hold down the “Shift” key while pressing the alphabetic keys. If you need to create symbols in WordPad, hold down the “Shift” key and then press the number key that shows the desired symbol at the top of the number key. To delete characters to the left of the insertion mark cursor, press the “Backspace” key. To delete characters to the right of the insertion mark cursor, press the “Delete” or “Del” key. Alternatively, to delete text in WordPad, click and drag over the text to delete to select it. Then press the “Delete” or “Del” key on your keyboard.
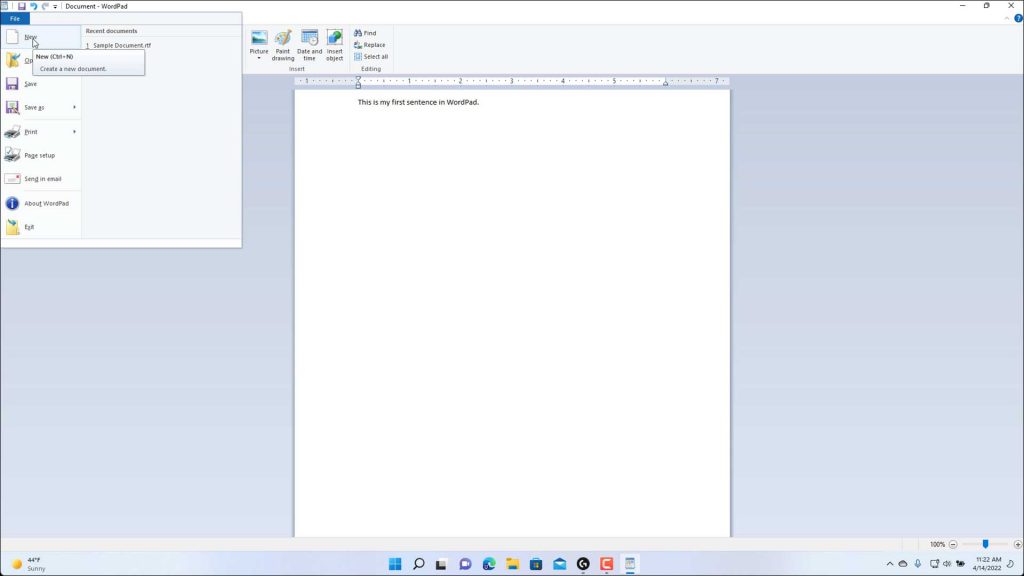
A picture showing how to create a new document in WordPad in Windows 11.
Instructions on How to Start WordPad in Windows 11:
- To start WordPad in Windows 11, click the Search button in the Windows taskbar to show the Search pane.
- Then click into the “Type here to search” field at the top of the Search pane and type “WordPad.”
- To open the WordPad app, then click the “WordPad” app in the search results listing.
- Alternatively, to pin the WordPad app to the “Pinned” section of the Start menu or pin it to the taskbar, right-click the app icon in the Search results and then click either the “Pin to Start” or “Pin to taskbar” buttons in the pop-up menu that appears to pin the app to either location for easier access in the future.
Instructions on How to Create a New Document in WordPad in Windows 11:
- After you start WordPad in Windows 11, it automatically creates a new, blank document for you.
- To then create a new document in WordPad in Windows 11, if desired, start typing on your keyboard into the document window.
- To later create a new document in WordPad in Windows 11 when working in WordPad, if needed, click the “File” tab in the Ribbon of the WordPad window.
- Then click the “New” command in the drop-down menu that appears.
- If you have unsaved changes in the current document, you are prompted whether to save those changes in a confirmation message box that appears.
- Click the desired response button in this message box to continue.
- In a WordPad document, the blinking insertion mark cursor shows where the text you type into the document will appear. When the cursor comes to the end of a line, it wraps automatically down to the next line.
- To begin a new paragraph in WordPad, press the “Enter” key on your keyboard.
- To create uppercase letters in WordPad, hold down the “Shift” key while pressing the alphabetic keys.
- If you want to create symbols in WordPad, hold down the “Shift” key and then press the number key that shows the desired symbol at the top of the number key.
- To delete characters to the left of the insertion mark cursor, press the “Backspace” key.
- To delete characters to the right of the insertion mark cursor, press the “Delete” or “Del” key.
- Alternatively, to delete text in WordPad, click and drag over the text to delete to select it.
- Then press the “Delete” or “Del” key on your keyboard.