How to Customize the Start Menu in Windows 11 – Instructions
How to Customize the Start Menu in Windows 11: Video
This video lesson, titled “How to Customize the Start Menu in Windows 11,” shows you how to customize the Start Menu in Windows 11. This video lesson is from our complete Windows 11 tutorial, titled “Mastering Windows Made Easy v.11.”
Overview of How to Customize the Start Menu in Windows 11:
You can customize the Start menu in Windows 11 by changing its settings to add or remove items from the sections that appear in it. However, Windows 11 lacks many of the app grouping and customization options that appeared in the Start Menu in Windows 10. To customize the Start menu in Windows 11, open the “Settings” app by clicking its icon in the Start menu. Alternatively, right-click the Start button and then click the “Settings” command in the pop-up menu that appears.
In the “Settings” app window, click the “Personalization” link at the left side of the window to show the “Personalization” settings to the right. Then click the “Start” link in the list of Personalization settings to show its settings at the right side of the window. To show recently-added apps in the Start menu of Windows 11, click the “Show recently added apps” toggle switch to set it to the “On” setting. Conversely, click it to switch it to the “Off” position to hide them.
To show the most-used apps in the Start menu, click the “Show most used apps” toggle switch to set it to the “On” setting. Conversely, click it to switch it to the “Off” position to hide them. To show recently-opened items in the Start menu, jump lists, and the File Explorer, click the “Show recently opened items in Start, Jump Lists, and File Explorer” toggle switch to set it to the “On” setting. Conversely, click it to switch it to the “Off” position to hide them.
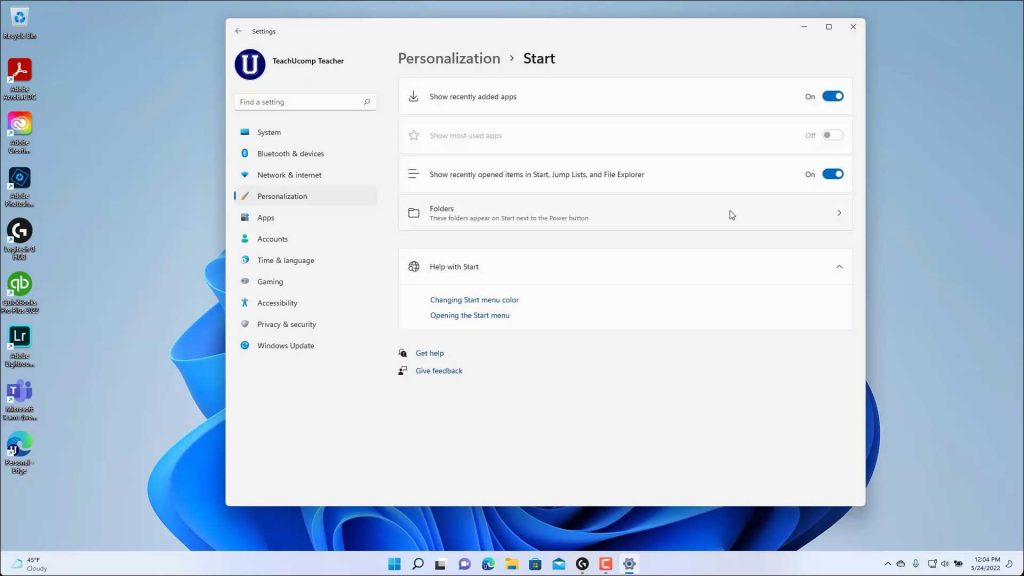
A picture showing the Start Personalization settings that let you customize the Start menu in Windows 11.
To add buttons for access to common user folders or the “Settings” app to the left of the “Power” button in the Start menu in Windows 11, click the “Folders” link at the right side of the “Start” category in the “Settings” window to show a listing of the windows and folders you can add to that section. To add a listed folder or app, click its toggle switch to set it to the “On” position. Conversely, to hide it, click its toggle switch to set it to the “Off” position.
If you choose to add buttons for the folders or apps, you can open them by clicking them in the Start menu, where they then appear to the left of the “Power” button. To close the “Settings” window after you finish customizing the Start menu, click the “X” button in its upper-right corner.
Instructions on How to Customize the Start Menu in Windows 11:
- To customize the Start menu in Windows 11, open the “Settings” app by clicking its icon in the Start menu.
- Alternatively, right-click the Start button and then click the “Settings” command in the pop-up menu that appears.
- Then click the “Personalization” link at the left side of the “Settings” app window to show the “Personalization” settings to the right.
- Then click the “Start” link in the list of Personalization settings to show its settings at the right side of the window.
- To show recently-added apps in the Start menu of Windows 11, click the “Show recently added apps” toggle switch to set it to the “On” setting.
- Conversely, to hide them, click it to switch it to the “Off” position.
- To show the most-used apps in the Start menu, click the “Show most used apps” toggle switch to set it to the “On” setting.
- Conversely, to hide them, click it to switch it to the “Off” position.
- To show recently-opened items in the Start menu, jump lists, and the File Explorer, click the “Show recently opened items in Start, Jump Lists, and File Explorer” toggle switch to set it to the “On” setting.
- Conversely, to hide them, click it to switch it to the “Off” position.
- To add buttons for access to common user folders or the “Settings” app to the left of the “Power” button in the Start menu in Windows 11, click the “Folders” link at the right side of the “Start” category in the “Settings” window to show a listing of the windows and folders you can add to that section.
- To add a listed folder or app, click its toggle switch to set it to the “On” position.
- Conversely, to hide it, click its toggle switch to set it to the “Off” position.
- If you choose to add buttons for the folders or apps, you can open them by clicking them in the Start menu, where they then appear to the left of the “Power” button.
- To close the “Settings” window after you finish customizing the Start menu, click the “X” button in its upper-right corner.