How to Install Fonts in Windows 11- Instructions
How to Install Fonts in Windows 11: Video
This video lesson, titled “Fonts Settings in Windows 11,” shows how to install fonts in Windows 11 and view, manage, and uninstall those fonts. This video lesson is from our complete Windows 11 tutorial, titled “Mastering Windows Made Easy v.11.”
Overview of How to Install Fonts in Windows 11:
To install fonts in Windows 11 and view the fonts and font settings, open the “Settings” app window. Then click the “Personalization” button at the left side of the screen to show the personalization settings for your computer to the right. Then click the “Fonts” button to the right to show the fonts and their settings at the right side of the “Settings” app window.
To install fonts in Windows 11, click and drag the font set to install from a File Explorer window onto the “Drag and drop to install” section of the “Fonts” settings window. If desired, to open the Microsoft Store app to get more fonts, click the “Get more fonts in Microsoft Store” link.
The installed fonts appear under the “Available fonts” section. To search for a font, type the font name into the “Type here to search” bar at the top of this section to filter the list below as you type. To inspect a font and view its font settings, click it to show its settings at the right side of the “Settings” window. If you want to preview the font using text you type, type the text into the “Type here to preview font” field at the top of the settings.
To change the font size shown in the font preview, click and drag the “Chang font size” slider. To view a font face’s metadata, select the font face from the “Select a font face to see its metadata” drop-down. If you want to uninstall the font, click the “Uninstall” button in its settings. To close the “Settings” app window, when finished, click the “X” button in its upper-right corner.
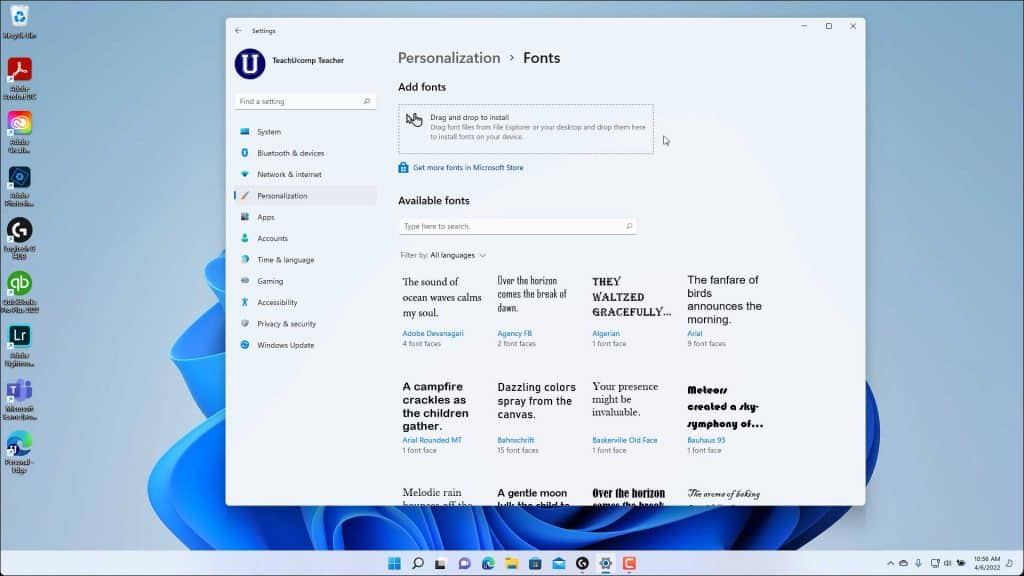
A picture that shows how to install fonts in Windows 11 within the “Fonts” settings in the “Settings” app.
Instructions on How to Install Fonts in Windows 11:
- To view the fonts and font settings in Windows 11, open the “Settings” app window and then click the “Personalization” button at the left side of the screen to show the personalization settings for your computer to the right.
- Then click the “Fonts” button to the right to show the fonts and their settings at the right side of the “Settings” app window.
- To install a font set in Windows 11, click and drag the font set to install from a File Explorer window onto the “Drag and drop to install” section of the “Fonts” settings window.
- If desired, to open the Microsoft Store app to get more fonts from it, click the “Get more fonts in Microsoft Store” link.
- The installed fonts appear under the “Available fonts” section.
- To search for a font, type the font name into the “Type here to search” bar at the top of this section to filter the list below as you type.
- To inspect a font and view its font settings, click it to show its settings at the right side of the “Settings” window.
- If you want to preview the font using text you type, type the text into the “Type here to preview font” field at the top of the settings.
- To change the font size shown in the font preview, click and drag the “Change font size” slider.
- To view a font face’s metadata, select the font face from the “Select a font face to see its metadata” drop-down.
- If you want to uninstall the font, click the “Uninstall” button in its settings.
- To close the “Settings” app window, when finished, click the “X” button in its upper-right corner.