TeachUcomp, Inc.

 MY CART
  • VIDEO COURSES
    • All-Access Subscriptions
    • Business Licensing
    • Course List
      • Accounting
      • Adobe
        • Acrobat
        • Lightroom Classic
        • Photoshop
        • Photoshop Elements
      • Crystal Reports
      • Employment Skills
        • Interview Skills
        • Resume Skills
      • For Lawyers
        • Excel for Lawyers
        • Outlook for Lawyers
        • QuickBooks for Lawyers
        • Word for Lawyers
      • HTML
      • JavaScript
      • Microsoft Office
        • Access
        • Excel
        • Microsoft Office Suite
        • OneNote
        • Outlook
        • Outlook on the Web
        • PowerPoint
        • Publisher
        • Word
      • Microsoft Project
      • Microsoft Teams
      • QuickBooks Online
      • QuickBooks Pro
      • Sage
        • Peachtree
        • Sage 50
      • SQL
      • Windows
    • Video Course Options
  • SUBSCRIPTIONS
  • MANUALS
    • Adobe
      • Acrobat
      • Lightroom Classic
      • Photoshop
      • Photoshop Elements
    • Crystal Reports
    • For Lawyers
      • Excel for Lawyers
      • Outlook for Lawyers
      • QuickBooks for Lawyers
      • Word for Lawyers
    • HTML
    • JavaScript
    • Microsoft Office
      • Access
      • Excel
      • OneNote
      • Outlook
      • Outlook on the Web
      • PowerPoint
      • Publisher
      • Word
    • Microsoft Project
    • Microsoft Teams
    • QuickBooks Online
    • QuickBooks Pro
    • Sage
      • Peachtree
      • Sage 50
    • SQL
    • Windows
  • REFERENCE CARDS
    • Adobe
      • Acrobat
      • Lightroom Classic
      • Photoshop
      • Photoshop Elements 2025
      • Photoshop Elements 2024
      • Photoshop Elements 2023
      • Photoshop Elements 2022
      • Photoshop Elements 2021
      • Photoshop Elements 2020
      • Photoshop Elements 2019
      • Photoshop Elements 2018
      • Photoshop Elements 15
    • Google
      • Google Classroom for Teachers
      • Google Docs
      • Google Drive
      • Google Forms
      • Google Sheets
      • Google Slides
    • Mac OS
      • Mac OS Keyboard Shortcuts
    • Microsoft Office
      • Excel Formulas and Functions
      • Excel Keyboard Shortcuts
      • Excel Tables PivotTables and Charts
      • Microsoft 365
        • Access for Microsoft 365
        • Excel for Microsoft 365
        • Microsoft Office 365
        • Outlook for Microsoft 365 Classic Edition
        • PowerPoint for Microsoft 365
        • Publisher for Microsoft 365
        • Word for Microsoft 365
      • Microsoft Office 2021
        • Access 2021
        • Excel 2021
        • Microsoft Office 2021
        • Outlook 2021
        • PowerPoint 2021
        • Publisher 2021
        • Word 2021
      • Microsoft Office 2019
        • Access 2019
        • Excel 2019
        • Microsoft Office 2019
        • Outlook 2019
        • PowerPoint 2019
        • Publisher 2019
        • Word 2019
      • Microsoft Office 2016
        • Access 2016
        • Excel 2016
        • Microsoft Office 2016
        • OneNote 2016
        • Outlook 2016
        • PowerPoint 2016
        • Publisher 2016
        • Word 2016
      • Microsoft Office 2013
        • Excel 2013
        • Microsoft Office 2013
        • OneNote 2013
        • Outlook 2013
        • PowerPoint 2013
        • Word 2013
      • Microsoft Office for iPad
        • Microsoft Office for iPad
      • Word Keyboard Shortcuts
    • Microsoft Teams
      • Microsoft Teams
    • QuickBooks Online
      • QuickBooks Online
    • QuickBooks Pro
      • QuickBooks Pro 2024
      • QuickBooks Pro 2023
      • QuickBooks Pro 2022
      • QuickBooks Pro 2021
      • QuickBooks Pro 2020
      • QuickBooks Pro 2019
      • QuickBooks Pro 2018
      • QuickBooks Pro 2017
      • QuickBooks Pro 2016
      • QuickBooks Pro 2015
      • QuickBooks Pro 2014
    • Sage
      • Sage 50 Accounting
    • SQL
      • SQL
    • Windows
      • Windows 11
      • Windows 11 and 10 Keyboard Shortcuts
      • Windows 10
  • STICKERS
    • Chrome OS
      • Chrome OS for Chromebooks
    • Mac OS
      • Mac OS
    • Microsoft Office
      • Word and Excel (Mac) 2022
      • Word and Excel (PC/Windows) 2021-2016 and 365
    • QuickBooks Desktop
      • QuickBooks Desktop (PC/Windows) 2024
      • QuickBooks Desktop (PC/Windows) 2023
      • QuickBooks Desktop (PC/Windows) 2022-2015
    • Windows
      • Windows 11 and 10
  • SUPPORT
    • Company
      • About Us
      • Blog
      • Contact Us
      • Our History
      • Our Philosophy
        • Customer Service
        • Mission
      • Policies
      • Testimonials
    • Contact Us
    • FAQ
    • Help
    • Lost Password
    • Register a Product
  • LOGIN
    • Manage My Account
    • Member Login
    • My Courses
Shop Now

How to Open a Document in Word

by Joseph Brownell / Thursday, March 28 2024 / Published in Latest, Microsoft, Office 2021, Office 365, Word 2021, Word for Office 365

How to Open a Document in Word: Video Lesson

            This video lesson, titled “Word for Microsoft 365 Tutorial: How to Open Documents in Word,” shows how to open a document in Word. This video lesson is from our complete Word tutorial, titled Mastering Word Made Easy™.

Overview:

How to Open a Document in Word at Startup:

            After initially opening Word for Microsoft 365, lists of recently opened, pinned, and documents others shared with you appear in the startup screen. To open a recent, pinned, or document shared with you in Word, click the desired tab, and then click the file’s name.

How to Pin and Unpin Documents in Word:

            A “pinned” file is one you added to the “Pinned” list for easy access, regardless of how long it has been since it was opened. To pin a recently opened file, hover over its name in the “Recent” list and then click the “pin” icon that appears to the right. Alternatively, right-click the file and then select the “Pin to list” command from the pop-up menu that appears.

            To unpin a pinned file, hover over its name in the “Pinned” list and then click the “pin” icon at its right end again. Alternatively, right-click the pinned file and then select the “Unpin from list” command from the pop-up menu that appears.

How to Open a Document Using the Open Category in the Backstage View:

            If the document to open doesn’t appear in any list, then you must know where it is saved. You can click the “More documents” command in the panel to show the “Open” category in the backstage view. Alternatively, to open another document if you are already working in Word, click the “File” tab in the Ribbon and then click the “Open” command at the left side of the backstage view to show the same “Open” category in the backstage view.

How to Choose Where to Look for the Document to Open:

            At that point, the locations within which to look for the file appear to the right of the command panel in the backstage view. It shows the “Recent” documents, by default. In the “Recent” category, you can click either the “Documents” or “Folders” link in the right panel to change whether it shows recent documents or recent folders. You can also pin or unpin either, using the same instructions we just covered. Clicking any document in the rightmost pane opens it. Clicking a folder in the rightmost pane shows the folder’s location or launches the “Open” dialog box, instead.

            Below the “Recent” category, you can instead click the “Shared with Me” location to show documents people have shared with you to the right. You can then click one of these shared documents to open it. Otherwise, click one of the OneDrive, SharePoint, or “This PC” save locations in this list to show its folders and documents in the list to the right. Note that if you select a “SharePoint” location, you may need to select a site from the list to the right to see its folders, first.

            If you need to add a new cloud save folder location, also note that you can click the “Add a Place” link in this list. Then click the button for the desired cloud save service to the right. Then enter your login credentials to add the selected cloud save locations for the associated login credentials to your list of saved online locations.

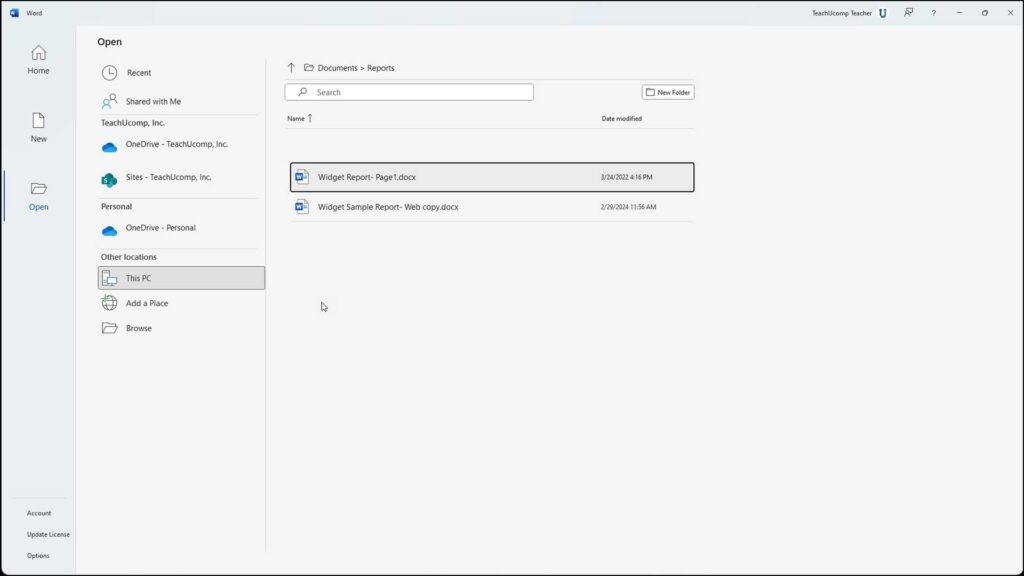
How to Navigate the Selected Location and Open a File:

            You can click the folders in the list of files and folders at the far-right side of the screen to then show their contents in the same area, if needed. To move up one level from within a folder, click the “Select to navigate up one level” button, which looks like an upward-pointing arrow, to the left of the current folder’s name at the top of the rightmost panel. You can click any Word file in the list of files and folders to open it.

A picture showing how to find and open a document in Word using the “Open” category in the backstage view of Word for Microsoft 365.

How to Use the “Open” Dialog Box to Open a File:

            To instead use an “Open” dialog box to find the file to open in Word, either click the “Browse” button in the list of locations or click the “currently selected” folder at the top of the rightmost list of files and folders to launch an “Open” dialog box. In the “Open” dialog box that appears, navigate to the folder location to view, if needed, using the folder navigation tools at the top or left sides of the dialog box. You should see an icon for the file and the file’s name appear in the files and folders in the “Open” dialog box.

            To open a file in the selected folder, click the file’s icon and then click the “Open” button in the lower-right corner of the “Open” dialog box. Alternatively, double-click the file’s icon in the “Open” dialog box.

How to Open Multiple Word Documents at Once Using the “Open” Dialog Box in Word:

            You can also use this dialog box to simultaneously open multiple documents in the same folder. To do this if the files are non-adjacent, or not next to each other in the folder, hold down the “Ctrl” key on your keyboard. Then click each file to select it.

            Alternatively, if the files are adjacent, or next to each other, instead click the first file, hold down “Shift” key, and then click the last file to select. Everything including and between the two files is then selected.

            After selecting the files, release any keyboard keys, and then click the “Open” button in the lower-right corner of the “Open” dialog box. Word opens all the highlighted, or selected, files.

Tagged under: add a place, backstage view, course, files, folder location, folder locations, help, how to open a document in word, how to open a file in word, how-to, learn, Microsoft Office 365, microsoft word, office 365, open, open dialog box, open documents in word, open files in word, overview, pin, pin documents in word, pin files, pin folders, recent, self study, teach, tutorial, unpin documents in word, video, video lesson, word, Word for Microsoft 365

About Joseph Brownell

Joseph Brownell is founder and Vice President of TeachUcomp, Inc. He is the author of dozens of titles across the TeachUcomp, Inc. product line.
Save $150! One Year Online Entire Library $49. Click here for more info.


Word Quick Reference Guide. Buy Now.
 

Categories

  • GET SOCIAL

© 2001-2025 Copyright TeachUcomp, Inc. All rights reserved.

TOP
SALE! $49 All-Access 2 Days 8 Hours 23 Minutes 27 Seconds      $199 $49 Entire Library!
See Deal