TeachUcomp, Inc.

 MY CART
  • VIDEO COURSES
    • All-Access Subscriptions
    • Business Licensing
    • Course List
      • Accounting
      • Adobe
        • Acrobat
        • Lightroom Classic
        • Photoshop
        • Photoshop Elements
      • Crystal Reports
      • Employment Skills
        • Interview Skills
        • Resume Skills
      • For Lawyers
        • Excel for Lawyers
        • Outlook for Lawyers
        • QuickBooks for Lawyers
        • Word for Lawyers
      • HTML
      • JavaScript
      • Microsoft Office
        • Access
        • Excel
        • Microsoft Office Suite
        • OneNote
        • Outlook
        • Outlook on the Web
        • PowerPoint
        • Publisher
        • Word
      • Microsoft Project
      • Microsoft Teams
      • QuickBooks Online
      • QuickBooks Pro
      • Sage
        • Peachtree
        • Sage 50
      • SQL
      • Windows
    • My Courses
    • Video Course Options
  • SUBSCRIPTIONS
  • MANUALS
    • Adobe
      • Acrobat
      • Lightroom Classic
      • Photoshop
      • Photoshop Elements
    • Crystal Reports
    • For Lawyers
      • Excel for Lawyers
      • Outlook for Lawyers
      • QuickBooks for Lawyers
      • Word for Lawyers
    • HTML
    • JavaScript
    • Microsoft Office
      • Access
      • Excel
      • OneNote
      • Outlook
      • Outlook on the Web
      • PowerPoint
      • Publisher
      • Word
    • Microsoft Project
    • Microsoft Teams
    • QuickBooks Online
    • QuickBooks Pro
    • Sage
      • Peachtree
      • Sage 50
    • SQL
    • Windows
  • BOOKS
    • QuickBooks Online
  • REFERENCE CARDS
    • Adobe
      • Acrobat
      • Lightroom Classic
      • Photoshop
      • Photoshop Elements 2026
      • Photoshop Elements 2025
      • Photoshop Elements 2024
      • Photoshop Elements 2023
      • Photoshop Elements 2022
      • Photoshop Elements 2021
      • Photoshop Elements 2020
      • Photoshop Elements 2019
      • Photoshop Elements 2018
      • Photoshop Elements 15
    • Chrome OS
      • Chrome OS Keyboard Shortcuts
    • FreshBooks
    • Google
      • Google Classroom for Teachers
      • Google Docs
      • Google Drive
      • Google Forms
      • Google Sheets
      • Google Slides
    • macOS
      • macOS Keyboard Shortcuts
      • macOS Tahoe
    • Microsoft Office
      • Excel Formulas and Functions
      • Excel Keyboard Shortcuts (macOS)
      • Excel Keyboard Shortcuts (PC/Windows)
      • Excel Tables PivotTables and Charts
      • Microsoft 365
        • Access for Microsoft 365
        • Excel for Microsoft 365
        • Microsoft Office 365
        • Outlook for Microsoft 365 Classic Edition
        • Outlook for Microsoft 365 (New Outlook)
        • PowerPoint for Microsoft 365
        • Publisher for Microsoft 365
        • Word for Microsoft 365
      • Microsoft Office 2021
        • Access 2021
        • Excel 2021
        • Microsoft Office 2021
        • OneNote for Windows 10
        • Outlook 2021
        • PowerPoint 2021
        • Publisher 2021
        • Word 2021
      • Microsoft Office 2019
        • Access 2019
        • Excel 2019
        • Microsoft Office 2019
        • Outlook 2019
        • PowerPoint 2019
        • Publisher 2019
        • Word 2019
      • Microsoft Office 2016
        • Access 2016
        • Excel 2016
        • Microsoft Office 2016
        • OneNote 2016
        • Outlook 2016
        • PowerPoint 2016
        • Publisher 2016
        • Word 2016
      • Microsoft Office 2013
        • Excel 2013
        • Microsoft Office 2013
        • OneNote 2013
        • Outlook 2013
        • PowerPoint 2013
        • Word 2013
      • Microsoft Office for iPad
        • Microsoft Office for iPad
      • Word Keyboard Shortcuts (PC/Windows)
    • Microsoft Teams
    • QuickBooks Online
    • QuickBooks Pro
      • QuickBooks Pro 2024
      • QuickBooks Pro 2023
      • QuickBooks Pro 2022
      • QuickBooks Pro 2021
      • QuickBooks Pro 2020
      • QuickBooks Pro 2019
      • QuickBooks Pro 2018
      • QuickBooks Pro 2017
      • QuickBooks Pro 2016
      • QuickBooks Pro 2015
      • QuickBooks Pro 2014
    • Sage 50 Accounting
    • SQL
    • Windows
      • Windows 11
      • Windows 11 and 10 Keyboard Shortcuts
      • Windows 10
  • STICKERS
    • Chrome OS
    • macOS
    • Microsoft Office
      • Word and Excel (Mac)
      • Word and Excel (PC/Windows)
    • QuickBooks Desktop
      • QuickBooks Desktop (PC/Windows) 2024
      • QuickBooks Desktop (PC/Windows) 2023
      • QuickBooks Desktop (PC/Windows) 2022-2015
    • QuickBooks Online
    • Windows
  • SUPPORT
    • Company
      • About Us
      • Blog
      • Contact Us
      • Our History
      • Our Philosophy
        • Customer Service
        • Mission
      • Policies
      • Testimonials
    • FAQ
      • Contact Us
    • Help
    • Lost Password
    • Register a Product
  • LOGIN
    • Manage My Account
    • Member Login
    • My Courses
Shop Now

How to Save a Word Document

by Joseph Brownell / Wednesday, April 03 2024 / Published in Latest, Microsoft, Office 2021, Office 365, Word 2021, Word for Office 365

How to Save a Document in Word: Video Lesson

            This video lesson, titled “Word for Microsoft 365 Tutorial: How to Save Documents in Word,” shows how to save a Word document. This video lesson is from our complete Word tutorial, titled Mastering Word Made Easy™.

Overview:

How to Save a Word Document for the First Time

            When you save a Word document for the first time, you must use the “Save As” command to choose where to save the file and what to name it. To do this, click the “File” tab in the Ribbon. Then click the “Save As” command in the command panel at the left side of the backstage view.

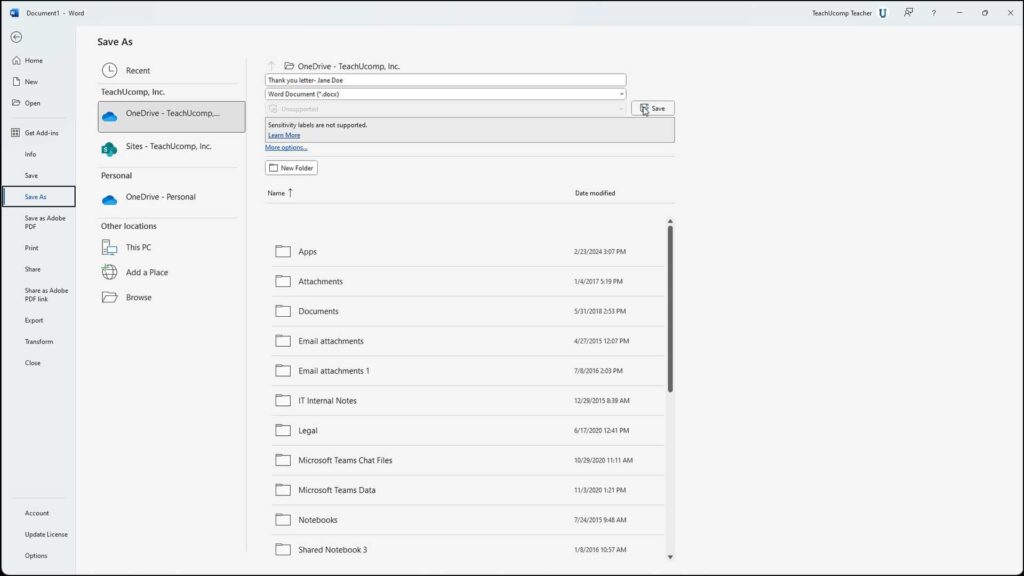
How to Select a Save Location

            To the right of the command panel, a list of available places to save the file appears. The choices vary, depending on the Office subscriptions and services available to your Microsoft account. If you have previously saved files, the “Recent” option shows a list of folder locations into which you recently saved files. Other common options include your “OneDrive” folder for Microsoft user accounts, SharePoint folders for business Microsoft 365 subscribers, and “This PC.” Select the location to which to save the file.

            If you save to a OneDrive or SharePoint folder, you save the file online, which lets you access it from any online computer when signed-in with the same user account. To add additional cloud save locations to which to save files, click the “Add a Place” link in this list. Then click a link to the right for the cloud service location to add.

            Then enter your login credentials for the selected cloud service to add any available cloud locations to your list of save locations. Alternatively, if you select the “This PC” choice in the list of save locations, you can save the file to the local computer or local computer network on which you are working.

            If signed into Microsoft Office using a Microsoft user account, you can click either the “OneDrive” or “SharePoint” choice to save the file online to either the selected OneDrive or SharePoint folder. If you select “SharePoint,” then select a SharePoint site that appears in the list to the right. Alternatively, you can click the “This PC” option to save the file to your local computer or local network.

How to Navigate the Folders in the Selected Save Location

            At that point, for all choices, a list of folders in the selected location appears in the list to the far-right. You can click a folder in this list to select it as the save location. To go back up one level from within the folder you selected, click the “Select to navigate up one level” button, which looks like an upward-pointing arrow, to the left of the current folder’s name at the top of the rightmost panel.

How to Enter the File Name

            Then type a file name into the “Enter file name here” field at the top of the rightmost list. File names should be short and descriptive. Word does not let you use the following symbols in a file name: the colon [:], the forward slash [/], the back slash [\], the greater than sign [>], the less than sign [<], the asterisk [*], double quotes [“”], or the pipe symbol [|]. Give the file a memorable name and note into which folder you saved it. People often remember what they named a file but forget into which folder they saved it.

How to Set Save Options and Finish Saving the File

            If needed, you can then use the drop-down below that field to select the specific file type to save. If available for your Microsoft 365 account, you can also select a file sensitivity choice from the “File Sensitivity” drop-down. After entering the file name and noting its save location, click the “Save” button to the right of the file type drop-down to finish saving the file.

A picture showing how to save a Word document to a selected folder location in Word for Microsoft 365.

How to Use the Save As Dialog Box to Save a Word Document

            Alternatively, if you prefer to use a Windows “Save As” dialog box to name saved files and select their save locations, either click the “More options…” link under the file type and sensitivity drop-downs at the top of the rightmost folder list or click the “Browse” link in the list of possible save locations.

            Doing either action then opens the “Save As” dialog box. In this dialog box, select the folder into which to save the file by using the folder navigation options at either the top or left side of the dialog box. Then enter a file name into the “File name” field. If needed, use the “Save as type” drop-down to select the file type to save. Then click the “Save” button within the “Save As” dialog box to finish saving the file.

How to Save Changes to an Existing Word Document

            After initially saving a file, its name then appears in the Title Bar. To save changes you make to locally saved files after that, simply click the “Save” button in the Quick Access toolbar or click the “File” tab in the Ribbon and then click the “Save” command. You will not have to re-enter the file name or select a save location. Word automatically saves the changes to the existing file.

            If the file is saved online to OneDrive or SharePoint and “AutoSave” is enabled, then there will not be a “Save” command available in the backstage view, although you can still use the “Save” button in the Quick Access toolbar, if desired.

Tagged under: add a place, backstage view, course, files, folder location, folder locations, help, how to save a document in word, how to save a file in word, how-to, learn, Microsoft Office 365, microsoft word, office 365, overview, recent, save, save as dialog box, save documents in word, save files in word, self study, teach, tutorial, video, video lesson, word, Word for Microsoft 365

About Joseph Brownell

Joseph Brownell is founder and Vice President of TeachUcomp, Inc. He is the author of dozens of titles across the TeachUcomp, Inc. product line.
Sale! One Year Online Entire Library $29. Click here to see the deals.


Word Quick Reference Guide. Buy Now.
 

Categories

  • GET SOCIAL

© 2001-2026 Copyright TeachUcomp, Inc. All rights reserved.

TOP
SALE! $29 All-Access 6 Days 16 Hours 15 Minutes 58 Seconds      $199 $29 Entire Library!
See Deal