How to Use Panels in Photoshop: Video
This video lesson, titled “Learn How to Use Panels in Adobe Photoshop: A Training Tutorial,” shows you how to use panels in Photoshop. This video lesson is from our complete Photoshop tutorial, titled “Mastering Photoshop Made Easy.”
Overview of How to Use Panels in Photoshop
How to Hide and Show Panels in Photoshop:
Panels in Photoshop contains the tools and settings you use to edit your document content. There are many panels in Photoshop. Photoshop saves its panels into an interface layout called a workspace, along with other interface tools.
To turn the display of a panel on or off in Photoshop, click the “Window” command in the Menu Bar. Then click to select the name of the panel to show or hide in the third and fourth sections of the drop-down menu that appears. Panel names in these sections of the drop-down menu that show a checkmark to the left of their names currently appear onscreen. Panel names without a checkmark do not appear onscreen. Clicking a name in the drop-down menu turns its display on or off.
Panels in Photoshop can appear docked within the panel docks at the right, left, or bottom sides of the Photoshop application window or appear floating over the document windows. Panels in Photoshop can also appear together with other panels in panel tab groups in those same locations.
How to Move Panels in Photoshop:
To move a panel in Photoshop, click and drag its panel tab name and release it over the desired location in the application interface. If you want to add a panel to a panel dock or into a panel tab group in Photoshop, click and drag the panel by its tab name until the desired drop zone location glows blue and then release it.
To move and dock panel tab groups in Photoshop, click and drag the panel tab group by either the bar that appears above the group if the panel tab group is collapsed or click and drag it by the blank area to the side of the panel tab names in the panel tab group if the group is expanded.
How to Collapse and Expand Panels in Photoshop:
To collapse the content of a single panel in Photoshop, double-click its tab name. If you want to show it again, click its tab name. To collapse and expand all the panels in a dock in Photoshop, click the “Collapse to Icons” or “Expand Panels” buttons, which look like double right-pointing or left-pointing arrows in the upper-right or upper-left corners of the panel docks at the right or left sides of the screen, respectively.
When a panel dock is collapsed, you can click the icons for its panels to show the panels to the side of the icons. You can then click the icons again to hide them. The “Collapse to Icons” or “Expand Panels” buttons also appear for panels in floating panel tab groups, which also let you expand and collapse those, if needed. To switch between panels in an expanded panel tab group in Photoshop, click the tab name of the panel to view.
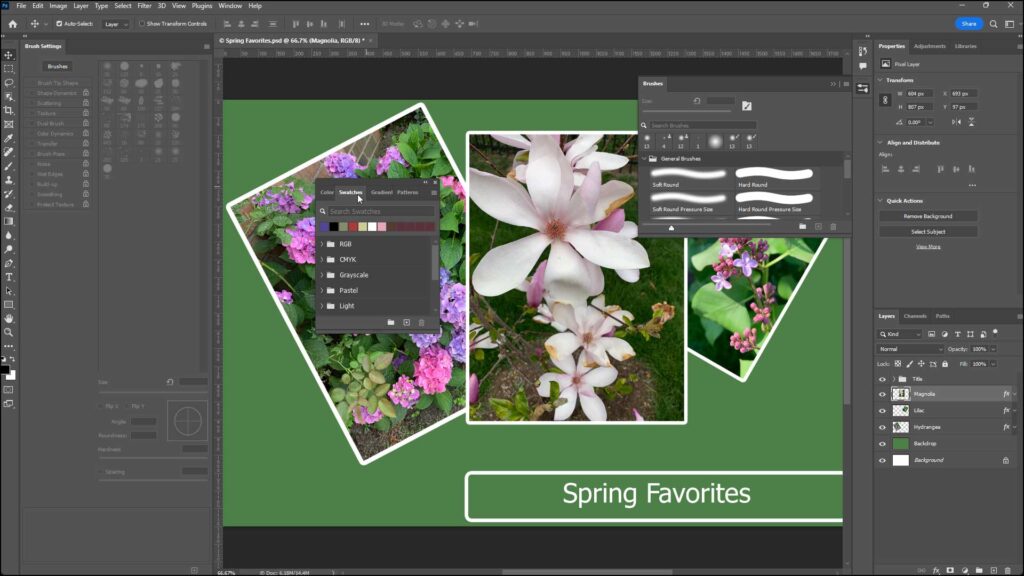
A picture showing how to use panels in Photoshop by switching between panels in an expanded panel tab group.
How to Close Panels in Photoshop:
To close a floating panel or panel tab group when it appears over the document windows in Photoshop, click the small “x” button in the upper-right corner of its panel or panel tab group. If you want to close a docked panel in Photoshop, right-click its panel tab name and then select the “Close” command from the pop-up menu that appears. To close a panel tab group in Photoshop, right-click any panel tab name in the panel tab group and then select the “Close Tab Group” command from the pop-up menu that appears.
How to Show Panel Options in Photoshop:
To view the panel options for a panel in Photoshop, click the panel tab name to make it active and then click the panel menu icon, which looks like three small stacked horizontal lines, in the upper-right corner of the panel to show a menu of panel options from which you can select. However, unlike most other panels, note that the Tools panel does not contain a panel options button.
How to Set Values within Panels in Photoshop:
To use the panels in Photoshop, click the buttons, drop-downs, and fields available in the panel to set values and make choices, as needed. Each panel contains different options. If desired, to perform math on existing numeric values within fields in panels that contain numeric values, click before or after the current value and then type your mathematical operators and values, as needed. Then press the “Enter” key on your keyboard. Alternatively, you can also simply select the current values to replace them with a new value you type or with a new mathematical expression you type, as desired.
How to Lock Panel Positions in Photoshop:
To prevent accidentally moving panels in a workspace, you can lock your workspace. To toggle the lock workspace feature on or off in Photoshop, select “Window| Workspace| Lock workspace” from the Menu Bar. When enabled, this prevents you from moving panels in Photoshop.
You can tell if this command is enabled or disabled by clicking the “Window” command in the Menu Bar, rolling over the “Workspace” command, and then looking at the “Lock workspace” command in the side menu that appears. If the command is checked, it is enabled. If unchecked, it is disabled.
How to Use Panels in Photoshop – Instructions
- Panels in Photoshop contains the tools and settings you use to edit your document content.
- Photoshop saves its panels into a layout called a workspace.
Instructions on How to Turn Panels On or Off in Photoshop:
- To turn the display of a panel on or off in Photoshop, click the “Window” command in the Menu Bar.
- Then click to select the name of the panel to show or hide in the third and fourth sections of the drop-down menu that appears.
- Panel names in these sections of the drop-down menu that show a checkmark to the left of their names currently appear onscreen. Panel names without a checkmark do not appear onscreen. Selecting the name of a panel in the drop-down menu toggles its onscreen display on or off.
- Panels in Photoshop can appear docked within the panel docks at the right, left, or bottom sides of the Photoshop application window or appear floating over the document windows.
- Panels in Photoshop can also appear together with other panels in panel tab groups in those same locations.
Instructions on How to Move a Panel in Photoshop:
- To move a panel in Photoshop, click and drag its panel tab name and release it over the desired location in the application interface.
- To add a panel to a panel dock or into a panel tab group in Photoshop, click and drag the panel by its tab name until the desired drop zone location glows blue and then release it.
- To move and dock panel tab groups in Photoshop, click and drag the panel tab group by either the bar that appears above a collapsed panel tab group or click and drag it by the blank area to the side of the panel tab names in an expanded panel tab group.
How to Collapse and Expand a Panel in Photoshop:
- To collapse the content of a single panel in Photoshop, double-click its tab name.
- To show it again, click its tab name.
- To collapse and expand all the panels in a dock in Photoshop, click the “Collapse to Icons” or “Expand Panels” buttons, which look like double right-pointing or left-pointing arrows in the upper-right or upper-left corners of the panel docks at the right or left sides of the screen, respectively.
- To show the panels when a panel dock is collapsed, click the icons for its panels to show the panels to the side of the icons. You can then click the icons again to hide them.
- The “Collapse to Icons” or “Expand Panels” buttons also appear for panels in floating panel tab groups, which also let you expand and collapse those, if needed.
- To switch between panels in an expanded panel tab group in Photoshop, click the tab name of the panel to view.
Instructions on How to Close a Panel in Photoshop:
- To close a floating panel or panel tab group when it appears over the document windows in Photoshop, click the small “x” button in the upper-right corner of its panel or panel tab group.
- To close a docked panel in Photoshop, right-click its panel tab name and then select the “Close” command from the pop-up menu that appears.
- To close a panel tab group in Photoshop, right-click any panel tab name in the panel tab group and then select the “Close Tab Group” command from the pop-up menu that appears.
Instructions on How to Show the Panel Options in Photoshop:
- To view the panel options for a panel in Photoshop, click the panel tab name to make it active and then click the panel menu icon, which looks like three small stacked horizontal lines, in the upper-right corner of the panel to show a menu of panel options from which you can select.
- However, unlike most other panels, note that the Tools panel does not contain a panel options button.
How to Set Values in a Panel in Photoshop:
- To set values in a panel in Photoshop, click the buttons, drop-downs, and fields available in the panel to set values and make choices, as needed. Each panel contains different options.
- If desired, to perform math on existing numeric values within fields in panels that contain numeric values, click before or after the current value and then type your mathematical operators and values, as needed.
- Then press the “Enter” key on your keyboard.
- Alternatively, you can also simply select the current values to replace them with a new value you type or with a new mathematical expression you type, as desired.
Instructions on How to Prevent Panels from Moving in Photoshop:
- To toggle the lock workspace feature on or off in Photoshop to prevent moving panels in the workspace, select “Window| Workspace| Lock workspace” from the Menu Bar.
- To see if this command is enabled or disabled, click the “Window” command in the Menu Bar, roll over the “Workspace” command, and then look at the “Lock workspace” command in the side menu that appears.
- If the command is checked, it is enabled. If unchecked, it is disabled.