How to Use Snap Layouts in Windows 11 – Instructions
How to Use Snap Layouts in Windows 11: Video
This video lesson, titled “How to Use Snap Layouts in Windows 11,” shows how to use snap layouts in Windows 11. This video lesson is from our complete Windows 11 tutorial, titled “Mastering Windows Made Easy v.11.”
What are Snap Layouts in Windows 11?
While the ability to snap an app window to the side of the screen was introduced in earlier versions of Windows, snapping apps is vastly improved in Windows 11. This feature allows you to lock up to four app windows open at a time so that you can have multiple windows open without having to toggle between them or having them overlap one another.
Windows 11 introduces new snap layouts for desktops that let you determine the type of app window arrangement you want to apply. After selecting a snap layout, the Snap Assist feature of Windows 11 then helps you to place open app windows into the other panes in the snap layout you selected.
How to Use Snap Layouts in Windows 11
To use snap layouts in Windows 11, hover your mouse pointer over the “Maximize” button in an app window. Alternatively, press the keyboard shortcut of “Windows” + “Z” on your keyboard. The snap layouts then appear in a menu below the active app window’s “Maximize” button. Each snap layout shows where you can place an app pane within the desktop. Click into the app pane into which to place the current app window within the desired snap layout. The app window then appears in that section of the desktop.
Snap Assist in Windows 11 then helps you by showing any other open app windows in the other available app pane or app panes. You can then click an app window that appears in the other app pane(s) to show it within the selected app pane. You repeat this process until you have assigned apps to all the app panes in the snap layout.
After adding your open apps into the app panes in the snap layout, you can adjust the size of the panes. To adjust the size of the app panes in a snap layout in Windows 11, hover your mouse pointer between the app panes to adjust until a thick gray bar appears and your mouse pointer turns into a double-pointed arrow. Then click and drag in either direction show by the arrows to change the size of the adjacent app panes. Then release the mouse button when the panes are the size you want.
After adding apps to a snap layout, you can hover over any app in the app layout in the Windows taskbar to show both the app and its snap layout app group. You can click either one to select it and bring it to the foreground if you have multiple windows opened.
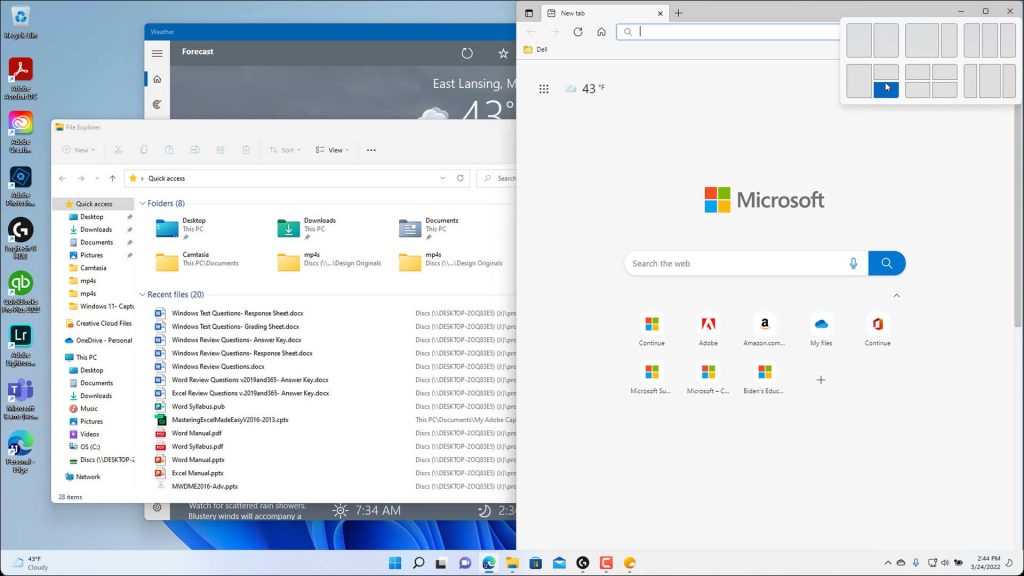
A picture showing the different snap layouts in Windows 11 for an app window.
Instructions on How to Use Snap Layouts in Windows 11:
- To use snap layouts in Windows 11, hover your mouse pointer over the “Maximize” button in an app window or press the keyboard shortcut of “Windows” + “Z” on your keyboard.
- The snap layouts then appear in a menu below the active app window’s “Maximize” button.
- Each snap layout shows where you can place an app pane within the desktop.
- Click into the app pane into which to place the current app window within the desired snap layout.
- The app window then appears in that section of the desktop.
- Snap Assist in Windows 11 then helps you by showing any other open app windows in the other available app pane or app panes.
- You can then click an app window that appears in the other app pane(s) to show it within the selected app pane.
- You repeat this process until you have assigned apps to all the app panes in the snap layout.
- To adjust the size of the app panes in a snap layout in Windows 11, hover your mouse pointer between the app panes to adjust until a thick gray bar appears and your mouse pointer turns into a double-pointed arrow.
- Then click and drag in either direction show by the arrows to change the size of the adjacent app panes.
- Then release the mouse button when the panes are the size you want.
- After adding apps to a snap layout, you can hover over any app included in the app layout in the Windows taskbar to show both the app and its snap layout app group.
- You can click either one to select it and bring it to the foreground if you have multiple windows opened, if desired.