How to Use the Document Windows in Photoshop: Video
This video lesson, titled “Learn How to Use the Document Windows in Adobe Photoshop: A Training Tutorial,” shows you how to use the document windows in Photoshop. This video lesson is from our complete Photoshop tutorial, titled “Mastering Photoshop Made Easy.”
Overview of How to Use the Document Windows in Photoshop
How to Arrange Tabbed Document Windows in Photoshop:
You use the document windows in Photoshop to work on the content of Photoshop documents. You can arrange the document windows in Photoshop workspaces to suit your workflow needs. By default, document windows in Photoshop appear as named tabs that appear docked in the center of the application window.
To switch between the opened tabbed document windows in Photoshop, click the name of the document window tab to view. To rearrange the order of the tabs from left to right, click and drag the tabbed document’s tab to a new location in the tabbed document windows and then release it.
How to Float Windows in Photoshop:
Alternatively, you can also arrange document windows in Photoshop much like you arrange panels. You can group them together into tab groups that appear floating over the application window. To show a tabbed document window in Photoshop in its own floating document window, click and drag the tabbed document’s tab away from the tabbed document title area and then release it into the desired location in the application window.
Alternatively, select the window to activate it. Then select “Window| Arrange| Float in Window” from the Menu Bar to float the window in its own window. Alternatively, to float all opened document windows in their own cascading floating document windows, select “Window| Arrange| Float All in Windows” from the Menu Bar.
How to Group Floating Windows in Photoshop:
If you float the document windows in their own panes in Photoshop, you can also group them together into tabbed groups, much like panels. To group floating document windows in Photoshop, click and drag the tabbed title of a document window and drop it onto the document window with which to group it. Then release it when the destination document window’s drop zone location glows blue. The documents then appear as tabs within a single floating window, and you can click each one’s tab name to switch to it.
How to Change Floating Windows to Tabbed Windows in Photoshop:
Conversely, to dock a floating tabbed document window in Photoshop, click and drag the tabbed document’s tab towards the tabbed document title area until the center workspace area drop zone location glows blue and then release it. Alternatively, to dock all document windows back into separate named tabs in Photoshop, select “Window| Arrange| Consolidate All to Tabs” from the Menu Bar.
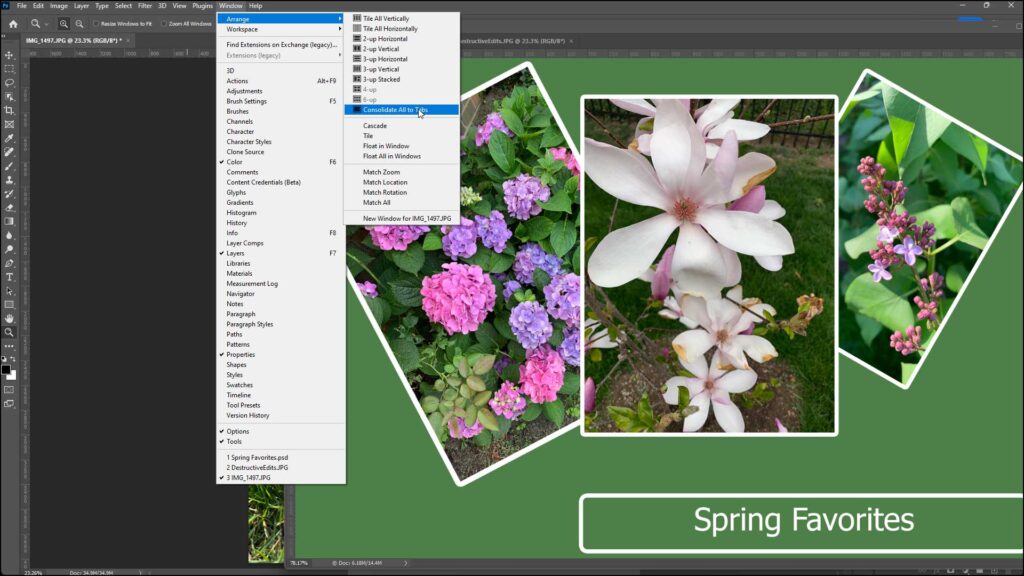
A picture showing how to use the document windows in Photoshop to change all floating document windows back into tabbed document windows.
How to Tile and Cascade Windows in Photoshop:
You can also tile and cascade opened document windows in Photoshop. To tile opened document windows in Photoshop, select “Window| Arrange| Tile” from the Menu Bar. Alternatively, to cascade opened document windows in Photoshop, select “Window| Arrange| Cascade” from the Menu Bar. To select from different preset tiling layouts for opened windows in Photoshop, select “Window| Arrange” from the Menu Bar. Then select the desired preset tiled layout to apply from the choices shown at the top of the side menu of choices that then appears.
How to Match the Zoom, Location, and Rotation of Tiled Windows in Photoshop:
If using a tiled document window layout for multiple documents in Photoshop, you can change the zoom, document content location, and/or rotation of the content in the active tiled document window and then apply the same to the other tiled document windows. To do this, first adjust the zoom, location shown onscreen, and/or rotation of the currently active tiled document window. Then select “Window| Arrange” from the Menu Bar.
To then match only the magnification in the other tiles to the current tile, select the “Match Zoom” command. Alternatively, to only match the currently displayed document location in the other tiles, select the “Match Location” command. Alternatively, to only match the currently displayed document rotation in the other tiles, select the “Match Rotation” command. To instead match the currently displayed document’s magnification, document location, and rotation in the other tiles, select the “Match All” command.
How to Open a Copy of the Current Document Window in a New Document Window in Photoshop:
To open a copy of the current document window as a new window in Photoshop, which only duplicates the content shown in the window and does not create a duplicate of the file itself, select “Window| Arrange| New Window for (file name),” where (file name) is the name of the currently selected document window’s file. Because the new document window is a different view of the same file, changes to the file’s content you make in one window appear in both. However, the two separate document windows allow you to have separate window magnifications and can focus on two different locations in the same file, as needed.
How to Use the Document Windows in Photoshop – Instructions
Instructions on How to Switch Between and Arrange Tabbed Document Windows in Photoshop:
- By default, document windows in Photoshop appear as named tabs that appear docked in the center of the application window.
- To switch between the opened tabbed document windows, click the name of the document window tab to view.
- To rearrange the order of the tabs from left to right, click and drag the tabbed document’s tab to a new location in the tabbed document windows and then release it.
Instructions on How to Float Windows in Photoshop:
- To show a tabbed document window in Photoshop in its own floating document window, click and drag the tabbed document’s tab away from the tabbed document title area and then release it into the desired location in the application window.
- Alternatively, select the window to activate it and then select “Window| Arrange| Float in Window” from the Menu Bar to float the window in its own window.
- Alternatively, to float all opened document windows in their own cascading floating document windows, select “Window| Arrange| Float All in Windows” from the Menu Bar.
How to Group Floating Windows in Photoshop:
- To group floating document windows in Photoshop, click and drag the tabbed title of a document window and drop it onto the document window with which to group it.
- Then release it when the destination document window’s drop zone location glows blue.
- The documents then appear as tabs within a single floating window, and you can click each one’s tab name to switch to it.
Instructions on How to Change Floating Windows to Tabbed Windows in Photoshop:
- To dock a floating tabbed document window in Photoshop, click and drag the tabbed document’s tab towards the tabbed document title area until the center workspace area drop zone location glows blue and then release it.
- Alternatively, to dock all document windows back into separate named tabs in Photoshop, select “Window| Arrange| Consolidate All to Tabs” from the Menu Bar.
Instructions on How to Tile and Cascade Windows in Photoshop:
- To tile opened document windows in Photoshop, select “Window| Arrange| Tile” from the Menu Bar.
- Alternatively, to cascade opened document windows in Photoshop, select “Window| Arrange| Cascade” from the Menu Bar.
- To select from different preset tiling layouts for opened windows in Photoshop, select “Window| Arrange” from the Menu Bar.
- Then select the desired preset tiled layout to apply from the choices shown at the top of the side menu of choices that then appears.
How to Match the Zoom, Location, and Rotation of Tiled Windows in Photoshop:
- To change the zoom, document content location, and/or rotation of the content in the active tiled document window and then apply the same to the other tiled document windows if using a tiled document window layout for multiple documents in Photoshop, first adjust the zoom, location shown onscreen, and/or rotation of the currently active tiled document window.
- Then select “Window| Arrange” from the Menu Bar.
- To then match only the magnification in the other tiles to the current tile, select the “Match Zoom” command.
- Alternatively, to only match the currently displayed document location in the other tiles, select the “Match Location” command.
- Alternatively, to only match the currently displayed document rotation in the other tiles, select the “Match Rotation” command.
- To instead match the currently displayed document’s magnification, document location, and rotation in the other tiles, select the “Match All” command.
Instructions on How to Open a Copy of the Current Document Window in a New Document Window in Photoshop:
- To open a copy of the current document window as a new window in Photoshop, which only duplicates the content shown in the window and does not create a duplicate of the file itself, select “Window| Arrange| New Window for (file name),” where (file name) is the name of the currently selected document window’s file.