How to Use the Gradient Editor in Photoshop: Video
This video lesson, titled “Learn How to Use the Gradient Editor in Adobe Photoshop: A Training Tutorial,” shows how to use the Gradient Editor in Photoshop to create custom gradients. This video lesson is from our complete Photoshop tutorial, titled “Mastering Photoshop Made Easy.”
Overview of How to Use the Gradient Editor in Photoshop:
How to Open the Gradient Editor in Photoshop
The “Gradient Editor” dialog box in Photoshop lets you create a new gradient, edit a preset gradient, or delete a gradient. You use the “Gradient Editor” dialog box to create and edit gradient presets in Photoshop, which you select from the Gradient Picker panel when using the Gradient Tool in Photoshop.
To open the “Gradient Editor” dialog box in Photoshop, click the Gradients panel’s tab name or select “Window| Gradients” from the Menu Bar to show the Gradients panel. Then click the panel options button in the upper-right corner of the Gradients panel and select the “New Gradient Preset…” command to open the “Gradient Editor” dialog box. Alternatively, if using the “Classic gradient” version of the Gradient Tool in Photoshop 24.5 or later or if using it in any older version of Photoshop, you can click the gradient pattern in the Options bar Control panel to open the “Gradient Editor” dialog box.
How to Create a Custom Gradient Preset Using the Gradient Editor in Photoshop:
To create a new gradient pattern from one of the preset gradient patterns in Photoshop, click to select the preset gradient to edit in the “Presets” list at the top of the “Gradient Editor” dialog box. The selected gradient pattern then appears at the bottom of the “Gradient Editor” dialog box for editing.
How to Change the Gradient Type of a Custom Gradient:
To select the type of gradient pattern, select either “Solid” or “Noise” from the “Type” drop-down. Noise gradients apply random, linear color and opacity changes to a gradient using a range of color and opacity you select, and solid gradients apply linear opacity and color transitions at locations you select within a gradient pattern. The “Solid” gradient type is the most commonly used. Depending on your choice in the “Type” drop-down, the following settings in the “Gradient Editor” dialog box change. So, let’s examine the settings if you select the “Solid” gradient pattern type, first.
How to Change the Smoothness of a Custom Gradient and Add and Delete Color Stops for a Solid Custom Gradient:
To set the smoothness of the solid gradient, select a percentage from the “Smoothness” drop-down or type a percentage into its field. Then create the gradient pattern by adding, editing, and/or deleting the color stops, opacity stops, and color and opacity midpoints on the sample gradient strip that appears.
Color stops in a solid gradient determine which colors appear in the gradient. To add a new color stop, click into the desired location at which to add the color stop in the bottom row of color stops in the gradient pattern strip. To delete a color stop, click it to select it. Then click the “Delete” button to the far-right of the “Color” label within the “Stops” section below the gradient strip.
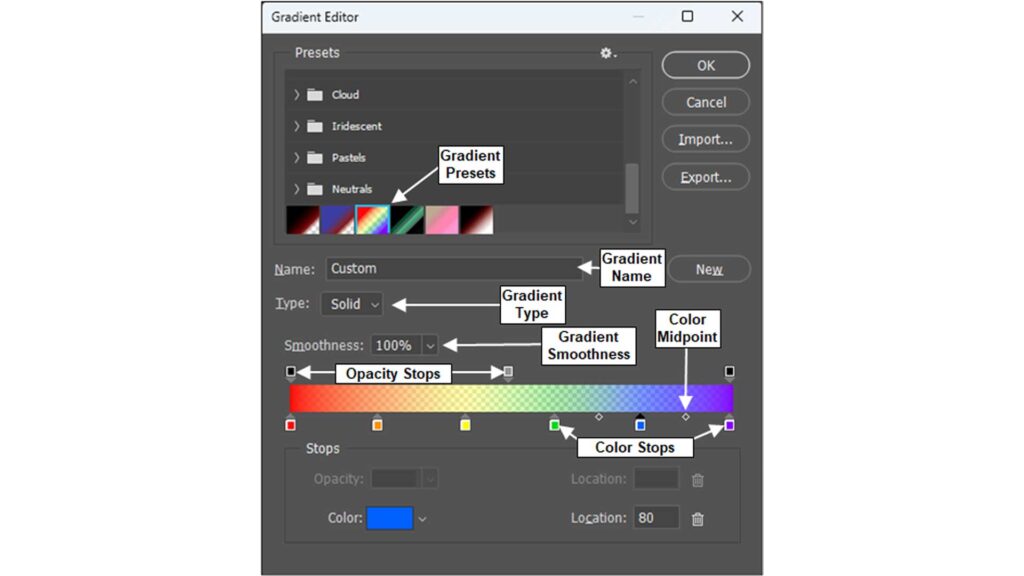
A picture showing the locations of the gradient presets, gradient name, gradient type, gradient smoothness, opacity stops, color stops, and color midpoints that appear when editing a solid gradient type in the Gradient Editor in Photoshop.
How to Change the Color and Location of Color Stops for a Custom Solid Gradient:
To edit the color for a color stop in the gradient pattern, double-click the color stop to change to open the “Color Picker (Stop Color)” dialog box. Then select the color to apply and click the “OK” button in the dialog box to finish.
To change the position of a color stop, click and drag it left or right to slide it to a new location and then release it. Alternatively, click the color stop to select it and then enter its location into the “Location” field to the right of the “Color” label in the “Stops” section. A value of 0 places it at the far-left end of the gradient and a value of 100 places it at the far-right end.
How to Change the Location of Color Midpoints for a Custom Solid Gradient:
To change the location of a color midpoint, which sets the midpoint where the color changes between two adjacent color stops, click to select one of the adjacent color stops for the color midpoint to adjust. The color midpoint icon or icons then appear as small gray diamonds between the two adjacent color stops. To move the color midpoint, click and drag the desired color midpoint diamond icon to a new location between the two color stops.
Alternatively, click to select the color midpoint whose position you want to change and then type a new relative value from 5 to 95 into the “Location” field in the “Stops” section. A value of 5 places it as close as possible to the left color stop and a value of 95 places it as close as possible to the right color stop. A value of 50 places it into the center of the two color stops.
How to Add and Delete Opacity Stops for a Custom Solid Gradient:
If you want to add transparency to a gradient, you must edit the opacity stops at the top of the gradient pattern. To add a new opacity stop to a gradient, click into the desired location at which to add the opacity stop within the top row of opacity stops in the gradient pattern strip. To delete an opacity stop from a gradient, click it to select it. Then click the “Delete” button to the far-right of the “Opacity” label within the “Stops” section below the gradient strip.
How to Change the Opacity and Location of Opacity Stops for a Custom Solid Gradient:
To change the opacity level of an opacity stop, click it to select it. Then click the “Opacity” drop-down in the “Stops” section and change the opacity percentage by using the slider. Alternatively, type the desired percentage into the “Opacity” field.
To change the position of an opacity stop in the gradient, click and drag it left or right to slide it to a new location and then release it. Alternatively, click the opacity stop to select it and then enter its location into the “Location” field to the right of the “Opacity” label in the “Stops” section. A value of 0 puts it at the far-left end of the gradient and a value of 100 puts it at the far-right end.
How to Change the Location of Opacity Midpoints for a Custom Solid Gradient:
To change the location of an opacity midpoint, which sets the midpoint where the opacity changes between two adjacent opacity stops, click to select one of the adjacent opacity stops for the opacity midpoint to adjust. The opacity midpoint icon or icons then appear as small gray diamonds between the two adjacent opacity stops. To move the opacity midpoint, click and drag the desired opacity midpoint diamond icon to a new location between the two opacity stops and then release it.
Alternatively, click to select the opacity midpoint whose position you want to change and then type a new relative value from 5 to 95 into the “Location” field in the “Stops” section. A value of 5 places it as close as possible to the left opacity stop and a value of 95 places it as close as possible to the right opacity stop. A value of 50 places it into the center of the two opacity stops.
How to Change the Roughness and Colors of Custom Noise Gradients in Photoshop:
Next, you will learn how to edit a noise gradient in Photoshop if you instead select the “Noise” gradient type from the “Type” drop-down. To set the roughness of the noise gradient, click the “Roughness” drop-down and select the desired percentage by using the slider that then appears. Alternatively, type the desired percentage into the “Roughness” field. The higher the percentage, the more color striations appear in the noise gradient.
To select the color model to use for the range of colors to show in the noise gradient, select a color model choice from the “Color Model” drop-down. You can choose either the “RGB,” “HSB,” or “LAB” color models. Then click and drag the arrows on the three color sliders for your selected color model that then appear below the “Color Model” drop-down to set the upper and lower limits of each, which determines the possible colors that can appear within the noise gradient.
To prevent the colors in the noise gradient from over-saturating, check the “Restrict Colors” checkbox in the “Options” section. To add transparency to the noise gradient, check the “Add Transparency” checkbox in the “Options” section. Optionally, to randomize the noise gradient again based on your current settings, which changes the pattern in the noise gradient, click the “Randomize” button.
How to Save a Custom Gradient as a Preset or Apply a Custom Gradient Using the Gradient Editor in Photoshop:
To save the current gradient as a new custom gradient preset you can select from the Gradient Picker panel after customizing its settings, type a name for the gradient into the “Name” field in the “Gradient Editor” dialog box. Then click the “New” button to the right to save the gradient into the “Presets” list at the top of the “Gradient Editor” dialog box as a new preset gradient.
Alternatively, if you opened the “Gradient Editor” dialog box by clicking the gradient pattern in the Options bar Control panel to create a custom gradient if using the “Classic gradient” version of the Gradient Tool in Photoshop 24.5 or later, or if using any older version of Photoshop, and now want to apply the pattern to the classic Gradient Tool, click the “OK” button in the “Gradient Editor” dialog box. Note that you cannot apply this gradient pattern to the new gradient adjustment layers created by the new Gradient Tool this way and must instead save the pattern as a gradient preset, which you can then select from the Gradients panel after selecting the gradient adjustment layer in the Layers panel, instead.
How to Export Preset Gradients Using the Gradient Editor in Photoshop:
If needed, to export your current gradient presets as a file you can import into another copy of Photoshop, click the “Export…” button in the “Gradient Presets” dialog box to open the “Save As” dialog box. Then decide where to save the file, type a name for it into the “File name” field, and then click the “Save” button.
To import the saved gradient preset file later, open the “Gradient Editor” dialog box within the copy of Photoshop and click the “Import…” button to open the “Load” dialog box. Use the dialog box to find the saved gradient presets export file, click it to select it, and then click the “Load” button. Then confirm your import in the confirmation warnings that appear, as needed, to finish importing the gradient presets file.
Instructions on How to Use the Gradient Editor in Photoshop:
- To open the “Gradient Editor” dialog box in Photoshop, click the Gradients panel’s tab name or select “Window| Gradients” from the Menu Bar to show the Gradients panel.
- Then click the panel options button in the upper-right corner of the Gradients panel and select the “New Gradient Preset…” command to open the “Gradient Editor” dialog box.
- Alternatively, if using the “Classic gradient” version of the Gradient Tool in Photoshop 24.5 or later or if using it in any older version of Photoshop, you can click the gradient pattern in the Options bar Control panel to open the “Gradient Editor” dialog box.
- To create a new gradient pattern from one of the preset gradient patterns in Photoshop, click to select the preset gradient to edit in the “Presets” list at the top of the “Gradient Editor” dialog box.
- The selected gradient pattern then appears at the bottom of the “Gradient Editor” dialog box for editing.
- To select the type of gradient pattern, select either “Solid” or “Noise” from the “Type” drop-down.
- Noise gradients apply random, linear color and opacity changes to a gradient using a range of color and opacity you select, and solid gradients apply linear opacity and color transitions at locations you select within a gradient pattern. The “Solid” gradient type is the most used.
- Depending on your choice in the “Type” drop-down, the following settings in the “Gradient Editor” dialog box change. So, let’s examine the settings if you select the “Solid” gradient pattern type, first.
- To set the smoothness of the solid gradient, select a percentage from the “Smoothness” drop-down or type a percentage into its field.
- Then create the gradient pattern by adding, editing, and/or deleting the color stops, opacity stops, and color and opacity midpoints on the sample gradient strip that appears.
- Color stops in a solid gradient determine which colors appear in the gradient.
- To add a new color stop, click into the desired location at which to add the color stop in the bottom row of color stops in the gradient pattern strip.
- To delete a color stop, click it to select it.
- Then click the “Delete” button to the far-right of the “Color” label within the “Stops” section below the gradient strip.
- To edit the color for a color stop in the gradient pattern, double-click the color stop to change to open the “Color Picker (Stop Color)” dialog box.
- Then select the color to apply and click the “OK” button in the dialog box to finish.
- To change the position of a color stop, click and drag it left or right to slide it to a new location and then release it.
- Alternatively, click the color stop to select it and then enter its location into the “Location” field to the right of the “Color” label in the “Stops” section. A value of 0 places it at the far-left end of the gradient and a value of 100 places it at the far-right end.
- To change the location of a color midpoint, which sets the midpoint where the color changes between two adjacent color stops, click to select one of the adjacent color stops for the color midpoint to adjust.
- The color midpoint icon or icons then appear as small gray diamonds between the two adjacent color stops.
- To move the color midpoint, click and drag the desired color midpoint diamond icon to a new location between the two color stops.
- Alternatively, click to select the color midpoint whose position you want to change and then type a new relative value from 5 to 95 into the “Location” field in the “Stops” section. A value of 5 places it as close as possible to the left color stop and a value of 95 places it as close as possible to the right color stop. A value of 50 places it into the center of the two color stops.
- To add transparency to a gradient, you must edit the opacity stops at the top of the gradient pattern.
- To add a new opacity stop to a gradient, click into the desired location at which to add the opacity stop within the top row of opacity stops in the gradient pattern strip.
- Optionally, to delete an opacity stop from a gradient, click it to select it.
- Then click the “Delete” button to the far-right of the “Opacity” label within the “Stops” section below the gradient strip.
- To change the opacity level of an opacity stop, click it to select it.
- Then click the “Opacity” drop-down in the “Stops” section and change the opacity percentage by using the slider.
- Alternatively, type the desired percentage into the “Opacity” field.
- To change the position of an opacity stop in the gradient, click and drag it left or right to slide it to a new location and then release it.
- Alternatively, click the opacity stop to select it and then enter its location into the “Location” field to the right of the “Opacity” label in the “Stops” section. A value of 0 puts it at the far-left end of the gradient and a value of 100 puts it at the far-right end.
- To change the location of an opacity midpoint, which sets the midpoint where the opacity changes between two adjacent opacity stops, click to select one of the adjacent opacity stops for the opacity midpoint to adjust.
- The opacity midpoint icon or icons then appear as small gray diamonds between the two adjacent opacity stops.
- To move the opacity midpoint, click and drag the desired opacity midpoint diamond icon to a new location between the two opacity stops and then release it.
- Alternatively, click to select the opacity midpoint whose position you want to change and then type a new relative value from 5 to 95 into the “Location” field in the “Stops” section. A value of 5 places it as close as possible to the left opacity stop and a value of 95 places it as close as possible to the right opacity stop. A value of 50 places it into the center of the two opacity stops.
- Next, you will learn how to edit a noise gradient in Photoshop if you instead select the “Noise” gradient type from the “Type” drop-down.
- To set the roughness of the noise gradient, click the “Roughness” drop-down and select the desired percentage by using the slider that then appears.
- Alternatively, type the desired percentage into the “Roughness” field. The higher the percentage, the more color striations appear in the noise gradient.
- To select the color model to use for the range of colors to show in the noise gradient, select a color model choice from the “Color Model” drop-down. You can choose either the “RGB,” “HSB,” or “LAB” color models.
- Then click and drag the arrows on the three color sliders for your selected color model that then appear below the “Color Model” drop-down to set the upper and lower limits of each, which determines the possible colors that can appear within the noise gradient.
- To prevent the colors in the noise gradient from over-saturating, check the “Restrict Colors” checkbox in the “Options” section.
- To add transparency to the noise gradient, check the “Add Transparency” checkbox in the “Options” section.
- Optionally, to randomize the noise gradient again based on your current settings, which changes the pattern in the noise gradient, click the “Randomize” button.
- To save the current gradient as a new custom gradient preset you can select from the Gradient Picker panel after customizing its settings, type a name for the gradient into the “Name” field in the “Gradient Editor” dialog box.
- Then click the “New” button to the right to save the gradient into the “Presets” list at the top of the “Gradient Editor” dialog box as a new preset gradient.
- Alternatively, if you opened the “Gradient Editor” dialog box by clicking the gradient pattern in the Options bar Control panel to create a custom gradient if using the “Classic gradient” version of the Gradient Tool in Photoshop 24.5 or later, or if using any older version of Photoshop, and now want to apply the pattern to the classic Gradient Tool, click the “OK” button in the “Gradient Editor” dialog box.
- Note that you cannot apply this gradient pattern to the new gradient adjustment layers created by the new Gradient Tool this way and must instead save the pattern as a gradient preset, which you can then select from the Gradients panel after selecting the gradient adjustment layer in the Layers panel, instead.
- If needed, to export your current gradient presets as a file you can import into another copy of Photoshop, click the “Export…” button in the “Gradient Presets” dialog box to open the “Save As” dialog box.
- Then decide where to save the file, type a name for it into the “File name” field, and then click the “Save” button.
- To import the saved gradient preset file later, open the “Gradient Editor” dialog box within the copy of Photoshop and click the “Import…” button to open the “Load” dialog box.
- Use the dialog box to find the saved gradient presets export file, click it to select it, and then click the “Load” button.
- Then confirm your import in the confirmation warnings that appear, as needed, to finish importing the gradient presets file.