Video Lesson on How to Use the Healing Tool in Camera Raw in Photoshop:
This video lesson, titled “Learn How to Use Healing in Camera Raw in Adobe Photoshop: A Training Tutorial,” shows how to use the Healing tool in Camera Raw in Photoshop and also how to rotate these photos. This video lesson is from our complete Photoshop tutorial, titled “Mastering Photoshop Made Easy.”
Overview:
To access the Healing tool in the “Camera Raw” dialog box in Photoshop, click the “Healing” button in the toolbar at the right side of the “Camera Raw” dialog box. Doing this then activates the Healing tool and shows the “Healing” tab in the panel to the left of the toolbar. This panel provides the tool’s settings.
To use the Healing tool in the “Camera Raw” dialog box of Photoshop, first click a button at the top of the “Healing” tab to select the desired retouching mode. To remove content from the photo and apply content-aware healing, click the “Content-Aware Remove” button. This is the default healing choice. Alternatively, to match the texture, lighting, and shading of a sampled area to a selected area, click the “Heal” button. Alternatively, to only copy pixels in a sample area to a selected area, click the “Clone” button.
To set the size of the Healing tool, use the “Size” slider or enter a size into its adjacent field. If needed, to set the amount of feathering for the Healing tool if you select the “Heal” or “Clone” button, use the “Feather” slider or enter a value into its field. To set the opacity of the Healing tool, use the “Opacity” slider or enter a value into its field. To turn spot visualization on or off, check the “Visualize spots” checkbox. If needed, to adjust the spot visualization threshold, use the adjacent “Adjust spot visualization threshold” slider.
After finding the spot to remove, heal, or clone, then either click or click and drag to select the area to retouch, as needed. When you release your mouse, the healing is automatically applied. To manually select a custom source if using the “Content-Aware Remove” setting, hold down the “Ctrl” key on your keyboard and then click or click and drag in the photo. To automatically update the selected spot with different content for all settings, click the “Refresh” button in the “Healing” tab or press the forward slash (/) keyboard key. Repeat this entire process, as needed, to heal the desired spots in the camera raw photo.
How to Edit Healing Tool Selections:
If needed, to toggle the visibility of the pins and selection mask overlays on or off to show the sampled and selected areas for the healing spots in the photo, check or uncheck the “Show Overlay” checkbox. To select a selection mask overlay if these are visible, click it to select it. To then move either the sample area or selected area, click and drag it using your mouse and then release it.
If needed, to extend a selected area for the Healing tool, hold down the “Shift” key on your keyboard and then click with the cursor to add areas selected by the cursor to the existing, selected selection area. Alternatively, to delete a selected selection mask, click it to select it and then press the “Delete” key on your keyboard. Alternatively, hold down the “Alt” key (“Option” on Macs) on your keyboard and then click the selection to delete. To instead delete multiple selection mask spots at once in a photo, hold down the “Alt” key (“Option” on Macs) on your keyboard. Then click and drag a selection marquee over all the masks to delete. Then release your mouse to finish deleting them.
To temporarily hide the visibility of your healing spots in a photo, click and hold down on the “Toggle Visibility” button, which looks like an “eye” icon, in the upper-right corner of the “Healing” panel. Then release the button to restore their visibility. To remove all Healing tool corrections in the camera raw image, click the “Reset Healing” button towards the upper-right corner of the “Healing” panel.
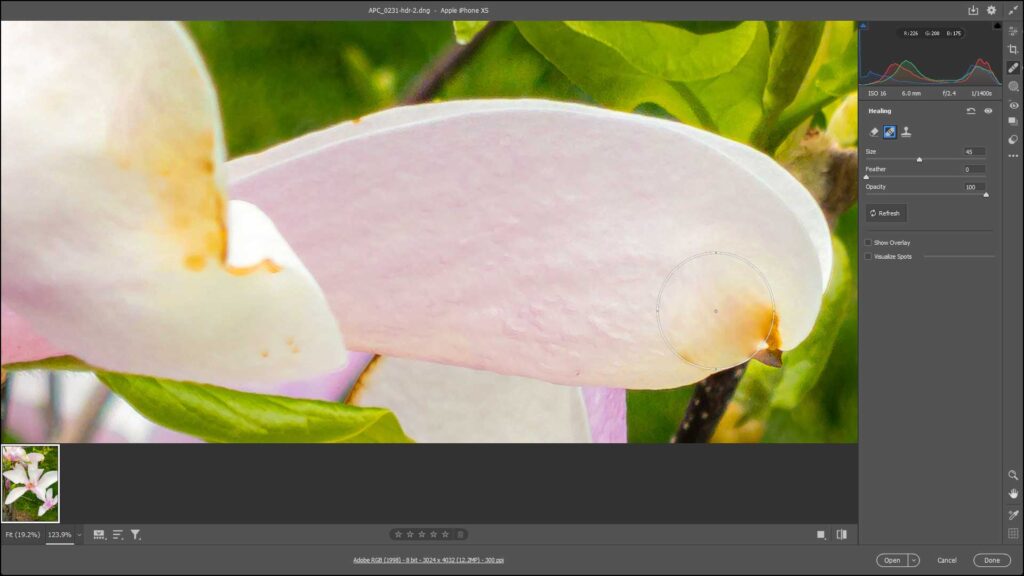
A picture showing how to use the Healing Tool in Camera Raw in Photoshop.
Instructions on How to Use the Healing Tool in Camera Raw in Photoshop:
- To access the healing tool in the “Camera Raw” dialog box in Photoshop, click the “Healing” button in the toolbar at the right side of the “Camera Raw” dialog box.
- To use the Healing tool in the “Camera Raw” dialog box of Photoshop, first click a button at the top of the “Healing” tab to select the desired retouching mode.
- If needed, to set the size of the Healing tool, use the “Size” slider or enter a size into its adjacent field.
- Optionally, to set the amount of feathering for the Healing tool if you select the “Heal” or “Clone” button, use the “Feather” slider or enter a value into its adjacent field.
- To set the opacity of the Healing tool, use the “Opacity” slider or enter a value into its adjacent field.
- To turn spot visualization on or off, check the “Visualize spots” checkbox.
- If needed, to adjust the spot visualization threshold, use the adjacent “Adjust spot visualization threshold” slider.
- After finding the spot to remove, heal, or clone, then either click or click and drag to select the area to retouch, as needed.
- Then release your mouse pointer to automatically apply the healing.
- To manually select a custom source if using the “Content-Aware Remove” setting, hold down the “Ctrl” key on your keyboard and then click or click and drag in the photo.
- To automatically update the selected spot with different content for all settings, click the “Refresh” button in the “Healing” tab or press the forward slash (/) keyboard key.
- Repeat this entire process, as needed, to heal the desired spots in the camera raw photo.
How to Edit Healing Tool Selections in Camera Raw in Photoshop:
- If needed, to toggle the visibility of the pins and selection mask overlays on or off to show the sampled and selected areas for the healing spots in the photo, check or uncheck the “Show Overlay” checkbox.
- To select a selection mask overlay if these are visible, click it to select it.
- To then move either the sample area or selected area for a selected healing spot, click and drag within it using your mouse and then release it.
- If needed, to extend a selected area for the Healing tool, hold down the “Shift” key on your keyboard and then click with the cursor to add areas selected by the cursor to the existing, selected selection area.
- Alternatively, to delete a selected selection mask, click it to select it and then press the “Delete” key on your keyboard.
- Alternatively, hold down the “Alt” key (“Option” on Macs) on your keyboard and then click the selection to delete.
- To instead delete multiple selection mask spots at once in a photo, hold down the “Alt” key (“Option” on Macs) on your keyboard.
- Then click and drag a selection marquee over all the masks to delete.
- Then release your mouse to finish deleting them.
- To temporarily hide the visibility of your healing spots in a photo, click and hold down on the “Toggle Visibility” button, which looks like an “eye” icon, in the upper-right corner of the “Healing” panel.
- Then release the button to restore their visibility.
- To remove all Healing tool corrections in the camera raw image, click the “Reset Healing” button towards the upper-right corner of the “Healing” panel.