How to Use Workspaces in Photoshop: Video
This video lesson, titled “Learn How to Create and Change Workspaces in Adobe Photoshop: A Training Tutorial,” shows you how to use workspaces in Photoshop. This video lesson is from our complete Photoshop tutorial, titled “Mastering Photoshop Made Easy.”
Overview of Workspaces in Photoshop
Workspaces in Photoshop are saved layouts and arrangements of panels and other tools in the Photoshop interface. A workspace in Photoshop can also optionally include saved layouts of keyboard shortcuts, menus, and the Tools panel, if you customize any of those. You can modify the workspaces in Photoshop, as desired. Photoshop provides you with a default workspace called the “Essentials” workspace. Photoshop also provides you with several other default workspace layouts you can apply and customize, as needed.
How to Select a Workspace in Photoshop:
To select a different workspace in Photoshop, select “Window| Workspace” from the Menu Bar. Then select the name of the workspace to use from the first or second section of workspace layout choice names that then appears in the side menu. Alternatively, click the “Choose a Workspace” drop-down button at the right end of the Options bar. Then select the name of the workspace to use in the drop-down menu that appears.
How to Reset Changes to the Selected Workspace in Photoshop:
To reset changes made to your selected workspace in Photoshop, if needed, select “Window| Workspace” from the Menu Bar. Then select the “Reset (workspace name)” command in the side menu that appears, where (workspace name) is the name of the current workspace. Alternatively, click the “Choose a Workspace” drop-down button at the right end of the Options bar. Then select the “Reset (workspace name)” command in the drop-down menu that appears, where (workspace name) is the name of the current workspace.
How to Save a Custom Workspace in Photoshop:
To save a new workspace in Photoshop, first customize the panels for the current workspace to show and arrange them in the layout you want to save as a new workspace. Then select “Window| Workspace| New Workspace…” from the Menu Bar to open the “New Workspace” dialog box. Alternatively, click the “Choose a Workspace” drop-down button at the right end of the Options bar. Then select the “New Workspace…” command in the drop-down menu that appears to open the same “New Workspace” dialog box.
Next, type the name for the new workspace into the “Name” field in the “New Workspace” dialog box. The current panel layout is automatically saved with the workspace. If desired, to also save the current keyboard shortcuts, menus, and/or Tools panel toolbar, check the “Keyboard Shortcuts,” “Menus,” and/or “Toolbar” checkboxes. Then click the “Save” button to save the workspace. Alternatively, click the “Cancel” button to cancel saving it.
You can select and reset custom workspaces the same way you select and reset the preset workspaces in Photoshop. Custom workspaces appear in a new section at the top of the side menu that appears when you select “Window| Workspace” from the Menu Bar. They also appear at the top of the drop-down menu that appears when you click the “Choose a Workspace” drop-down button at the right end of the Options bar.
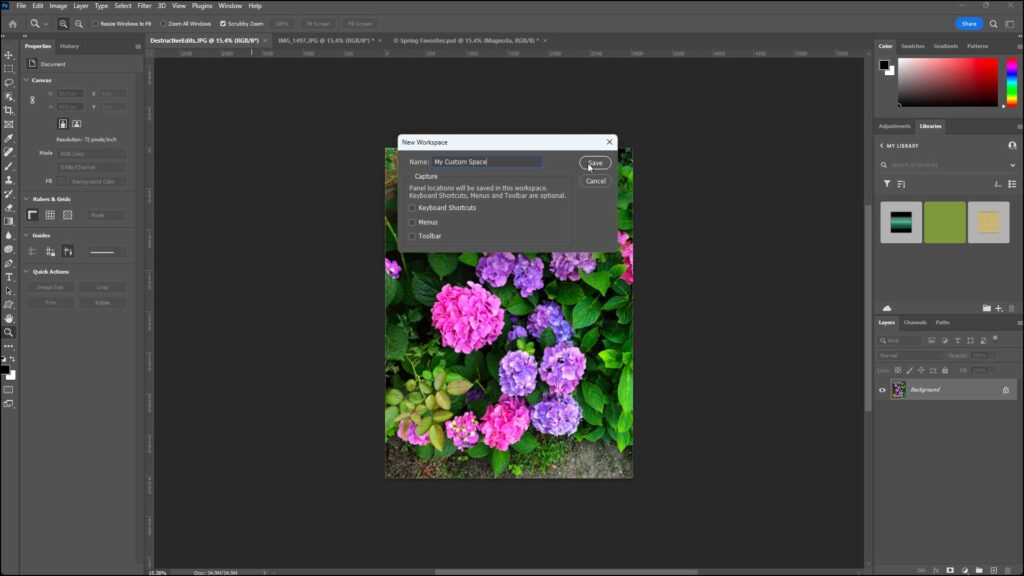
A picture showing how to use workspaces in Photoshop by saving a custom workspace.
How to Delete a Workspace in Photoshop:
To delete a workspace in Photoshop, first select a different workspace than the one you want to delete to apply it. Then select “Window| Workspace| Delete Workspace…” from the Menu Bar to open the “Delete Workspace” dialog box. Alternatively, click the “Choose a Workspace” drop-down button at the right end of the Options bar. Then select the “Delete Workspace…” command in the drop-down menu that appears to opens the same “Delete Workspace” dialog box.
Then use the “Workspace” drop-down in the “Delete Workspace” dialog box to select the name of the workspace to delete. Note that you cannot delete the currently active workspace. After selecting the name of the workspace to delete, click the “Delete” button. Then click the “Yes” button in the confirmation dialog box to confirm its deletion.
Instructions on How to Use Workspaces in Photoshop
How to Select a Workspace in Photoshop:
- To select a different workspace in Photoshop, select “Window| Workspace” from the Menu Bar.
- Then select the name of the workspace to use from the first or second section of workspace layout choice names that then appears in the side menu.
- Alternatively, click the “Choose a Workspace” drop-down button at the right end of the Options bar.
- Then select the name of the workspace to use in the drop-down menu that appears.
How to Reset Changes to the Current Workspace in Photoshop:
- To reset changes made to your selected workspace in Photoshop, if needed, select “Window| Workspace” from the Menu Bar.
- Then select the “Reset (workspace name)” command in the side menu that appears, where (workspace name) is the name of the current workspace.
- Alternatively, click the “Choose a Workspace” drop-down button at the right end of the Options bar.
- Then select the “Reset (workspace name)” command in the drop-down menu that appears, where (workspace name) is the name of the current workspace.
Instructions on How to Create a Custom Workspace in Photoshop:
- To save a new workspace in Photoshop, first customize the panels for the current workspace to show and arrange them in the layout you want to save as a new workspace.
- Then select “Window| Workspace| New Workspace…” from the Menu Bar to open the “New Workspace” dialog box.
- Alternatively, click the “Choose a Workspace” drop-down button at the right end of the Options bar.
- Then select the “New Workspace…” command in the drop-down menu that appears to open the same “New Workspace” dialog box.
- Next, type the name for the new workspace into the “Name” field in the “New Workspace” dialog box.
- The current panel layout is automatically saved with the workspace.
- If desired, to also save the current keyboard shortcuts, menus, and/or Tools panel toolbar, check the “Keyboard Shortcuts,” “Menus,” and/or “Toolbar” checkboxes.
- Then click the “Save” button to save the workspace.
- Alternatively, click the “Cancel” button to cancel saving it.
- You can select and reset custom workspaces the same way you select and reset the preset workspaces in Photoshop.
- Custom workspaces appear in a new section at the top of the side menu that appears when you select “Window| Workspace” from the Menu Bar. They also appear at the top of the drop-down menu that appears when you click the “Choose a Workspace” drop-down button at the right end of the Options bar.
How to Delete a Workspace in Photoshop:
- To delete a workspace in Photoshop, first select a different workspace than the one you want to delete to apply it.
- Then select “Window| Workspace| Delete Workspace…” from the Menu Bar to open the “Delete Workspace” dialog box.
- Alternatively, click the “Choose a Workspace” drop-down button at the right end of the Options bar.
- Then select the “Delete Workspace…” command in the drop-down menu that appears to opens the same “Delete Workspace” dialog box.
- Then use the “Workspace” drop-down in the “Delete Workspace” dialog box to select the name of the workspace to delete. Note that you cannot delete the currently active workspace.
- After selecting the name of the workspace to delete, click the “Delete” button.
- Then click the “Yes” button in the confirmation dialog box to confirm its deletion.