Import Data to QuickBooks Online- Instructions
Import Data to QuickBooks Online: Video
This video lesson, titled “Importing Company Data,” shows you how to import data to QuickBooks Online. This video lesson on importing data in QuickBooks Online is from our complete QuickBooks Online tutorial titled “Mastering QuickBooks Online Made Easy.”
Overview of How to Import Data to QuickBooks Online
You can import data to QuickBooks Online. The type of data you want to import determines the saved file type the import process accepts. Most imports accept saved Excel worksheets or CSV files, and some also provide other options. Alternatively, you can also import all the available data from a QuickBooks Desktop file.
How to Import Data to QuickBooks Online
To import either “Bank Data,” “Customers,” “Vendors,” “Chart of Accounts,” “Products and Services,” or “Invoices” into QuickBooks Online, click the “Settings” button. Then click the “Import Data” link to open an “Import Data” page. Then click the link button at the top of the page for the type of data to import.
After clicking the link button for the type of data to import, a new page appears and provides you with specific import instructions and shows its related import process. For most imports, except the “Bank Data” import, you upload a file, then map the fields in the uploaded file to the fields within your QuickBooks Online company file, and then import the file. For these types of imports, you start by clicking the “Browse…” button in the page to open a “File Upload” dialog box. Then use this dialog box to find and select the file to upload. After selecting it, click the “Open” button to upload the file. Back in the import screen, then click the “Next” button to continue.
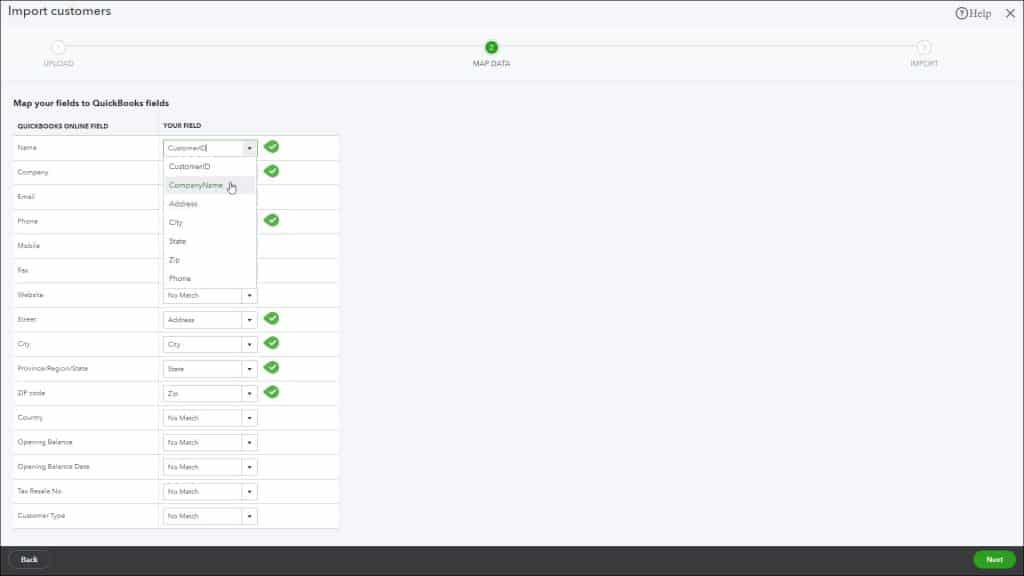
In the “Map Fields” screen that then appears, you match the data in the “QuickBooks Online fields” to “Your fields” from your file upload to map where the data goes, so your data is correctly identified. When finished, click the “Next” button to go to the “Import” screen. This screen lets you double-check the data to ensure it matches. If the data is correct, click the “Import” button to import it into QuickBooks Online.

A picture of a user importing list data into QuickBooks Online.
How to Import QuickBooks Desktop Data to QuickBooks Online
Alternatively, to import an entire QuickBooks Desktop company file to QuickBooks Online, click the “Settings” button. Then click the “Import desktop data” link to open a page that contains a video lesson and instructions on importing data from QuickBooks Desktop versions. There are also helpful links in the page for related questions.
Follow the instructions shown for your version of QuickBooks Desktop. You may need to update your version of QuickBooks Desktop to ensure you can export it to QuickBooks Online. After importing, continue to follow the instructions to verify your QuickBooks Desktop data has been correctly imported into QuickBooks Online. Importantly, also note that to import data into QuickBooks Online, you must do it within the first 60 days after starting your company file’s QuickBooks Online subscription.
Instructions on How to Import Data to QuickBooks Online
Instructions on How to Import Data to QuickBooks Online
- To import either “Bank Data,” “Customers,” “Vendors,” “Chart of Accounts,” “Products and Services,” or “Invoices” into QuickBooks Online, click the “Settings” button.
- Then click the “Import Data” link to open an “Import Data” page.
- Then click the link button at the top of the page for the type of data to import.
- After clicking the link button for the type of data to import, a new page appears and provides you with specific import instructions and shows its related import process.
- For most imports, except the “Bank Data” import, you upload a file, then map the fields in the uploaded file to the fields within your QuickBooks Online company file, and then import the file.
- For these types of imports, start by clicking the “Browse…” button in the page to open a “File Upload” dialog box, which you use to find and select the file to upload.
- After selecting it, click the “Open” button to upload the file.
- Back in the import screen, then click the “Next” button to continue.
- In the “Map Fields” screen that then appears, match the data in the “QuickBooks Online fields” to “Your fields” from your file upload to map where the data goes, so your data is correctly identified.
- When finished, click the “Next” button to go to the “Import” screen.
- This screen lets you double-check the data to ensure it matches.
- If the data is correct, click the “Import” button to import it into QuickBooks Online.
Instructions on Import QuickBooks Desktop Data to QuickBooks Online
- Alternatively, to import an entire QuickBooks Desktop company file, click the “Settings” button.
- Then click the “Import desktop data” link to open a page that contains a video lesson and instructions on importing data from QuickBooks Desktop versions.
- There are also helpful links in the page for related questions.
- Follow the instructions shown for your version of QuickBooks Desktop.
- You may need to update your version of QuickBooks Desktop to ensure you can export it to QuickBooks Online.
- After importing, continue to follow the instructions to verify your QuickBooks Desktop data has been correctly imported into QuickBooks Online.
- It is important to note that to import data into QuickBooks Online, you must do it within the first 60 days after starting your company file’s QuickBooks Online subscription.


