Insert a Symbol in Word- Instructions and Video Lesson
Insert a Symbol in Word: Video Lesson
This video lesson, titled “Inserting Symbols,” shows you how to insert a symbol in Word. This video lesson on how to insert a symbol in Word is from our complete Word tutorial, titled “Mastering Word Made Easy v.2019 and 365.”
Insert a Symbol in Word: Overview
You may need to insert a symbol in Word when creating documents. Two of the most often used symbols are the copyright symbol “©” and the trademark symbol “™.” However, there are also more symbols available to insert into documents.
To insert a symbol in Word, place the insertion point into your document where you want to add the symbol. Then click the “Insert” tab in the Ribbon. Then click the “Symbol” drop-down button in the “Symbols” button group. The drop-down menu that then appears shows some of the most commonly-used symbols. It also shows a “More Symbols…” command. Click the symbol to insert in this menu. If you don’t see the symbol you want, click the “More Symbols…” command to open the “Symbol” dialog box.
This dialog box contains a “Symbols” and a “Special Characters” tab. On the “Symbols” tab, use the “Font:” drop-down and, if shown, the “Subset:” drop-down, to choose a specific category in which to look for a symbol. The symbols for your selected font appear in the large scrollable list at the top of the tab. Click a symbol here to select it. Any “Recently used symbols:” also appear in the area of the same name. You can select a symbol here to select it, too. If you know the “Character code:” for a symbol from the selected font, you can enter it in the labeled text field. You will also need to choose where it is “from:” by using the adjacent drop-down.
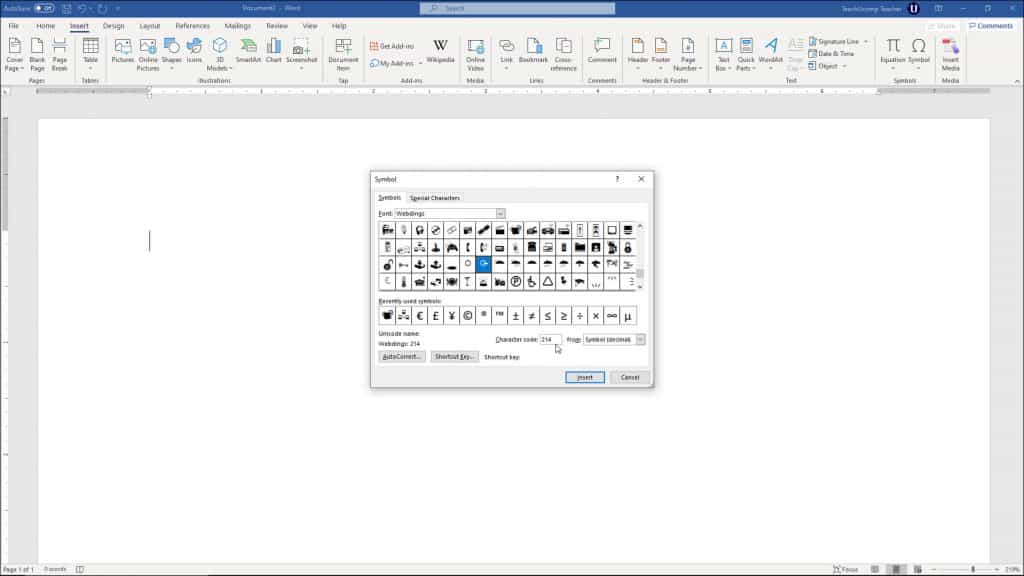
Insert a Symbol in Word- Instructions and Video Lesson: A picture of a user adding a symbol to a document using the “Symbol” dialog box in Word.
To create an AutoCorrect entry for a selected symbol, click the “AutoCorrect…” button to open the “AutoCorrect” dialog box. In the “Replace text as you type” field, enter a combination of characters for the chosen symbol. Then click “Add” to add your entry. Then click “OK” to close the dialog box. The next time you type the AutoCorrect entry in your document, it is replaced by the selected symbol.
To create a shortcut key for a selected symbol, click the “Shortcut Key…” button to open the “Customize Keyboard” dialog box. In this dialog box, the cursor appears in the “Press new shortcut key:” field. Press the combination of keys to use for a keyboard shortcut in conjunction with either the “Ctrl” or “Alt” keys. The key combination then appears in the “Press new shortcut key:” field. Below this, a “Currently assigned to:” line appears. If the shortcut key you entered is assigned to another command, it appears here. If you see “Currently assigned to: [unassigned],” then you may use that keyboard shortcut. Do not replace existing keyboard shortcut keys if they are already assigned!
Then click the “Assign” button to assign the keyboard shortcut to the selected symbol. Then click the “Close” button to return to the “Symbol” dialog box. Later, you can press the shortcut key in a document to insert the selected symbol.
The “Special Characters” tab contains a list of characters and their corresponding shortcut keys. You can click a symbol in this list to select it. You will also see the same “AutoCorrect…” and “Shortcut Key…” buttons. After selecting a symbol on either the “Symbol” or “Special Characters” tab, then click the “Insert” button in the “Symbol” dialog box to insert the symbol into your document. Then click the “Close” button to close the dialog box.
Insert a Symbol in Word: Instructions
- To insert a symbol in Word, place your cursor where you want the symbol to appear in your document.
- Then click the “Insert” tab in the Ribbon.
- Then click the “Symbol” button in the “Symbols” button group to display a drop-down menu of the most commonly used symbols.
- To insert a commonly-used symbol, click it in this drop-down menu to insert it into your document
- Alternatively, to open the “Symbol” dialog box to choose from all available symbols, click the “More Symbols…” command in drop-down menu.
- The “Symbol” dialog box that then open contains a “Symbols” and a “Special Characters” tab.
- To insert a symbol from the “Symbols” tab, click the “Symbols” tab.
- Then use the “Font:” drop-down and, if shown, the “Subset:” drop-down, to choose a specific category in which to look for a symbol.
- The symbols for the selected font appear in the scrollable list at the top of the tab.
- Click a symbol shown here to select it.
- Alternatively, to select a recently-used symbol, click to select a symbol in the “Recently used symbols:” area.
- Alternatively, to enter a character code for a symbol, enter the code into the “Character code” field. You must also choose where it is “from:” by using the adjacent drop-down.
- To create an AutoCorrect entry for a selected symbol, click the “AutoCorrect…” button to open the “AutoCorrect” dialog box.
- In the “Replace text as you type” field, enter a combination of characters for the chosen symbol.
- Then click “Add” to add your entry.
- Then click “OK” to close the dialog box.
- The next time you type the AutoCorrect entry in your document, it is replaced by the selected symbol.
- To create a shortcut key for a selected symbol, select the symbol and click the “Shortcut Key…” button to open the “Customize Keyboard” dialog box.
- The cursor appears in the “Press new shortcut key:” field.
- Press the combination of keys to use for a keyboard shortcut in conjunction with either the “Ctrl” or “Alt” keys.
- After pressing a key combination, it then appears in the “Press new shortcut key:” field.
- Below this field, a “Currently assigned to:” line also appears.
- If the shortcut key you entered is assigned to another command, it appears here.
- If you see “Currently assigned to: [unassigned],” you may use that keyboard shortcut.
- Do not replace existing keyboard shortcut keys if they are already assigned!
- To assign the keyboard shortcut you created to the symbol you chose, click the “Assign” key. Then click the “Close” button to return to the “Symbol” dialog box.
- Later, you can press the shortcut key in a document to insert the selected symbol.
- To view a short list of the special characters you can insert and their corresponding shortcut keys, click the “Special Characters” tab of the “Symbol” dialog box.
- The same “AutoCorrect…” and “Shortcut Key…” buttons appear on this tab.
- To insert a selected symbol into your document after selecting a symbol on either the “Symbol” or “Special Characters” tab, click the “Insert” button in the “Symbol” dialog box.
- Then click the “Close” button to close the dialog box.

