Insert a Table of Figures in Word
Insert a Table of Figures in Word: Video Lesson
This video lesson, titled “Inserting a Table of Figures,” shows you how to insert a table of figures in Word. If you’d like to learn more about Word, this video lesson is from our complete Word tutorial, titled “Mastering Word Made Easy v.2019 and 365.”
Insert a Table of Figures in Word: Overview
You can insert a table of figures in Word, which is similar to a table of contents. However, a table of figures in Word shows the page numbers of any document objects with captions or, alternatively, styles. After you insert a table of figures in Word, any document objects with captions or, alternatively, styles appear in the table of figures. They are sorted by number and appear in a list.
To create a table of figures in Word, your document should contain captioned figures. Alternatively, you can also create a table of figures in Word by using styles. We will first show you how to create a table of figures in Word by using captions. We will then show you how to create a table of figures in Word by using styles.
How to Insert a Table of Figures in Word from Captions
If you need to learn how to add captions to objects in a Word document, you can read our post on how to add captions in Word to see how. After applying captions to your document’s objects, place your cursor at the point in your document where you want to insert a table of figures in Word. Then click the “References” tab in the Ribbon. Then click the “Insert Table of Figures” button in the “Captions” button group. Doing this then opens the “Table of Figures” dialog box and selects the “Table of Figures” tab within it.
The top of this tab shows how your table of figures will print in the “Print Preview” section. Below that, there are options for changing the appearance of the printed version of the table of figures. To not print page numbers, uncheck the “Show page numbers” checkbox. Page numbers, if enabled, are right-aligned by default.
To print the page number immediately after the caption title, instead, uncheck the “Right align page numbers” checkbox. Then select the desired style of leader tab to connect the caption titles to the page numbers from the “Tab leader:” drop-down. The “Web Preview” section shows how your table of figures would look in a web page. To remove the hyperlinks from a web table of figures, uncheck the “Use hyperlinks instead of page numbers” checkbox.
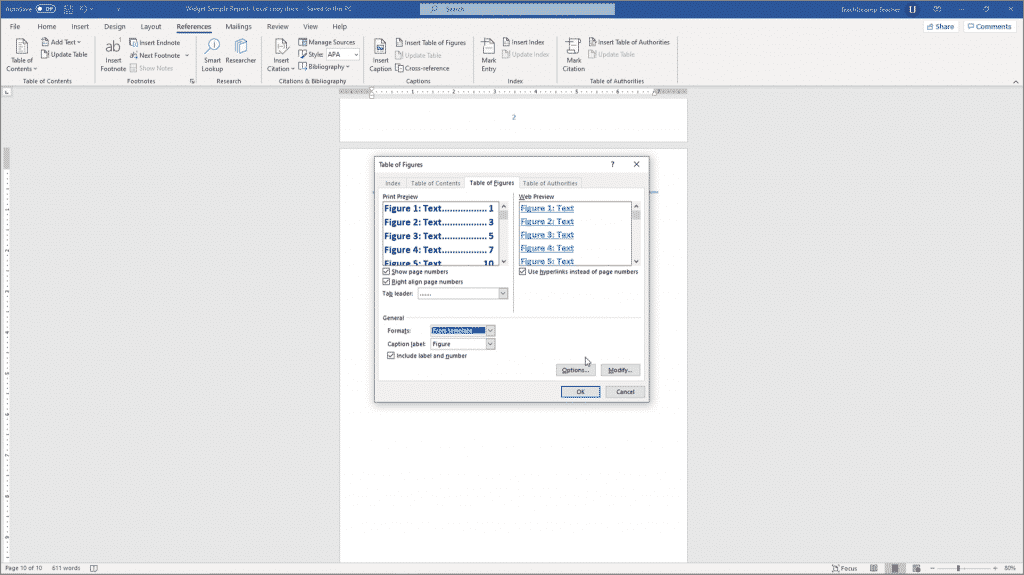
Insert a Table of Figures in Word – Instructions: A picture of a user inserting a table of figures in Word.
The “General” section of this dialog box lets you change the general settings of the table of figures. If desired, you can select a different general format for the table of figures by selecting a different choice from the “Formats:” drop-down. To change the label of the captions, select a choice from the “Caption label” drop-down. To remove the label and number, if desired, uncheck the “Include label and number” checkbox.
If you want to customize the text styles of a table of figures, you must select the “From template” choice from the “Formats” drop-down. This is because you can only customize the appearance of the default table of figures style for the document’s template. Then click the adjacent “Modify…” button to open the “Style” dialog box. Select the table of figures style to modify from the list and then click the “Modify…” button in the “Style” dialog box.
Doing this then opens the “Modify Style” dialog box, which lets you change the table of figures style. Make any changes you want and then click the “OK” button. Then click the “OK” button in the “Style” dialog box to return to the “Table of Figures” dialog box. When finished, click the “OK” button in the “Table of Figures” dialog box to insert the table of figures into your document.
How to Insert a Table of Figures in Word from Styles
To insert a table of figures in Word using styles instead of captions, first add text titles directly into the document next to the objects to which they refer. These titles become the “captions” for the objects. Next, apply a consistent style to the titles of these document objects at the various locations at which they appear in the document. Make sure the style you choose is only applied to these objects’ titles and is not used elsewhere in the document. If you need to learn how to apply styles in Word, you can read our post on how to apply styles in Word to see how.
After applying your styles, then place your insertion mark cursor at the document location at which to insert a table of figures in Word. Then click the “References” tab in the Ribbon. Then click the “Insert Table of Figures” button in the “Captions” button group to open the “Table of Figures” dialog box and show the “Table of Figures” tab again.
Next, click the “Options…” button to open the “Table of Figures Options” dialog box. Check the “Style” checkbox and then choose the name of the style you applied to the titles of the inserted objects from which to make the table of figures from the drop-down to the right. Then click the “OK” button in the “Table of Figures Options” dialog box to return to the “Table of Figures” dialog box. Then click the “OK” button to make Word list every object with the selected style applied in a table of figures.
Insert a Table of Figures in Word: Instructions
Instructions on How to Prepare to Insert a Table of Figures in Word
- To insert a table of figures in Word, you must first apply captions to the figures to include in the table of figures.
- Alternatively, you must first apply a selected style to the names of the figures to include. Make sure the style you choose is only applied to these objects’ titles and is not used elsewhere in the document.
Instructions on How to Insert a Table of Figures in Word from Captions
- To insert a table of figures in Word from captions, place your insertion mark cursor at the document location at which to insert the table of figures.
- Then click the “References” tab in the Ribbon.
- Then click the “Insert Table of Figures” button in the “Captions” button group to open the “Table of Figures” dialog box and show the “Table of Figures” tab.
- The top of this tab shows how your table of figures will print in the “Print Preview” section.
- Below that, there are options for changing the appearance of the printed version of the table of figures.
- To not print page numbers, uncheck the “Show page numbers” checkbox.
- Page numbers, if enabled, are right-aligned by default.
- To print the page number immediately after the caption title, instead, uncheck the “Right align page numbers” checkbox.
- Then select the desired style of leader tab to connect the caption titles to the page numbers from the “Tab leader:” drop-down.
- The “Web Preview” section shows how your table of figures would look in a web page.
- To remove the hyperlinks from a web table of figures, uncheck the “Use hyperlinks instead of page numbers” checkbox.
- The “General” section of this dialog box lets you change the general settings of the table of figures.
- If desired, you can select a different general format for the table of figures by selecting a different choice from the “Formats:” drop-down.
- To change the label of the captions, select a choice from the “Caption label” drop-down.
- To remove the label and number, if desired, uncheck the “Include label and number” checkbox.
- If you want to customize the text styles of a table of figures, you must select the “From template” choice from the “Formats” drop-down, as you can only customize the appearance of the default table of figures style for the document’s template.
- Then click the adjacent “Modify…” button to open the “Style” dialog box.
- Select the table of figures style to modify from the list and then click the “Modify…” button in the “Style” dialog box to open the “Modify Style” dialog box, which lets you change the table of figures style.
- Make any changes you want and then click the “OK” button.
- Then click the “OK” button in the “Style” dialog box to return to the “Table of Figures” dialog box.
- When finished, click the “OK” button in the “Table of Figures” dialog box to insert the table of figures into your document.
Instructions on How to Insert a Table of Figures in Word from Styles
- To insert a table of figures in Word from styles, place your insertion mark cursor at the document location at which to insert the table of figures.
- Then click the “References” tab in the Ribbon.
- Then click the “Insert Table of Figures” button in the “Captions” button group to open the “Table of Figures” dialog box and show the “Table of Figures” tab again.
- Next, click the “Options…” button to open the “Table of Figures Options” dialog box.
- Check the “Style” checkbox and then choose the name of the style you applied to the titles of the inserted objects from which to make the table of figures from the drop-down to the right.
- Then click the “OK” button in the “Table of Figures Options” dialog box to return to the “Table of Figures” dialog box.
- Then click the “OK” button to make Word list every object with the selected style applied in a table of figures.

