Insert a Text Box in Word – Instructions
Insert a Text Box in Word: Video Lesson
This video lesson, titled “Inserting Text Boxes,” shows you how to insert a text box in Word. This video lesson is from our complete Word tutorial, titled “Mastering Word Made Easy v.2019 and 365.”
Insert a Text Box in Word: Overview
This lesson shows you how to insert a text box in Word. A text box in Word is just a shape into which text is inserted. Therefore, you can format a text box the same way you can format a shape. However, a text box also contains text you can format the same way you can format other document text.
How to Insert a Text Box in Word
To insert a text box in Word into a document, click the “Insert” tab in the Ribbon. Then click the “Text Box” drop-down button in the “Text” button group. Then select the “Draw Text Box” command. Doing this then changes your mouse pointer into a black crosshair when you hold it back over your document area. Then click and drag over the area in the document you want the text box to cover. When you release your mouse, the text box automatically inserts itself into your document. The text insertion mark appears inside of the text box. So, you simply type the text you want to appear within the text box.
How to Move and Resize a Text Box in Word
To move the text box in Word, click and drag the text box by its border to place it into the desired document area. Notice it moves easily about the document, as if it was a picture with a text wrapping style other than “In line with text” applied to it. To resize a text box in Word, click and drag the resizing handles that appear around the perimeter of the text box.
How to Edit Text in a Text Box in Word
To edit the text inside a text box in Word, click directly into the text in the text box to place the insertion mark cursor into the text box. You can tell when you are editing text within a text box by the dashed border that appears around the text box when it is in “text editing” mode. Then make your editing changes. When finished, you can click the border of the text box to set the text and then treat the text box as if it were a shape. When the text box is selected as a shape, you can format it using the shape formatting options in the “Shape Format” contextual tab in the Ribbon.
How to Insert a Preset Text Box in Word
Alternatively, to insert a preset text box in Word, click the “Insert” tab in the Ribbon. Then click the “Text Box” drop-down button in the “Text” button group. Then select a preset text box to insert from the choices shown in the “Built-in” list. The text box then appears within the document.
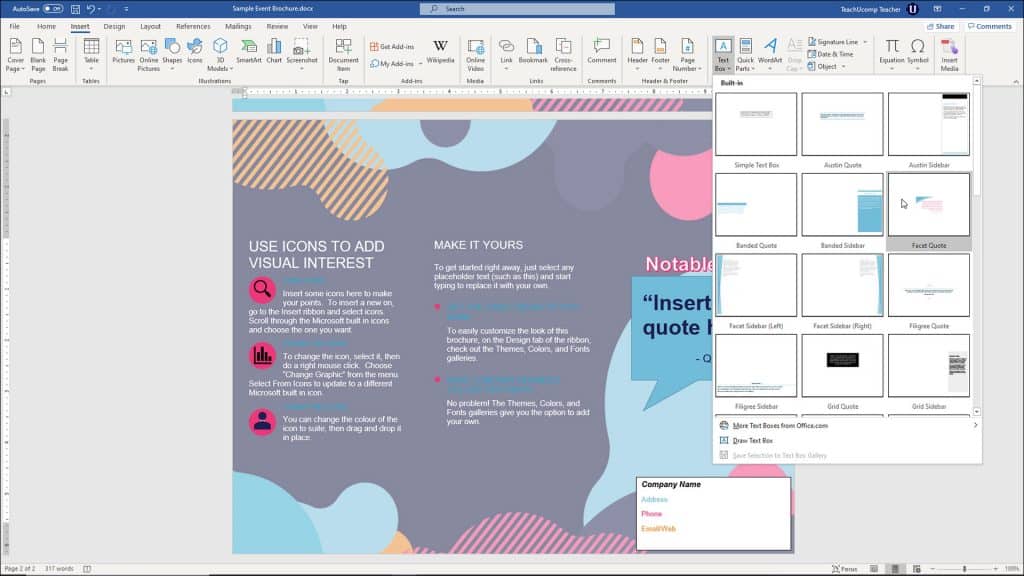
Insert a Text Box in Word – Instructions: A picture of a user selecting a preset text box in Word from the “Built-in” list.
You can then click and drag it by its border to place it where you desire. You can click the placeholder text within it to type your own. Note that many of these preset text boxes are actually “grouped” objects that consist of multiple objects, like pictures and text boxes, joined together. So, you may need to carefully ensure you are selecting the correct objects within the grouped object when applying any formatting changes to these preset text boxes.
Insert a Text Box in Word: Instructions
Instructions on How to Insert a Text Box in Word
- To insert a text box in Word into a document, click the “Insert” tab in the Ribbon.
- Then click the “Text Box” drop-down button in the “Text” button group.
- Then select the “Draw Text Box” command.
- Doing this then changes your mouse pointer into a black crosshair when you hold it back over your document area.
- Then click and drag over the area in the document you want the text box to cover.
- When you release your mouse, the text box automatically inserts itself into your document.
- The text insertion mark appears inside of the text box.
- Type the text you want to appear within the text box.
Instructions on How to Move and Resize a Text Box in Word
- To move a text box in Word, click and drag the text box by its border to place it into the desired area of the document.
- Notice it moves easily about the document, as if it was a picture with a text wrapping style other than “In line with text” applied to it.
- To resize a text box in Word, click and drag the resizing handles that appear around the perimeter of the text box.
Instructions on How to Edit Text in a Text Box in Word
- To edit the text inside a text box in Word, click directly into the text in the text box to place the insertion mark cursor into the text box.
- To tell when you are editing text within a text box, look for a dashed border that appears around the text box when it is in “text editing” mode.
- When finished, you can click the border of the text box to set the text and then treat the text box as if it were a shape.
- When the text box is selected as a shape, you can format it using the shape formatting options in the “Shape Format” contextual tab in the Ribbon, if desired.
Instructions on How to Insert a Preset Text Box in Word
- Alternatively, to insert a preset text box in Word, click the “Insert” tab in the Ribbon.
- Then click the “Text Box” drop-down button in the “Text” button group.
- Then select a preset text box to insert from the choices shown in the “Built-in” list.
- The text box then appears within the document.
- To move it, click and drag it by its border to place it where you desire.
- Click the placeholder text within it to type your own.
- Note that many of these preset text boxes are actually “grouped” objects that consist of multiple objects, like pictures and text boxes, joined together. So, you may need to carefully ensure you are selecting the correct objects within the grouped object when applying any formatting changes to these preset text boxes.

