Insert Special Fields in Crystal Reports- Tutorial
Insert Special Fields in Crystal Reports: Video Lesson
This video lesson, titled “Inserting Special Fields,” shows how to insert special fields in Crystal Reports. This video is from our complete Crystal Reports training, titled “Mastering Crystal Reports Made Easy v.2013-2011.”
Insert Special Fields in Crystal Reports: Overview
When you insert special fields in Crystal Reports, you add data fields to your reports that display information that is unrelated to the information stored in the tables of the report. You can insert special fields in Crystal Reports to retrieve general report and system information that you may find useful in reports, such as page numbering, the date the report was printed, the filename of the report, and other types of general report data. When you insert special fields in Crystal Reports, you use the same technique for field insertion used for inserting “Database Fields.” You insert both types of fields in the same manner within the “Field Explorer” pane at the right side of the window.
To insert special fields in Crystal Reports, click the small plus sign next to the “Special Fields” entry within the “Field Explorer” pane. Click the name of the special field that you want to insert into the report and then click the “Insert to Report” button in the toolbar of the “Field Explorer” pane. Finally, click into the place in the report where you want to display the value of the special field.
While you may insert special fields in Crystal Reports into almost any section you would like, sometimes the type of field indicates where it would most likely be placed. For example, inserting the “Page N of M” field into the “Page Footer” section of the report would display the page numbering at the bottom of each page of the report, which makes more sense than placing that type of information into the “Details” section. Many times the type of data represented by the special fields is best placed into the various header and footer sections of the report. The following table lists the types of special fields you can insert, and the data they display in your reports.
| Field Name: | Description: |
| Content Locale | Displays the locale setting of the computer on which the report is running. |
| Current CE User Id | Shows the user id of the current Crystal Enterprise user, if available. |
| Current CE User Name | Shows the name of the current Crystal Enterprise user, if available. |
| Current CE User Time Zone | Shows the time zone of the user (if one exists). |
| Data Date | Shows the date that the report data was last refreshed. |
| Data Time | Shows the time that the report data was last refreshed. |
| Data Time Zone | Shows the time zone in which the data was last refreshed. |
| File Author | Shows the “Author” listed in the “Summary Info” window. |
| File Creation Date | Shows the date that the report was created. |
| File Path and Name | Inserts the file path and name of the current report. |
| Group Number | Numbers each group and displays it in the group header or group footer. |
| Group Selection Formula | Shows the group selection formula used to filter the groups displayed in the report. |
| Horizontal Page Number | Numbers the horizontal pages created by report objects, such as OLAP grids and cross-tabs, which may extend over several horizontal pages. |
| Modification Date | Shows the last date that the report was saved. |
| Modification Time | Shows the last time that the report was saved. |
| Page N of M | Inserts the page number with a total page count into the report. |
| Page Number | Inserts the page number on each page in the report. |
| Print Date | Shows the date that the report was printed. |
| Print Time | Shows the time that the report was printed. |
| Print Time Zone | Shows the time zone in which the report was printed. |
| Record Number | Assigns and displays a number for each record in the report. |
| Record Selection Formula | Shows the Record Selection Formula used to select the records in the report. |
| Report Comments | Shows the comments that you have entered into the “Summary Info” window. |
| Report Title | Shows the report title that you have entered into the “Summary Info” window. |
| Selection Locale | Shows the locale setting of the machine the report is running on. |
| Total Page Count | Shows the total count of the pages in the report. |
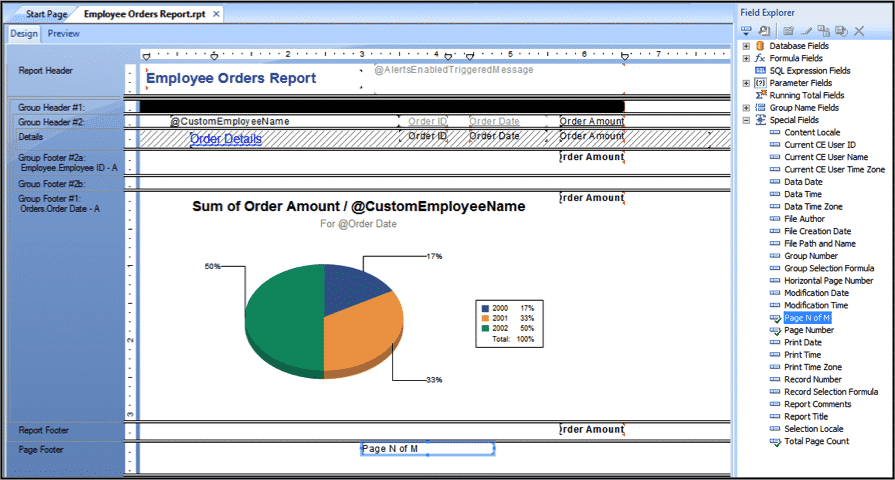
Insert Special Fields in Crystal Reports: A picture that shows how to insert special fields in Crystal Reports.
Insert Special Fields in Crystal Reports: Instructions
1. To insert special fields in Crystal Reports, click the small plus sign next to the “Special Fields” icon within the “Field Explorer” to display the special fields in the report.
THEN
2. Select the name of the field that you wish to add to the report from the “Field Explorer” and then click the “Insert to Report” button in the toolbar at the top of the “Field Explorer” pane.
3. Click into the report section where you wish to place the field.
OR
2. Click and drag the field that you wish to add to the report from the “Field Explorer” into the desired section of the report.
OR
2. Right-click the name of the field that you would like to add to the report in the “Field Explorer” pane.
3. Choose “Insert to Report” from the pop-up menu that appears.
4. Click into the report at the location where you wish to insert the selected field.
