Insert Video in PowerPoint – Instructions
How to Insert Video in PowerPoint: Video
This video lesson, titled “Inserting Videos,” shows you how to insert video in PowerPoint. This lesson on how to insert video in PowerPoint is from our complete PowerPoint tutorial, titled “Mastering PowerPoint Made Easy v.2019 and 365.”
Overview of How to Insert Video in PowerPoint:
You can insert video in PowerPoint within presentation slides. If inserting a local video, PowerPoint prefers MP4 videos (e.g., .mp4, .m4v, or .mov) encoded with H.264 video and AAC audio. However, it also supports the “.asf,” “.avi,” “.wmv,” and “.mpeg” file types.
PowerPoint lets you insert a video from your computer or from online sources. For videos you insert from your computer, you can choose to either embed the video into the presentation or link to the video. Embedding video is the default behavior in PowerPoint. However, if you link to a video, make sure to include the external video in the same location when delivering the presentation. Microsoft recommends storing the presentation and linked videos in the same folder for ease of transport and use if you choose to link videos or other external files to a presentation.
How to Insert Video in PowerPoint from Your Computer:
To insert video in PowerPoint from your computer, click the “Insert” tab of the Ribbon. Then click the “Video” drop-down button in the “Media” button group. Then select the “This Device…” command from the drop-down menu. Alternatively, to insert video in PowerPoint from your computer, click the “Insert Video” button in a slide content placeholder
After doing either action, the “Insert Video” dialog box then appears. Use this dialog box to navigate to and select the video file to insert. To then embed the selected video, click the “Insert” button in the “Insert Video” dialog box. Alternatively, to link to the selected video, click the drop-down arrow next to the “Insert” button and then select the “Link to File” choice from the drop-down menu that appears.
How to Insert Video in PowerPoint from Online Sources:
Alternatively, to insert a video into a PowerPoint slide from a supported online source, click the “Video” drop-down button in the “Media” button group on the “Insert” tab of the Ribbon and then select the “Online Videos…” command from the drop-down menu to open a window that shows a list of supported online video sites.
To insert a video embed code or video address you copied from a video sharing website, paste the video embed code or video address into the large text field at the top of the window. If you can insert the video, you should see a preview appear below the field. Then click the “Insert” button in the lower-right corner of the window to insert the online video into the slide.
How to Insert Video in PowerPoint from Microsoft’s Stock Videos:
Alternatively, to insert a video in PowerPoint from Microsoft’s stock videos, click the “Video” drop-down button in the “Media” button group on the “Insert” tab of the Ribbon and then select the “Stock Videos…” command from the drop-down menu to open a window that shows the “Videos” tab of Microsoft’s stock images and videos. Then find and select the stock video to use and click it to select it. Then click the “Insert” button at the bottom the window to insert the selected video into the slide.
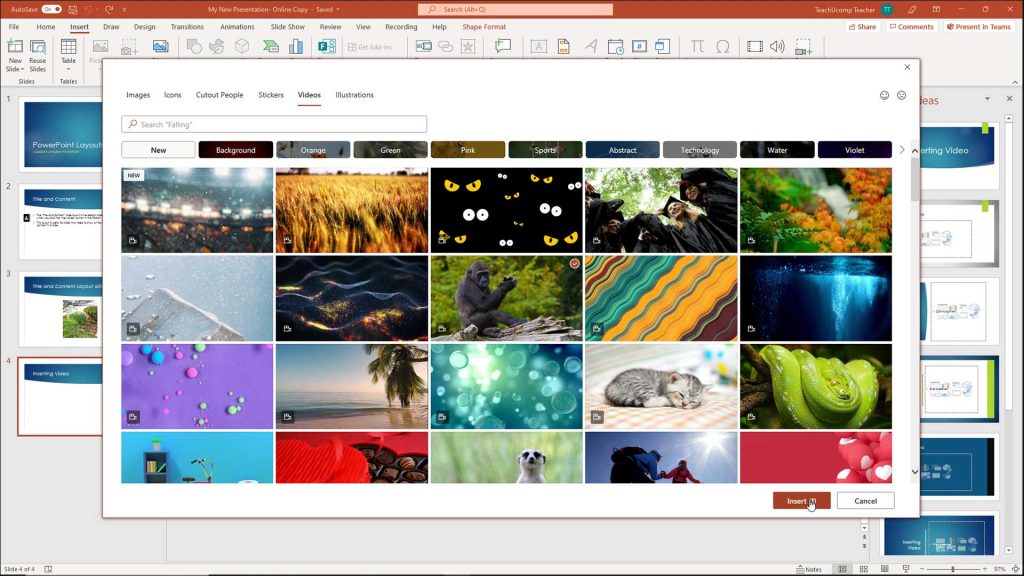
A picture that shows how to insert video in PowerPoint from Microsoft’s stock videos.
How to Set Video Options in PowerPoint:
After inserting the video in PowerPoint, it appears selected. When a video is selected in PowerPoint, the “Video Format” and “Playback” contextual tabs then appear in the Ribbon.
How to Set Video Playback Options in PowerPoint:
To select when to play the video when delivering the presentation in Slide Show view in PowerPoint, click the “Playback” contextual tab in the Ribbon. Then use the “Start” drop-down in the “Video Options” button group to select your preferred playback option. If you want to play the video automatically, select the “Automatically” choice. To play the video when clicked, select the “When Clicked On” choice. To play the video as part of the sequence of slide clicks, select the default “In Click Sequence” choice.
You can also set additional playback options in the “Video Options” button group by checking the settings checkboxes, if available for the selected video clip. Often, these are only available for videos inserted from your computer, not online videos.
How to Set Video Formatting Options in PowerPoint:
You can move and resize a video in PowerPoint just as you would move or resize a picture or shape. To format the default poster appearance of the video in the slide, use the formatting options available on the “Video Format” contextual tab in the Ribbon. These are many of the same options available as when formatting shapes or pictures.
Also, note that you may not be able to change some attributes of videos inserted from online resources. Any button that appears “greyed-out” on the “Video Format” or “Playback” contextual tabs is unavailable to use with the selected online video.
How to Set Video Editing Options in PowerPoint:
For videos inserted from your computer, you can also use the buttons in the “Editing” button group on the “Playback” contextual tab to trim the video duration or select how long to fade in or out when playing. For all inserted videos, you can click the “Play” button in the “Preview” button group on either contextual tab in the Ribbon to preview the video while using the “Normal” view of your presentation.
Online Video Security in PowerPoint:
For online videos, the next time you open the presentation, a bar should appear at the top of the presentation window that says, “SECURITY WARNING References to external media objects have been blocked.” To enable the video playback if you know the embedded video is safe to play, click the “Enable Content” button to the right of this message. Otherwise, PowerPoint stops the online video from playing.
Instructions on How to Insert Video in PowerPoint:
Instructions to How to Insert Video in PowerPoint from Your Computer:
- To insert video in PowerPoint from your computer, click the “Insert” tab of the Ribbon.
- Then click the “Video” drop-down button in the “Media” button group.
- Then select the “This Device…” command from the drop-down menu.
- Alternatively, to insert video in PowerPoint from your computer, click the “Insert Video” button in a slide content placeholder.
- After doing either action, the “Insert Video” dialog box then appears.
- Use this dialog box to navigate to and select the video file to insert.
- To then embed the selected video, click the “Insert” button in the “Insert Video” dialog box.
- Alternatively, to link to the selected video, click the drop-down arrow next to the “Insert” button.
- Then select the “Link to File” choice from the drop-down menu that appears.
Instructions on How to Insert Video in PowerPoint from Online Sources:
- To insert video in PowerPoint from a supported online source, click the “Insert” tab of the Ribbon.
- Then click the “Video” drop-down button in the “Media” button group.
- Then select the “Online Videos…” command from the drop-down menu to open a window that shows a list of supported online video sites.
- To insert a video embed code or video address you copied from a video sharing website, paste the video embed code or video address into the large text field at the top of the window.
- If you can insert the video, you should see a preview appear below the field.
- Then click the “Insert” button in the lower-right corner of the window to insert the video into the slide.
Instructions on How to Insert Video in PowerPoint from Microsoft’s Stock Videos:
- To insert video in PowerPoint from Microsoft’s stock videos, click the “Insert” tab of the Ribbon.
- Then click the “Video” drop-down button in the “Media” button group.
- Then select the “Stock Videos…” command from the drop-down menu to open a window that shows the “Videos” tab of Microsoft’s stock images and videos.
- Find and select the stock video to use in this window and click it to select it.
- Then click the “Insert” button at the bottom the window to insert the selected video into the slide.
Instructions on How to Set Video Options in PowerPoint:
- Immediately after inserting a video in PowerPoint, it is selected.
- When a video is selected in PowerPoint, you can then set its video options on the “Video Format” and “Playback” contextual tabs then appear in the Ribbon.
Instructions on How to Set Video Playback Options in PowerPoint:
- To select when to play the video in PowerPoint when delivering the presentation in Slide Show view, click the “Playback” contextual tab in the Ribbon.
- Then use the “Start” drop-down in the “Video Options” button group to select your playback option.
- If you want to play the video automatically, select the “Automatically” choice.
- To play the video when clicked, select the “When Clicked On” choice.
- To play the video as part of the sequence of slide clicks, select the “In Click Sequence” choice.
- To set additional playback options in the “Video Options” button group if available for the selected video clip, check the settings checkboxes. Often, these are only available for videos inserted from your computer, not online videos.
Instructions on How to Set Video Formatting Options in PowerPoint:
- You can move and resize a video in PowerPoint just as you would move or resize a picture or shape.
- To format the default poster appearance of the video in the slide, use the formatting options available on the “Video Format” contextual tab in the Ribbon. These are many of the same options available as when formatting shapes or pictures, as shown in previous lessons.
- Also, note that you may not be able to change some attributes of videos inserted from online resources. Any button that appears “greyed-out” on the “Video Format” or “Playback” contextual tabs is unavailable to use with the selected online video.
Instructions on How to Set Video Editing Options in PowerPoint:
- To set video editing options for videos inserted from your computer, you can also use the buttons in the “Editing” button group on the “Playback” contextual tab to trim the video duration or select how long to fade in or out.
- For all inserted videos, you can click the “Play” button in the “Preview” button group on either contextual tab in the Ribbon to preview the video while using the “Normal” view of a presentation.
Instructions on Security for Online Video in PowerPoint:
- For online videos, the next time you open the presentation, a bar should appear at the top of the presentation window that says, “SECURITY WARNING References to external media objects have been blocked.”
- To enable the video playback if you know the embedded video is safe to play, click the “Enable Content” button to the right of this message.
- Otherwise, PowerPoint stops the online video from playing.