Install Plugins in WordPress- Tutorial and Instructions
Install Plugins in WordPress: Video Lesson
This video lesson, titled “Installing Plugins,” shows how to install plugin in WordPress 4.0. This video is from our complete WordPress 4.0 training, titled “Mastering WordPress Made Easy v.4.0.”
Install Plugins in WordPress: Overview
A plugin is a software component that is an add-on to, or extension of, an already existing piece of software. You can install plugins in WordPress to apply additional features and functions outside of the standard features that come with WordPress. On the WordPress website, there are over 30,000 free plugins available to download. These plugins can be used to enable e-commerce in a site, to enable content sharing to social networking sites, and much more. When you install plugins in WordPress, note that while many plugins are free to download, you may need to pay to use some plugins or to add functionality to them.
Before you install plugins in WordPress, you should learn how to view existing plugins in your site. To see the plugins in your WordPress site, click the “Plugins” button within the Navigation Bar of the WordPress Admin Panel. After you install plugins in WordPress, you can click the links at the top of the page to view your plugins. Click the “All” link to view all plugins already installed. On this index page, if a plugin is shown in white, it is currently not activated. If it is shown in blue, it is activated. If the plugin is shown in red, there is an update available that can be installed.
Click the “Active” link to view plugins that have been installed and are being actively used. Click the “Inactive” link to see plugins that have been installed but are not being actively used. Click the “Recently Active” link to see which plugins have been used recently. Finally, click the “Update Available” link, if shown, to see which plugins have an update that is available to install.
When viewing all of your plugins, you can click the links under each plugin name to activate or delete them. Click the “Activate” link to make the plugin active and available for use within your site. Click the “Deactivate” link if the plugin is activated and you wish to deactivate it- making it inactive and not available for use on your site. Click the “Delete” link to delete the plugin permanently. You can also use the “Bulk Actions” drop-down to select a bulk action to apply to a list of selected plugins. To do this, check the checkboxes next to the plugins to which you want to apply a bulk action, and then select either “Activate,” “Deactivate,” “Update,” or “Delete” from the “Bulk Actions” drop-down. Then click the “Apply” button.
To install plugins in WordPress, click the “Add New” link at the top of the plugins screen. Use the “Search” bar in the “Install Plugins” screen to search for a plugin by typing the word or phrase to search for into the text box and then pressing the “Enter” key on your keyboard. You can also click a link under the “Popular tags” section to find plugins using commonly searched for terms. Click the links at the top of the page to view “Featured,” “Popular,” and “Favorites” plugins. You can also upload your own plugin by clicking the “Upload Plugin“ button. Note that once you install plugins in WordPress, a new menu option for the installed plugin will often appear in the Navigation Bar within the WordPress Admin Panel.
After searching for plugins or clicking a plugin category link, a list of available plugins will be shown on the screen. You can read a description and view the rating of each plugin here. To view the details of a specific plugin, click the “More Details” link for the plugin. Once you have decided which plugin to install, click the “Install Now” link for the plugin, or if you have opened the details pane, click the “Install Now” button located at the lower right corner of the pane. WordPress will display a prompt asking if you want to install the plugin. Click “Yes” and the plugin will be downloaded, unpacked, and installed. After you install plugins in WordPress, use the features on the “Plugins” page to activate or deactivate your installed plugins.
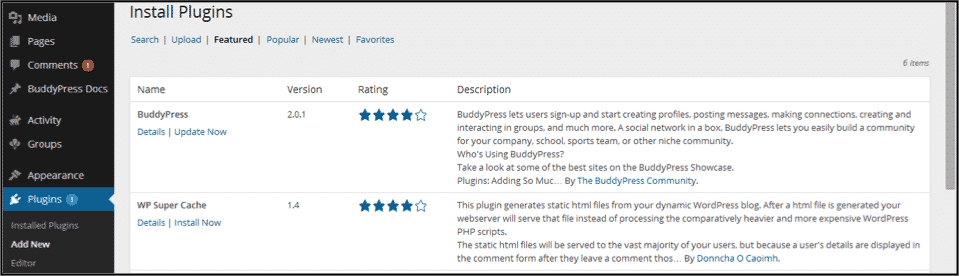
A picture of the “Install Plugins” screen that is used to install plugins in WordPress 4.0.
Install Plugins in WordPress: Step-by-step Instructions
- To see your plugins, click the “Plugins” button within the Navigation Bar of the WordPress Admin Panel.
- To view the types of plugins that are installed, click the links at the top of the page.
- Click the “All” link to view all plugins already installed. On this index page, if a plugin is shown in white, it is currently not activated. If it is shown in blue, it is activated. If the plugin is shown in red, there is an update available that can be installed.
- Click the “Active” link to view plugins that have been installed and are being actively used.
- Click the “Inactive” link to see plugins that have been installed but are not being actively used.
- Click the “Recently Active” link to see which plugins have been used recently.
- Click the “Update Available” link to see which plugins have an update that is available to install.
- To manage the installed plugins, click the links under each plugin name to activate or delete them.
- Click the “Activate” link to make the plugin active and available for use on your site.
- Click the “Deactivate” link if the plugin is activated and you wish to deactivate it- making it inactive and not available for use on your site.
- Click the “Delete” link to delete the plugin permanently.
- To use the “Bulk Actions” drop-down to select a bulk action to apply to a list of selected plugins, check the checkboxes next to the plugins to which you want to apply a bulk action, and then select either “Activate,” “Deactivate,” “Update,” or “Delete” from the “Bulk Actions” drop-down.
- Then click the “Apply” button.
- To install plugins in WordPress, click the “Add New” link at the top of the plugins screen.
- Use the “Search” bar in the “Install Plugins” screen to search for a plugin by typing the word or phrase to search for into the text box and then pressing the “Enter” key on your keyboard.
- You can also click a link under the “Popular tags” section to find plugins using commonly searched for terms. Click the links at the top of the page to view “Featured,” “Popular,” and “Favorites” plugins. You can also upload your own plugin by clicking the “Upload Plugin“ button. Note that once you install a plugin, a new menu option for that plugin will appear in the Navigation Bar within the WordPress Admin Panel.
- After searching for plugins or clicking a plugin category link, a list of available plugins will be shown on the screen. You can read a description and view the rating of each plugin here. To view the details of a specific plugin, click the “More Details” link for the plugin. Once you have decided which plugin to use, click the “Install Now” link for the plugin, or if you have opened the details pane, click the “Install Now” button located at the lower right corner of the pane. WordPress will display a prompt asking if you want to install the plugin. Click “Yes” and the plugin will be downloaded, unpacked, and installed. Then, use the features on the “Plugins” page to activate or deactivate your installed plugins.
