Layer Types in Photoshop Elements- Instructions
The Different Layer Types in Photoshop Elements: Video
This video lesson, titled “Learn How to Create Different Layer Types in Adobe Photoshop Elements 2023: A Training Tutorial,” shows you the different layer types in Photoshop Elements and how to create them. This video lesson is from our complete Photoshop Elements tutorial, titled “Mastering Photoshop Elements Made Easy™ v.2023.”
Overview of the Layer Types in Photoshop Elements:
Image Layers in Photoshop Elements:
There are many layer types in Photoshop Elements you can create. The first of the layer types in Photoshop Elements we discuss in this lesson is the image layer. An image layer, often simply called a layer, is a basic type of raster layer. This means you can use your pixel-editing tools, like the Painting Tools, to edit its content.
To create a new blank layer in Photoshop Elements, select the layer above which to add a layer in the Layers panel. Then click the “Create a new layer” button at the top of the Layers panel. The new layer is then added above the current layer in the Layers panel.
If you open a photographic file, like a JPEG, in Photoshop Elements, the image content appears within a layer of this type, called the “Background” layer, which has its own unique layer properties.
Fill Layers and Adjustment Layers in Photoshop Elements:
The next of the layer types in Photoshop Elements we examine are the fill layers and adjustment layers. Fill layers and adjustment layers in Photoshop Elements are layers that apply fills or adjustments to the content of underlying layers. When you create a fill layer or adjustment layer, the fill or adjustment content appears as a thumbnail at the left side of the layer in the Layers panel. Its linked layer mask appears to the right of that, after the link icon. The layer mask determines where the adjustment or fill is applied.
To create a fill layer or adjustment layer in Photoshop Elements, click the “Create new fill or adjustment layer” button at the top of the Layers panel. Then choose the fill or adjustment to apply from the menu that appears. Then set the fill or adjustment properties in the dialog box or panel that then opens. Separately, to add a layer mask to a selected layer in Photoshop Elements, click the “Add layer mask” button at the top of the Layers panel.
If you select a blank layer in Photoshop Elements and then create a fill layer, which are the “Solid Color…”, “Gradient…”, and “Pattern…” choices in the menu, then the fill effect is applied to the selected layer and a layer mask is also applied to that layer. Otherwise, Photoshop creates a new fill effect layer above the selected layer. In contrast to this, Photoshop Elements always creates adjustment layers, which are all the other choices in the menu, as new layers above the layer selected in the Layers panel.
Shape Layers in Photoshop Elements:
The next of the layer types in Photoshop Elements to discuss is the shape layer. Shape layers in Photoshop Elements are layers where you have created a vector-based shape. To create a shape layer in Photoshop Elements, select any of the Shape Tools, which we will discuss in a separate chapter, in the Toolbox. Then either select a blank layer in the Layers panel to convert into a shape layer or select a layer with content above which to add a new shape layer in the Layers panel.
Then click and drag within the selected layer to draw a shape. If you have a blank image layer selected, the layer is converted into a shape layer and the shape is added to it. If not, a new shape layer is instead created above the selected layer and the shape is added to it.
Type Layers in Photoshop Elements:
The next of the layer types in Photoshop Elements to review is the type layer. Type layers in Photoshop Elements are layers in which you create vector-based text. To create a type layer in Photoshop Elements, select any Type Tool except the “Horizontal Type Mask Tool” or “Vertical Type Mask Tool” in the Toolbox. Then either select a blank layer in the Layers panel to convert into a type layer or select a layer with content above which to add the type layer in the Layers panel.
Then create the text using your selected tool and click the “Commit” button to finish. If you selected a blank image layer, the layer is then converted into a type layer and the type is added to it. If not, a new type layer is instead created above the selected layer and the type is added to it.
Smart Object Layers in Photoshop Elements:
Finally, the last of the layer types in Photoshop Element to examine is the Smart Object layer. Smart Object layers in Photoshop Elements are layers to which you add external file content as an embedded vector object. Smart Objects let you perform vector-based edits to the file content, like transforms, without changing the raster content of the embedded object. However, you cannot perform editing with your pixel-based editing tools directly on a Smart Object layer in Photoshop Elements without first rasterizing, or simplifying, it.
You create Smart Object layers in Photoshop Elements when you add content to a selected layer in the Layers panel using the “File| Place…” command, as discussed in an earlier lesson. Unlike Photoshop, you cannot directly edit Smart Object layer content in Photoshop Elements. To edit the content of a Smart Object layer in Photoshop Elements, you must first simplify, or rasterize, it.
To rasterize a Smart Object layer in Photoshop Elements, which converts it into a raster image layer, right-click the Smart Object layer’s name in the Layers panel. Then select the “Simplify Layer” command in the pop-up contextual menu.
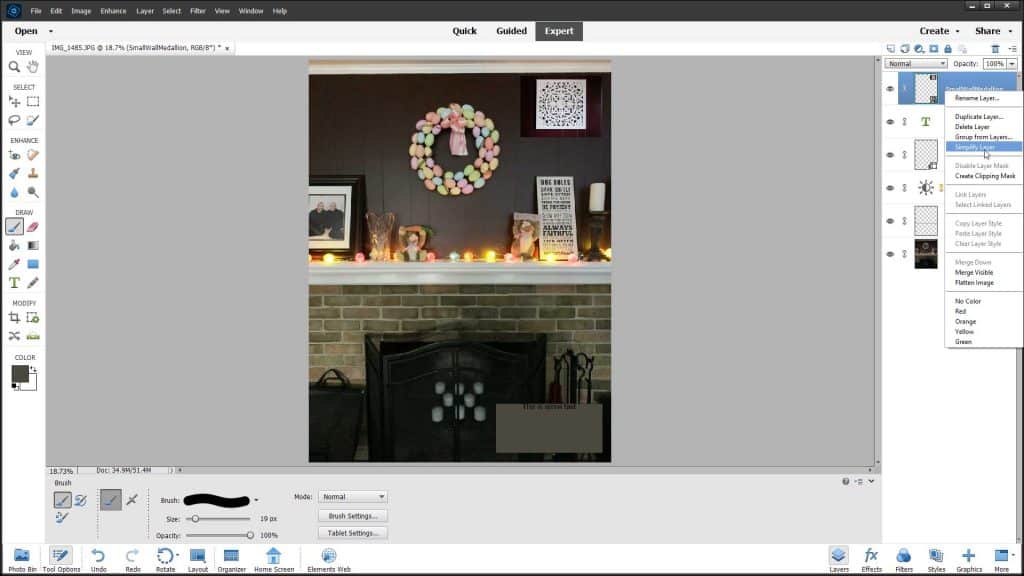
Layer Types in Photoshop Elements: A picture of a user simplifying a Smart Object layer in Photoshop elements.
Instructions on How to Create Different Layer Types in Photoshop Elements:
How to Create a New Image Layer in Photoshop Elements:
- To create a new blank raster layer in Photoshop Elements, select the layer above which to add a layer in the Layers panel.
- Then click the “Create a new layer” button at the top of the Layers panel.
How to Create a New Fill Layer or Adjustment Layer in Photoshop Elements:
- To create a fill layer or adjustment layer in Photoshop Elements, click the “Create new fill or adjustment layer” button at the top of the Layers panel.
- Then choose the fill or adjustment to apply from the menu that appears.
- Then set the fill or adjustment properties in the dialog box or panel that then opens.
- Separately, to add a layer mask to a selected layer in Photoshop Elements, click the “Add layer mask” button at the top of the Layers panel.
- If you select a blank layer in Photoshop Elements and then create a fill layer, which are the “Solid Color…”, “Gradient…”, and “Pattern…” choices in the menu, then the fill effect is applied to the selected layer and a layer mask is also applied to that layer.
- Otherwise, Photoshop creates a new fill effect layer above the selected layer.
- In contrast to this, Photoshop Elements always creates adjustment layers, which are all the other choices in the menu, as new layers above the layer selected in the Layers panel.
How to Create a New Shape Layer in Photoshop Elements:
- To create a shape layer in Photoshop Elements, select any of the Shape Tools in the Toolbox.
- Then either select a blank layer in the Layers panel to convert into a shape layer or select a layer with content above which to add a new shape layer in the Layers panel.
- Then click and drag within the selected layer to draw a shape.
- If you have a blank image layer selected, the layer is converted into a shape layer and the shape is added to it.
- If not, a new shape layer is instead created above the selected layer and the shape is added to it.
How to Create a New Type Layer in Photoshop Elements:
- To create a type layer in Photoshop Elements, select any Type Tool except the “Horizontal Type Mask Tool” or “Vertical Type Mask Tool” in the Toolbox.
- Then either select a blank layer in the Layers panel to convert into a type layer or select a layer with content above which to add the type layer in the Layers panel.
- Then create the text using your selected tool and click the “Commit” button to finish.
- If you selected a blank image layer, the layer is then converted into a type layer and the type is added to it.
- If not, a new type layer is instead created above the selected layer and the type is added to it.
How to Create a New Smart Object Layer in Photoshop Elements:
- To create a Smart Object layer in Photoshop Elements, add content to a selected layer in the Layers panel by using the “File| Place…” command, as shown in an earlier lesson.
- Unlike Photoshop, you cannot directly edit Smart Object layer content in Photoshop Elements.
- To edit the content of a Smart Object layer in Photoshop Elements, you must first simplify, or rasterize, it.
- To rasterize a Smart Object layer in Photoshop Elements, which converts it into a raster image layer, right-click the Smart Object layer’s name in the Layers panel.
- Then select the “Simplify Layer” command in the pop-up contextual menu.

