Libraries in Windows 11 – Instructions
How to Use Libraries in Windows 11: Video
This video lesson, titled “Managing Libraries in Windows 11,” shows how to use libraries in Windows 11. This video lesson is from our complete Windows 11 tutorial, titled “Mastering Windows Made Easy v.11.”
How to Show Libraries in Windows 11
Libraries are collections of folders that contain files of a selected type. The default libraries in Windows 11 are “Camera Roll,” “Documents,” “Music,” “Pictures,” “Saved Pictures” and “Videos.” However, libraries are also hidden by default in Windows 11. So, to view your libraries in File Explorer in Windows 11, click the “See more” button in the Ribbon at the top of the File Explorer window, which looks like an ellipsis mark. Then select the “Options” command in the button’s drop-down menu to open the “Folder Options” dialog box.
Click the “View” tab in the “Folder Options” dialog box. Then scroll to the bottom of the options in the “Advanced settings” section at the bottom of the tab. Then check the “Show libraries” checkbox under the “Navigation pane” settings. Then click the “OK” button at the bottom of the “Folder Options” dialog box to then show the libraries in the Navigation pane of the File Explorer window. To hide the libraries in the future, if desired, repeat the same process but uncheck the “Show libraries” checkbox, instead.
After showing the libraries in the Navigation Pane of the File Explorer window, you can click the “Libraries” folder in the Navigation Pane to view your libraries in the right pane of the File Explorer window. These libraries contain references to different folders you commonly use to save files of that type on your computer. That way, you can simply open the associated library folder to view all the subfolders and files within all the folders associated with that library.
How to Add Folders to Libraries in Windows 11
You can add other folders to these libraries to search and back up the files within them using Windows. Note that subfolders contained within existing library folders are already considered part of the library, so you will not need to add those to the definition of the library. However, you can add other folders in your computer to the libraries, if needed, and perform other library management tasks using File Explorer.
You can add a folder within your computer’s hard drive, a USB drive, OneDrive, or a connected network folder to your library if the folder is capable of being indexed and the device, if external, is connected to your computer. You cannot add a folder within a CD or DVD drive or any network-attached storage drives to a library. You also cannot add individual files to a library, only folders.
To add a folder to a library, navigate to the folder to add to the library using File Explorer until it appears in the right pane. Then right-click the folder to add to the library. Then select the “Show more options” command in the small pop-up contextual menu to show another pop-up contextual menu that shows all the available commands. Roll over the “Include in library” command in the full pop-up contextual menu. Then click the name of the library to which to add the selected folder in the side menu that appears.
How to Manage Libraries in Windows 11
You can manage libraries to remove folders from libraries and set the default folder into which to save items for each library. To manage libraries in Windows 11, display the libraries in your computer in the right pane of the File Explorer window. Then click the library to manage in the right pane of the File Explorer window to select it. Then click the “See more” button in the Ribbon at the top of the File Explorer window. Then select the “Properties” command from its drop-down menu to open the “Library name Properties” dialog box, where “Library name” is the name of the selected library.
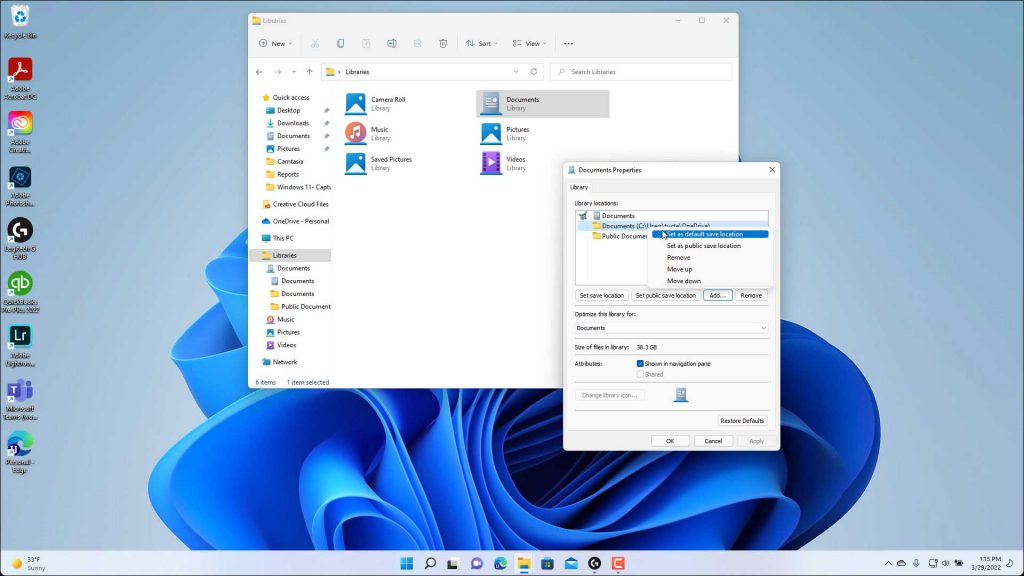
A picture showing how to manage libraries in Windows 11.
This dialog box shows the names of all the folders added to the selected library. To remove a folder added to the library, click its name in this list and then click the “Remove” button below the list. To add folders to this library, click the “Add…” button below the list to open an “Include Folder” dialog box that lets you navigate to the folder to include. Click the folder to select it in this dialog box and then click the “Include folder” button.
Within each library, one folder is marked “Public save location” and one is marked “Default save location.” They may even be the same folder. The folder marked as the default save location is where your computer will default to saving items of that library type when logged in using your current account. The folder marked as the public save location is where items of that library type will default to being saved when someone is logged in using a “Guest” account.
To set which folder is the default save and which is the public save in this dialog box, right-click the folder to set as a default save location for either choice. Then select either the “Set as default save location” or “Set as public save location” command in the pop-up menu that appears. You can repeat the process to set a single folder as the default for both if it is the default for neither. Note these commands won’t appear if you right-click a folder already set as a default, as you must set a default folder for both settings.
When finished managing your library, click the “OK” button at the bottom of the “Library name Properties” dialog box to apply your changes.
Instructions on How to Show Libraries in Windows 11:
- To view your libraries in File Explorer in Windows 11, click the “See more” button in the Ribbon at the top of the File Explorer window, which looks like an ellipsis mark.
- Select the “Options” command in the button’s drop-down menu to open the “Folder Options” dialog box.
- Click the “View” tab in the “Folder Options” dialog box.
- Then scroll to the bottom of the options in the “Advanced settings” section at the bottom of the tab.
- Then check the “Show libraries” checkbox under the “Navigation pane” settings.
- Then click the “OK” button at the bottom of the “Folder Options” dialog box to then show the libraries in the Navigation pane of the File Explorer window.
- To hide the libraries in the future, if desired, repeat the same process but uncheck the “Show libraries” checkbox, instead.
- After showing the libraries in the Navigation Pane of the File Explorer window, you can click the “Libraries” folder in the Navigation Pane to view your libraries in the right pane of the File Explorer window. These libraries contain references to different folders you commonly use to save files of that type on your computer. That way, you can simply open the associated library folder to view all the subfolders and files within all the folders associated with that library.
Instructions on How to Add Folders to Libraries in Windows 11:
- To add a folder to a library in Windows 11, navigate to the folder to add to the library using File Explorer until it appears in the right pane.
- Then right-click the folder to add to the library.
- Then select the “Show more options” command in the small pop-up contextual menu to show another pop-up contextual menu that shows all the available commands.
- Roll over the “Include in library” command in the full pop-up contextual menu.
- Then click the name of the library to which to add the selected folder in the side menu that appears.
Instructions on How to Manage Libraries in Windows 11:
- To manage libraries in Windows 11, display the libraries in your computer in the right pane of the File Explorer window.
- Then click the library to manage in the right pane of the File Explorer window to select it.
- Then click the “See more” button in the Ribbon at the top of the File Explorer window and select the “Properties” command from its drop-down to open the “Library name Properties” dialog box, where “Library name” is the name of the selected library.
- This dialog box shows the names of all the folders added to the selected library.
- To remove a folder added to the library, click its name in this list and then click the “Remove” button below the list.
- To add folders to this library, click the “Add…” button below the list to open an “Include Folder” dialog box that lets you navigate to the folder to include.
- Click the folder to select it in this dialog box and then click the “Include folder” button.
- To set which folder is the default save and which is the public save in this dialog box, right-click the folder to set as a default save location for either choice and then select either the “Set as default save location” or “Set as public save location” command in the pop-up menu that appears.
- You can repeat the process to set a single folder as the default for both if it is the default for neither.
- Note these commands won’t appear if you right-click a folder already set as a default, as you must have a default folder set for both settings.
- To apply your changes when finished, click the “OK” button at the bottom of the “Library name Properties” dialog box.