Lock Screen Settings in Windows 11- Instructions
Lock Screen Settings in Windows 11: Video Lesson
This video lesson, titled “Lock Screen Settings in Windows 11,” shows how to change the lock screen settings in Windows 11. This video lesson is from our complete Windows 11 tutorial, titled “Mastering Windows Made Easy v.11.”
Overview of the Lock Screen Settings in Windows 11:
To view the lock screen settings in Windows 11, open the “Settings” app window and then click the “Personalization” button at the left side of the screen to show the personalization settings for your computer to the right. Then click the “Lock screen” button to the right to show the “Lock screen” settings at the right side of the “Settings” app window.
To select which content to show on the lock screen in Windows 11, select a choice from the “Personalize your lock screen” setting’s drop-down. If you select the “Picture” choice, then you can either select a recent picture shown in the “Recent images” setting section or click the “Browse photos” button in the “Choose a photo” section to launch an “Open” dialog box that lets you select a local picture from your computer to use. To show tips on your lock screen, check the Get fun facts, tips, tricks, and more on your lock screen” checkbox. To hide tips on the lock screen, uncheck this checkbox.
Alternatively, if you select the “Slideshow” choice, then click the “Browse” button in the “Add an album for your slideshow” setting to open a “Select folder” button that lets you select the folder that contains the pictures to use for the slideshow and then click the “Choose this folder” button to apply the change. The list of selected folders for the slideshow appears below this setting. To remove a folder you have added, click the “Remove” button to the right of the folder. Like pictures, to show tips on your lock screen, check the Get fun facts, tips, tricks, and more on your lock screen” checkbox. To hide tips on the lock screen, uncheck this checkbox.
To set advanced slideshow settings if you select the “Slideshow” choice, click the “Advanced slideshow settings” button to expand and collapse it, as needed. To include camera roll folders from this PC and OneDrive, check the “Include camera roll folders from this PC and OneDrive” checkbox. To only use pictures that fit your screen, check the “Only use pictures that fit my screen” checkbox.
To play the slideshow on battery power, check the “Play a slideshow when using battery power” checkbox. To show the lock screen instead of turning off the screen when your PC is inactive, check the “When my PC is inactive, show the lock screen instead of turning off the screen” checkbox. To turn the screen off after playing the slideshow for a time period, select the desired choice from the “Turn off the screen after the slideshow has played for” drop-down.
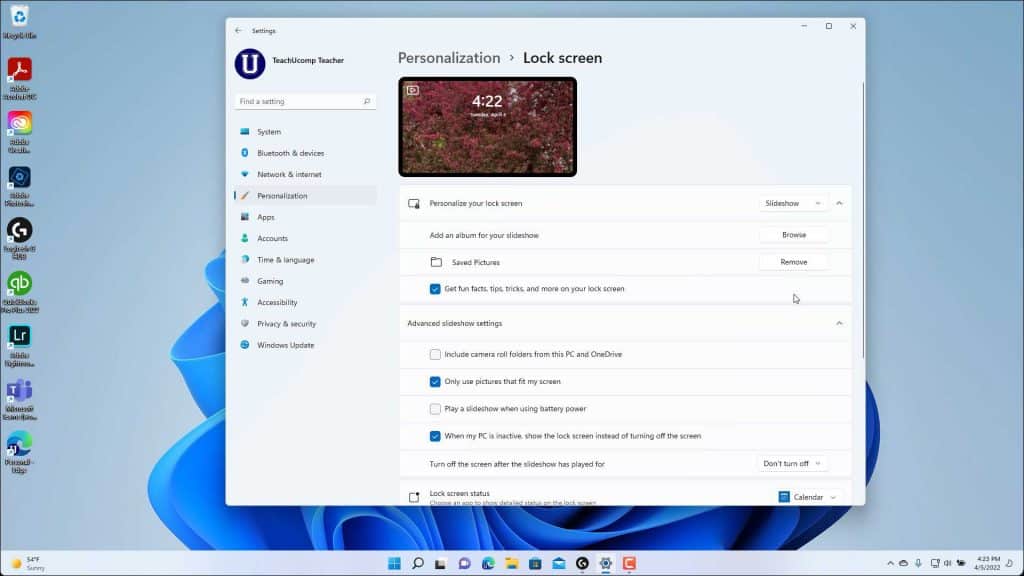
A picture of the Lock Screen settings in Windows 11.
For all lock screen content choices, to show details from a selected app on the lock screen in Windows 11, select the name of the desired app from the “Lock screen status” setting’s drop-down. To show or hide the lock screen picture on the sign-in screen, click the “Show the lock screen background picture on the sign-in screen” setting’s toggle switch to set it to either the “On” or “Off” position, as desired.
If you click the “Screen timeout” setting button under the “Related settings” section, you will see the “Power & battery” settings in the “System” settings, as previously discussed. To return to the “Lock screen” settings, click the “Back” button in the upper-left corner of the “Settings” app window.
How to Change the Screen Saver in Windows 11:
To change your screen saver in Windows 11, click the “Screen saver” settings button under the “Related settings” section to open the “Screen Saver Settings” dialog box. To set a screen saver, select a choice from the “Screen saver” drop-down. To change the selected screen saver’s settings, if available for your selected screen saver, click the adjacent “Settings…” button, make any changes in the dialog box that appears, and then click the “Save” or “OK” button. To preview the screen saver, click the “Preview” button to show it onscreen. To stop the preview, move your mouse pointer onscreen.
To choose how long to wait before the screen saver appears, enter the number of minutes into the “Wait” spinner box. To show the sign-in screen after resuming from the screen saver, check the “On resume, display logon screen” checkbox. To apply your screen saver settings, click the “OK” button in the “Screen Saver Settings” dialog box. Alternatively, to cancel your changes, click the “Cancel” button. To close the “Settings” app window, when finished, click the “X” button in its upper-right corner.
Instructions on How to Change the Lock Screen Settings in Windows 11:
- To view the lock screen settings in Windows 11, open the “Settings” app window and then click the “Personalization” button at the left side of the screen to show the personalization settings for your computer to the right.
- Then click the “Lock screen” button to the right to show the “Lock screen” settings at the right side of the “Settings” app window.
- To select which content to show on the lock screen in Windows 11, select a choice from the “Personalize your lock screen” setting’s drop-down.
- If you select the “Picture” choice, then you can either select a recent picture shown in the “Recent images” setting section or click the “Browse photos” button in the “Choose a photo” section to launch an “Open” dialog box that lets you select a local picture from your computer to use.
- To show tips on your lock screen, check the Get fun facts, tips, tricks, and more on your lock screen” checkbox.
- To hide tips on the lock screen, uncheck this checkbox.
- Alternatively, if you select the “Slideshow” choice, then click the “Browse” button in the “Add an album for your slideshow” setting to open a “Select folder” button that lets you select the folder that contains the pictures to use for the slideshow and then click the “Choose this folder” button to apply the change.
- The list of selected folders for the slideshow appears below this setting.
- To remove a folder you have added, click the “Remove” button to the right of the folder.
- Like pictures, to show tips on your lock screen, check the Get fun facts, tips, tricks, and more on your lock screen” checkbox.
- To hide tips on the lock screen, uncheck this checkbox.
- To set advanced slideshow settings if you select the “Slideshow” choice, click the “Advanced slideshow settings” button to expand and collapse it, as needed.
- To include camera roll folders from this PC and OneDrive, check the “Include camera roll folders from this PC and OneDrive” checkbox.
- To only use pictures that fit your screen, check the “Only use pictures that fit my screen” checkbox.
- To play the slideshow on battery power, check the “Play a slideshow when using battery power” checkbox.
- To show the lock screen instead of turning off the screen when your PC is inactive, check the “When my PC is inactive, show the lock screen instead of turning off the screen” checkbox.
- To turn the screen off after playing the slideshow for a time period, select the desired choice from the “Turn off the screen after the slideshow has played for” drop-down.
- For all lock screen content choices, to show details from a selected app on the lock screen in Windows 11, select the name of the desired app from the “Lock screen status” setting’s drop-down.
- To show or hide the lock screen picture on the sign-in screen, click the “Show the lock screen background picture on the sign-in screen” setting’s toggle switch to set it to either the “On” or “Off” position, as desired.
- If you click the “Screen timeout” setting button under the “Related settings” section, you will see the “Power & battery” settings in the “System” settings, as previously discussed.
- To return to the “Lock screen” settings, click the “Back” button in the upper-left corner of the “Settings” app window.
- To change your screen saver in Windows 11, click the “Screen saver” settings button under the “Related settings” section to open the “Screen Saver Settings” dialog box.
- To set a screen saver, select a choice from the “Screen saver” drop-down.
- To change the selected screen saver’s settings, if available for your selected screen saver, click the adjacent “Settings…” button, make any changes in the dialog box that appears, and then click the “Save” or “OK” button.
- To preview the screen saver, click the “Preview” button to show it onscreen.
- To stop the preview, move your mouse pointer onscreen.
- To choose how long to wait before the screen saver appears, enter the number of minutes into the “Wait” spinner box.
- To show the sign-in screen after resuming from the screen saver, check the “On resume, display logon screen” checkbox.
- To apply your screen saver settings, click the “OK” button in the “Screen Saver Settings” dialog box.
- Alternatively, to cancel your changes, click the “Cancel” button.
- To close the “Settings” app window, when finished, click the “X” button in its upper-right corner.