Managing Teams and Members in Teams
Managing Teams and Members in Teams: Video Lesson
This video lesson, titled “Managing Teams and Members,” shows you ways of managing teams and members in Teams. This video lesson is from our complete Teams tutorial, titled “Mastering Teams Made Easy.”
Managing Teams and Members in Teams: Overview
Managing teams and members in Teams is a straightforward process. Each member in Microsoft Teams is assigned one of three roles. Each role has a specific set of permissions that controls their activity in Teams. The roles are Owners, Members, and Guests. You can assign multiple people to each of the three roles. Certain settings for members and guests, such as file permissions, are set by the Microsoft 365 Administrator.
Team owners have the most control. Owners manage the settings for the team, including adding and removing team members and guests, setting the team permissions, and deleting and archiving teams. Members are the people in your organization that are part of a team. Members can communicate with one another, add apps, share chat files, discover and join public teams, and view the organizational chart. Guests are people from outside your organization that have been invited by a team Owner. Guests have limited capabilities, but they can participate in channel conversations, private chats, and delete or edit their posted messages.
To add a member, click the “Teams” button in the app bar and click the “More options” ellipsis to the right of the team name. Select “Add member” from the menu. In the “Add members” dialog box, type the member’s name and then select it from the resulting list. To invite a guest from outside your organization, type their email address, instead. Click the “Add” button. Repeat as desired and click the “Close” button when done.
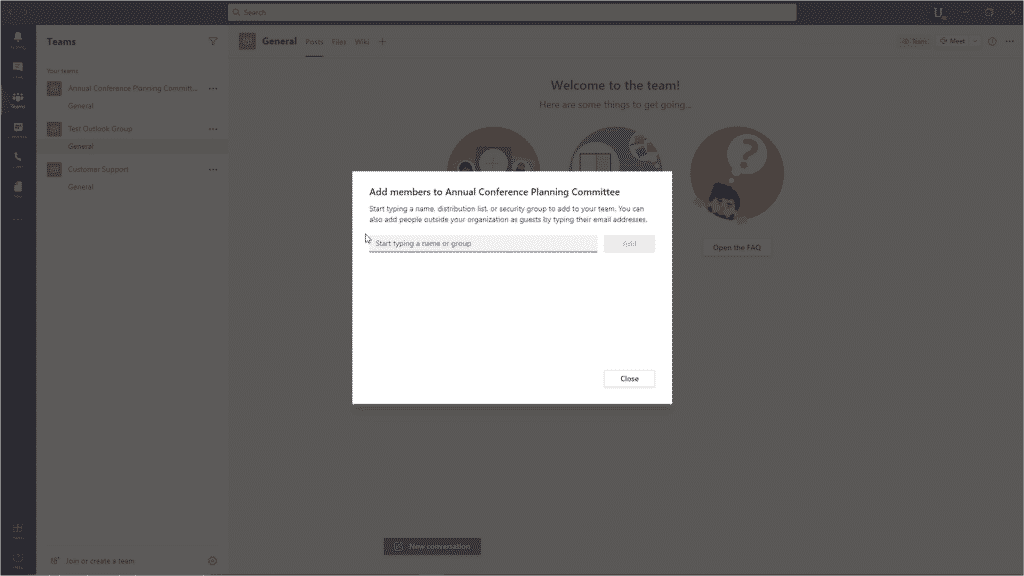
Managing Teams and Members in Teams – Instructions: A picture of the “Add members” dialog box in Microsoft Teams.
To delete a member, click the “More options” ellipsis to the right of the team name and select “Manage team” from the menu. To expand or collapse the “Owners” or “Members and guests” lists, click their names in the content window. Click the “Remove” button (an “X”) at the far-right end of the member or guest’s name.
To change a team member’s role, click the “More options” ellipsis to the right of the team name and select “Manage team” from the menu. Select the “Role” drop-down at the right end of the name and select the new role.
To change the team’s settings, such as the team picture, member and guest permissions, and controlling @Mentions, click the “More options” ellipsis to the right of the team name and select “Manage team” from the menu. Click the “Settings” tab at the top of the team. Select the setting name to display its options.
To change the team’s picture, click the “Team picture” setting, then click the “Change picture” link and then the “Upload picture” link, navigate to the photo, select it, and click the “Open” button. Click the “Save” button. To change the other settings, use the available checkboxes and drop-down menus. Changes you make are automatically saved.
To leave a team, click the “More options” ellipsis to the right of the team name, select “Leave the team” from the menu, and then click the “Leave the team” button to confirm that you no longer wish to be part of that team.
Managing Teams and Members in Teams: Instructions
- To add a team member, click the “Teams” button in the app bar and click the “More options” ellipsis to the right of the team name.
- Select “Add member” from the menu.
- In the “Add members” dialog box, type the member’s name and then select it from the resulting list.
- Alternatively, to invite a guest from outside your organization, type their email address, instead.
- Click the “Add” button.
- Repeat as desired, and then click the “Close” button when done.
- To delete a member, click the “More options” ellipsis to the right of the team name and select “Manage team” from the menu.
- To expand or collapse the “Owners” or “Members and guests” lists, click their names in the content window.
- Click the “Remove” button (an “X”) at the far-right end of the member or guest’s name.
- To change a team member’s role, click the “More options” ellipsis to the right of the team name and select “Manage team” from the menu.
- Select the “Role” drop-down at the right end of the name and select the new role.
- To change the team’s settings, click the “More options” ellipsis to the right of the team name and select “Manage team” from the menu.
- Click the “Settings” tab at the top of the team.
- Then select the setting name to display its options.
- To change the team’s picture, click the “Team picture” setting, then click the “Change picture” link and then the “Upload picture” link, navigate to the photo, select it, and click the “Open” button.
- Click the “Save” button.
- To change the other team settings, use the available checkboxes and drop-down menus. Changes you make are automatically saved.
- To leave a team, click the “More options” ellipsis to the right of the team name, select “Leave the team” from the menu, and then click the “Leave the team” button to confirm.