Mark Messages as Read or Unread in the Outlook Web App- Tutorial
Mark Messages as Read or Unread in the Outlook Web App: Video Lesson
This video lesson, titled “Marking Messages as Read or Unread,” shows you how to mark messages as read or unread in the Outlook Web App. This video lesson is from our complete Outlook Web App training for Office 365, titled “Mastering Outlook on the Web Made Easy v.2016.”
Mark Messages as Read or Unread in the Outlook Web App: Overview
When you open an email to read, it will be automatically marked as “Read” when you change to a new message or select another item, by default. You can adjust the “Mark as read” settings by clicking the Settings icon and choosing “Options.” Under “Mail | Automatic processing,” choose “Mark as read” and choose one of the three options.
The first option is “Mark displayed items as read.” If you choose this item, you will set the “Number of seconds to wait before marking items as read” by entering a numerical value in the provided field. The default is “5.” The default option, “Mark items as read when the selection changes,” will be selected when you open this setting menu. The last item is “Don’t automatically mark items as read.” This will leave all items left as “Unread” until you manually change them. Click “Save” when you have made your selection to save your changes. Click “Options” to return to the Mail App.
There are two ways to mark messages as read or unread in the Outlook Web App. When you have the message open in the reading pane, there will be a “Mark as unread” link on the top right side of the pane if the message has been read. If you haven’t switched out of the view, or you have your system set to leave all items as unread, “Mark as read” will be displayed. Click “Mark as read” to mark the email message as read. Click “Mark as unread” if you want to reset the message as unread.
The second way to mark messages as read or unread in the Outlook Web App is to right-click the item and choose “Mark as read” or “Mark as unread” from the list.
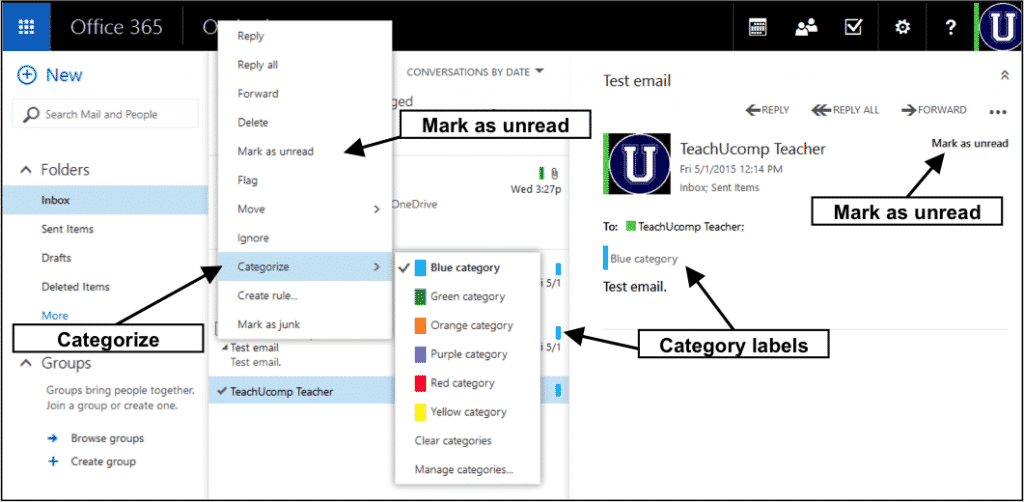
Mark Messages as Read or Unread in the Outlook Web App- Tutorial: A picture of the Inbox within Outlook Web App. The “Mark as unread” commands for a selected message are shown.
Mark Messages as Read or Unread in the Outlook Web App: Instructions
- By default, all mail messages are marked as “Read” when you change to a new message or select another item.
- To change the settings for “Mark as read,” click the Settings icon and choose Options.
- Under “Mail | Automatic processing,” click “Mark as read.”
- The default option, “Mark items as read when the selection changes,” will be selected when you visit the page.
- To set a specific number of seconds to mark an item as read, choose “Mark displayed items as read” and enter a numerical value for the number of seconds to wait in the “Number of seconds to wait before marking items as read” text field.
- To set the Outlook Web App to NOT automatically mark items as read, choose “Don’t automatically mark items as read.”
- Click “Save” to save your changes.
- Click “Options” to be returned to the Mail App.
- To mark items as read in the Reading pane, click “Mark as read” on the top, right side of the message.
- To mark items as unread in the Reading pane, click “Mark as unread” on the top, right side of the message. This will only display on messages that have been read.
- To mark items as read in the Inbox pane, right-click the item and click “Mark as read.”
- To mark items as unread in the Inbox pane, right-click the item and click “Mark as unread.”
