Video Lesson on How to Apply Masks in Camera Raw in Photoshop:
This video lesson, titled “Learn How to Use Masking in Camera Raw in Adobe Photoshop: A Training Tutorial,” shows how to apply masking in Camera Raw in Photoshop. This video lesson is from our complete Photoshop tutorial, titled “Mastering Photoshop Made Easy.”
Overview of Masking in Camera Raw in Photoshop:
The Masking tool in the “Camera Raw” dialog box lets you apply masks and associated adjustments to local selections in camera raw photos. A mask is a grayscale layer applied to a photo. The intensity of its applied adjustment effect is shown by the grayscale level of the mask’s pixels. White pixels in the mask fully show the adjustment and black pixels fully hide the adjustment. Gray pixels in the mask show or hide the adjustment using semi-transparency, based on the gray color used. Unlike adjustments applied to standard pixel selections, masking allows for more subtle adjustment application due to the grayscale level of the pixels in the mask.
How to Apply a Mask in Camera Raw:
To apply a mask and adjustment to a camera raw photo in Photoshop, click the “Masking” button in the toolbar at the right side of the “Camera Raw” dialog box to show the Masking panel to its left. There are a variety of pixel selection tools in the Masking panel which you can use to create a new mask and select the pixels to which to apply the desired adjustment effect.
How to Create a Mask Using an AI Selection:
To create a new mask, click to select the tool to use to create the mask. To create a new mask using AI to select the photo’s subject, sky, or background, click the “Select Subject,” “Select Sky,” or “Select Background” button in the Masking panel. Alternatively, to instead select people using AI, click any recognized people or person in the “People” section and then check the checkboxes that appear to select either the entire person or only elements of the selected person to mask. To instead select an object using AI, click the “Objects” choice and then click and drag over the object to select in the photo.
How to Create a Mask Using a Brush:
Alternatively, to create a mask using a brush, click the “Brush” button. To set the brush attributes, use the “Size,” “Feather,” “Flow,” and “Density” sliders to set the size, feathering, flow, and density of the brushstroke to use to apply the mask. To toggle brush edge sensitivity on or off, check or uncheck the “Auto Mask” checkbox. Then click and drag in the photo where you want to apply the mask. The mask is shown in the preview image by the current mask overlay, which we’ll examine momentarily.
How to Create a Mask Using a Linear Gradient:
Alternatively, to create a mask using a linear gradient, click the “Linear Gradient” button. Then click and drag in the image from where you want the mask gradient to start being applied to where you want it to stop. The gradient mask transition occurs over the area at which you click and drag. To move the gradient after drawing it, click and drag the center blue square and release it in the desired location.
To extend the gradient at either end, hover your mouse pointer over the line at either end and then click and drag once the pointer turns into a double-pointed arrow. If needed, to rotate the gradient, hover over the middle of the three lines until your pointer becomes a curved double-pointed arrow, and then click and drag to rotate it.
How to Create a Mask Using a Radial Gradient:
Alternatively, to create a mask using a radial gradient, click the “Radial Gradient” button. Then click and drag in the image from the center of where you want to apply the radial mask gradient, outward to the edge of the circle where you want it to stop. The gradient mask transition occurs over the area at which you click and drag, radiating outward in a circle from the center point at which you initially clicked.
To move the radial gradient after drawing it, click and drag in the center of the gradient and release it in the desired location. To resize the radial gradient, hover your pointer over the resizing handle at the circle’s border which corresponds to the direction in which to resize it until the pointer turns into a double-pointed arrow icon. Then click and drag in either direction shown on the arrow to resize it in that direction.
To rotate the radial gradient, hover over the handle at the end of the stick that juts out from the border until your pointer becomes a curved double-pointed arrow, and then click and drag to rotate it.
How to Create a Mask from a Color Range:
Alternatively, to create a mask from a color range, click the “Range” button. Then select the “Color Range” choice. Then click to select a color to sample in the photo. For greater accuracy, click and drag on the color.
Alternatively, to add multiple samples, hold down the “Shift” key on your keyboard and then click to select up to 5 color samples. Each sample appears with a color wheel or eyedropper icon. To remove a sample, hold down the “Alt” key (“Option” for Macs) and then click the sample icon for the color to remove. After selecting the color(s), pixels of the selected color(s) are then selected in the mask as the pixels to which to apply the mask effect. To refine the range of color(s) selected, click and drag the “Refine” slider in the Masking panel.
How to Create a Mask from a Luminance Range Selection:
Alternatively, to create a mask from a luminance range selection, click the “Range” button. Then select the “Luminance Range” choice. Then click the luminance to sample in the photo to select it. To sample a range of luminance values, click and drag, instead. The selected luminance range appears in the “Select Luminance” bar in the Masking panel as a selected section within the bar.
For precise control of the selected luminance, click and drag the selected section and/or the other icons in the Select Luminance bar, as needed. To show the selected luminance pixels in a luminance map, check the “Show Luminance Map” checkbox. To show the luminance map while adjusting the Luminance Bar, if needed, hold down the “Alt” key (“Option” for Macs) while clicking and dragging in the Luminance Bar.
How to Create a Mask from a Depth Range Selection:
Alternatively, to create a mask from a depth range selection if using a camera raw photo that contains depth information, click the “Range” button. Then select the “Depth Range” choice. To sample a range of depth values, click and drag in the photo. Alternatively, click and drag in the “Select Depth” slider within the Masking panel. To show the selected depth pixels in a depth map, check the “Show Depth Map” checkbox.
How to Select Masks in the Masking Panel:
After creating your first mask using any of these tools, it then appears with a default name of “Mask 1” in the Masking panel. The tool used to create the mask selection appears indented below the mask in the Masking panel. To create another new mask, if needed, click the “Create New Mask” button at the top of the Masking panel, select the tool to use to create the mask from the drop-down menu that appears, and then create the mask using the selected tool, as previously shown. To select a mask to edit if you have multiple masks in a camera raw image, click the mask to edit in the Masking panel.
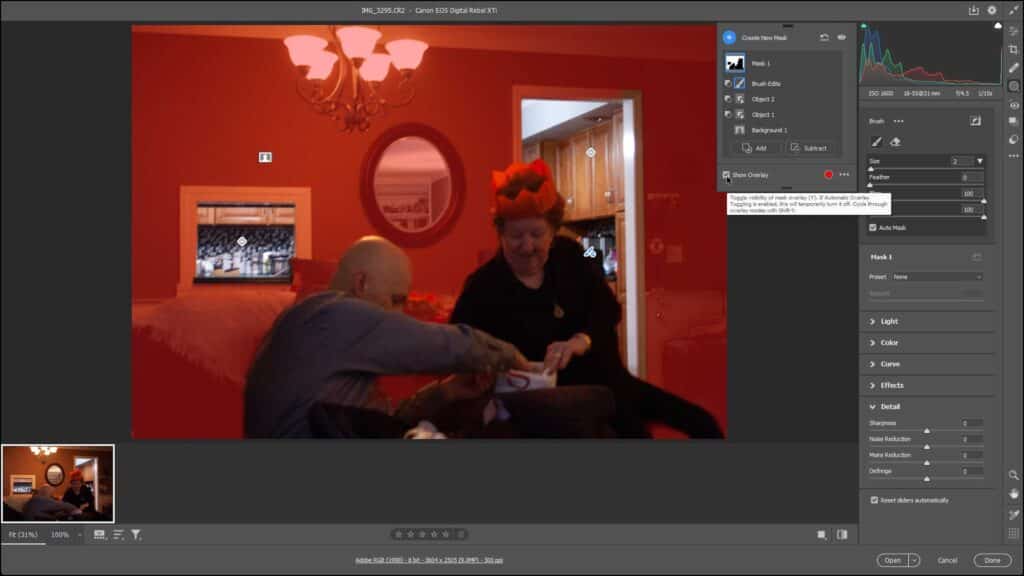
A picture showing an edited luminance range mask in the Masking Panel in Camera Raw in Photoshop that adjusts different white light color temperatures in a photo.
How to Add to or Subtract from a Mask:
To add or subtract from a selected mask in the Masking panel, click the “Add” or “Subtract” button below the selected mask, select a tool to edit the selected mask from the drop-down menu that appears, and then edit the mask using the selected tool, as previously shown. “Add” layers add pixels that show the mask’s adjustment effects and “Subtract” layers remove pixels to hide the mask’s adjustment effects.
The new editing mask selection appears as another layer in the mask’s group in the Masking panel. “Subtract” layers show a small icon to the left of the layer’s icon. To convert an “Add” layer to a “Subtract” layer or vice versa, hover over the layer mask to change, click the 3-dot icon at its right end, and then select either the “Convert to Add” or “Convert to Subtract” command from the pop-up menu that appears.
How to Edit Masks in the Masking Panel in Camera Raw:
To edit a selected mask list item in the Masking panel, hover over it in the Masking panel and then click the 3-dot button that appears at its right end. Then select the desired command to execute from the pop-up menu. To rename it, click the “Rename…” command, type a new name in the “Rename Mask List Item” dialog box that appears, and then click “OK.”
To intersect the current mask with another mask selection you create, which makes the mask effect only appear where the two selections overlap, roll over the “Intersect Mask With” choice in the pop-up menu, select the tool to edit the mask from the drop-down that appears, and then create the editing mask selection using the tool, as previously shown.
If desired, to invert a selected mask list item, which changes selected pixels to non-selected pixels and vice versa, click the “Invert” command in the pop-up menu to toggle inversion on or off. To duplicate, hide, or delete a selected mask list item, select the “Duplicate,” “Hide,” or “Delete” command in the pop-up menu, as needed. To change the order of the mask selection list items in the mask group, select the “Move Up” or “Move Down” command in the pop-up menu, as desired.
If you want to show or hide masks overlays in the preview image, check or uncheck the “Show Overlay” checkbox in the Masking panel. When shown, to change the look of the masking overlay in the preview, click the “More overlay settings” button at the right end of the “Show Overlay” checkbox to show a drop-down menu of display choices. Then select the desired mask overlay choices from the drop-down menu.
How to Set the Adjustments for a Selected Mask in the Masking Panel:
To set the adjustments for a selected mask in the Masking panel, click to expand the desired adjustment tab in the Masking adjustments panel, as needed. To adjust the intensity of a preset mask effect if you applied an adaptive masking preset adjustment from the Presets panel or selected a manually saved custom masking adjustment preset from the “Preset” drop-down at the top of the Masking adjustments panel, use the “Amount” slider at the top of the panel to adjust the intensity of the preset.
For adjustments using process versions higher than “Version 2” on the “Calibration” tab in the Edit panel, the adjustment tabs are “Light,” “Color,” “Curve,” “Effects,” and “Detail.” Older process versions have fewer adjustments available. Then click and drag the sliders in the desired tab or enter values into their adjacent fields to set the desired adjustment effect for the selected mask. Most of these adjustment effects duplicate the camera raw adjustment effects already covered in previous lessons about the tabs in the Edit panel, so we will not review them all again, for brevity’s sake.
However, if needed, to set the “Color” setting on the “Color” tab, click the box at the setting’s right end to open the “Color Picker” dialog box, select a color, and then click “OK” to apply it. Another new slider that appears is the “Moire Reduction” slider (pronounced mȯ-ˈrā) on the “Detail” tab. You can use the “Moire Reduction” slider to try and remove moiré patterns from photos that sometimes appear when photographing things like fabrics. To reset an adjustment slider, hold down the “Alt” key (“Option” on Macs) and then click the “Reset” link that appears where the slider name previously appeared.
How to Reset Masking Adjustments in the Masking Panel in Camera Raw:
To reset all adjustments for the currently selected mask in the Masking panel, click the “Reset (mask name) Adjustments” button in the upper-right corner of the Adjustments panel, where (mask name) is the name of the selected mask. Alternatively, hover over the mask in the Masking panel and then click the 3-dot button that appears at its right end. Then select the “Reset (mask name) Adjustments” command in the pop-up menu, where (mask name) is the name of the selected mask.
Also note that to rename, delete, duplicate, intersect, invert, or invert and duplicate a mask, you can select the desired command from this same pop-up menu, just as when editing its mask layers. To reset all masks in a camera raw image in Photoshop, which removes them, click the “Reset all masks” button towards the upper-right corner of the Masking panel.