TeachUcomp, Inc.

P: 877-925-8080

  • HOME
  • COURSES
    • Course List
    • For Lawyers
    • My Courses
    • Online Learning
      • Member Login
      • Online Learning FAQ
      • Subscribe
    • Training Options
  • FOR BUSINESS
    • Business Licensing
    • Request a Quote
  • MANUALS
  • REFERENCE CARDS
    • Adobe
      • Acrobat DC
      • Lightroom Classic CC 2018
      • Photoshop 2020
      • Photoshop CC 2018
      • Photoshop Elements 2021
      • Photoshop Elements 2020
      • Photoshop Elements 2019
      • Photoshop Elements 2018
      • Photoshop Elements 15
    • Google
      • Google Classroom for Teachers
    • Microsoft Office
      • Microsoft Office 365
        • Excel for Office 365
        • Microsoft Office 365
        • OneNote for Windows 10
        • Outlook for Office 365
        • PowerPoint for Office 365
        • Word for Office 365
      • Microsoft Office 2019
        • Access 2019
        • Excel 2019
        • Microsoft Office 2019
        • Outlook 2019
        • PowerPoint 2019
        • Publisher 2019
        • Word 2019
      • Microsoft Office 2016
        • Access 2016
        • Excel 2016
        • Microsoft Office 2016
        • OneNote 2016
        • Outlook 2016
        • PowerPoint 2016
        • Publisher 2016
        • Word 2016
      • Microsoft Office 2013
        • Excel 2013
        • Microsoft Office 2013
        • OneNote 2013
        • Outlook 2013
        • PowerPoint 2013
        • Word 2013
      • Microsoft Office for iPad
        • Microsoft Office for iPad
    • Microsoft Teams
      • Microsoft Teams
    • QuickBooks Pro
      • QuickBooks Pro 2021
      • QuickBooks Pro 2020
      • QuickBooks Pro 2019
      • QuickBooks Pro 2018
      • QuickBooks Pro 2017
      • QuickBooks Pro 2016
      • QuickBooks Pro 2015
      • QuickBooks Pro 2014
    • Sage
      • Sage 50 2019
      • Sage 50 2018
    • Windows
      • Windows 10
  • SUPPORT
    • Company
      • About Us
      • Blog
      • Contact Us
      • Our History
      • Our Philosophy
        • Customer Service
        • Mission
      • Policies
      • Testimonials
    • Contact Us
    • FAQ
    • Help
    • Lost Password
    • Register a Product
  • MEMBER LOGIN
    • Manage My Account
    • Member Login
    • My Courses
  • MY CART
Shop Now

Microsoft Office Collaboration Using Word Online and OneDrive

by Joseph Brownell / Wednesday, June 25 2014 / Published in Latest, Microsoft, Microsoft Office Online, OneDrive, Word Online
A picture of the


As mentioned in our previous blog post, you can perform Microsoft Office collaboration using Microsoft Office Online. In this blog post, we will examine how to perform collaboration with other users by using Word Online and OneDrive, formerly called SkyDrive. OneDrive is the free online, shared server storage space within which you can save documents and collaborate with others. It is automatically included as part of your free Microsoft account.

After you sign in to the free online version of Microsoft Word Online, you can create a new document. You can create a new blank document or start by using one of the many online templates available. Documents created in Microsoft Word Online are automatically saved to OneDrive.

To share the document that you have made with other users, click the “File” tab in the Ribbon and then click the “Share” button at the left side of the backstage view that appears. Then click the “Share with People” button shown in the area to the right.

A picture of the “Share” screen within the “File” tab in the Ribbon in Microsoft Word Online.

A picture of the "Share" screen within the "File" tab in Microsoft Word Online.


Doing that will display a window where you can then share and collaborate on the document with others. Ensure that the “Invite others” link is selected at the left side of this screen and then enter the email addresses of the people with whom you want to share the document into the “To” field. You can type a brief message to the recipients into the field below the “To” field. To set editing for the Word document, click the “Recipients can edit” hyperlink underneath the message. Two drop-down menus will then replace the hyperlink. Use the top drop-down menu to select whether or not the recipients can edit the Word document. Use the bottom drop-down to select whether or not the recipients need to sign in with a Microsoft account to view or edit the document. When finished, click the “Share” button to send an email to the recipients inviting them to collaborate on the document with you. You will then see the names of the recipients in the left part of this window under the “Shared with” section. You can click the “Close” button to return to the Word document.

A picture of the “Invite People” screen within Microsoft Word Online.

A picture of the "Invite People" screen within Microsoft Word Online.


Another way to share and collaborate on a document in Word Online is to share a link. To do this, click the “File” tab in the Ribbon and then click the “Share” button at the left side of the backstage view that appears. Then click the “Share with People” button shown in the area to the right.

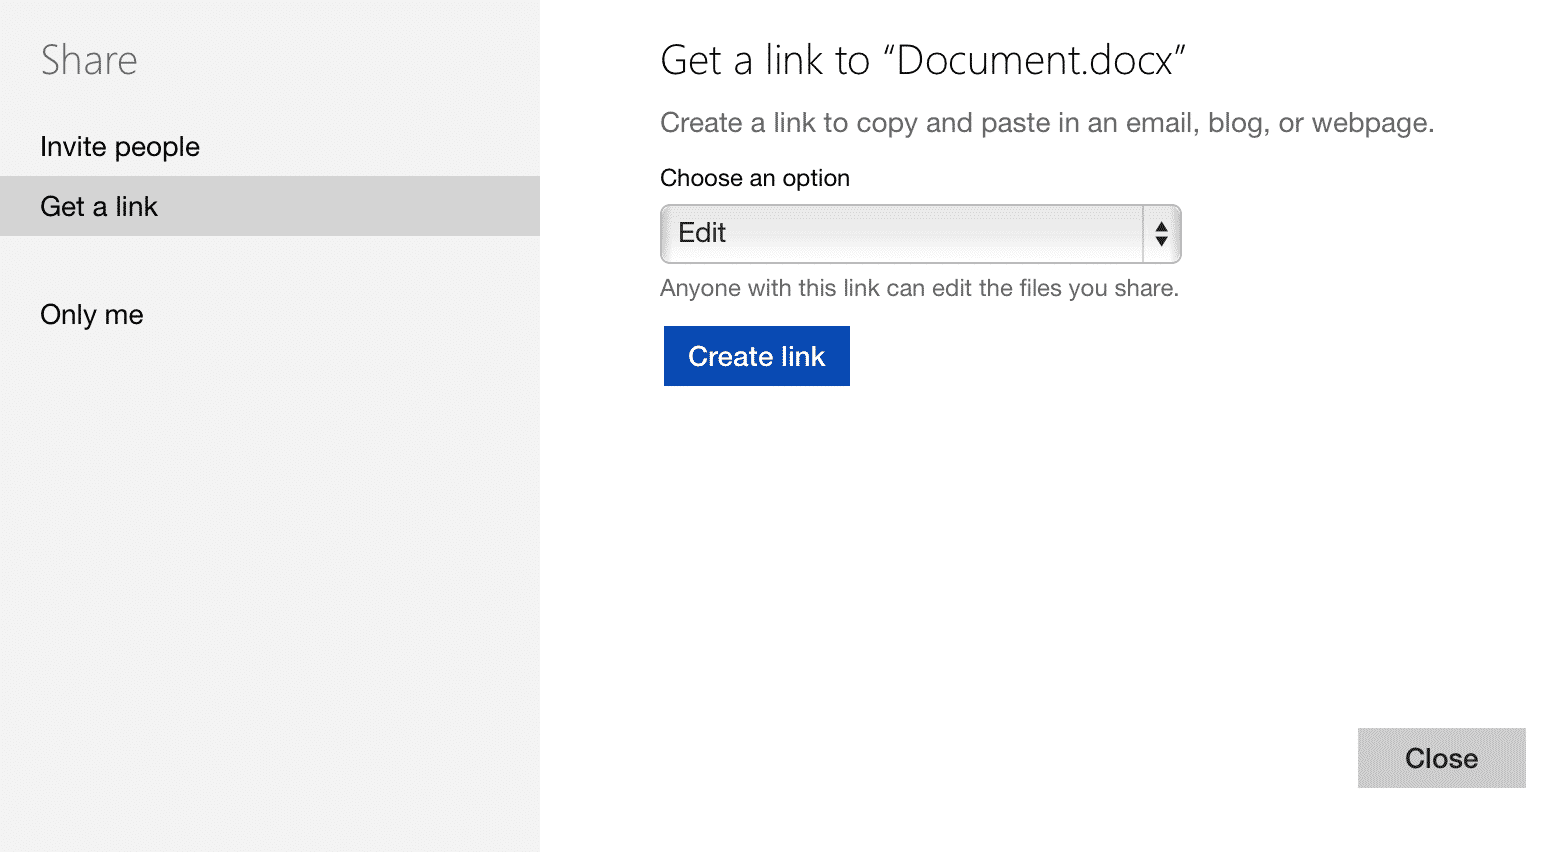
This time, however, you will click the “Get a link” button at the left side of the window that appears. You can use the drop-down in the area to the right to select “Edit” to create a link that allows anyone with the link to edit the document. The other choices in the drop-down menu are “View only,” to share a read-only link to the document, and “Public,” which makes the document publicly viewable and searchable. You will most commonly select “Edit” when collaborating with others. After making your selection, you can then click the “Create link” button to display a hyperlink in a field, which you can copy and send to anyone with whom you want to share an editable copy of the Word document. You can share the link via social media by clicking the desired social media sharing button below the link to share the link with people in Facebook, Twitter, LinkedIn or Weibo.

A picture of the “Get a link” screen within Microsoft Word Online.

A picture of the "Get a link" screen within Microsoft Word Online.

Tagged under: collaboration, email, Facebook, free, link, LinkedIn, Microsoft Office, Microsoft Office Online, Microsoft Word Online, OneDrive, online, online storage, sharing, twitter, Weibo, word

About Joseph Brownell

What you can read next

Setting Up Sales Tax in QuickBooks 2014
Custom Font Schemes in Publisher- Instructions: A picture of the “Create New Font Scheme” dialog box in Publisher.
Custom Font Schemes in Publisher- Instructions
Insert a Symbol in Word- Instructions and Video Lesson: A picture of a user adding a symbol to a document using the “Symbol” dialog box in Word.
Insert a Symbol in Word- Instructions and Video Lesson

Recent Posts

  • Buy Photoshop Elements 2021 Training: A picture of the Mastering Photoshop Elements Made Easy v.2021 digital download and/or DVD training interface.

    Buy Photoshop Elements 2021 Training

    New Photoshop Elements 2021 Training Now Availa...
  • Create Group Items in QuickBooks Desktop Pro - Instructions: A picture of a user adding items to a Group item in QuickBooks Desktop Pro.

    Create Group Items in QuickBooks Desktop Pro – Instructions

    Create Group Items in QuickBooks Desktop Pro: O...
  • @Mentions in Microsoft Teams: A picture showing someone selecting a suggested @mention in a post in Microsoft Teams.

    @Mentions in Microsoft Teams

    Overview You can send a co-worker or an entire ...

Categories

Archives

  • GET SOCIAL

© 2001-2021 Copyright TeachUcomp, Inc. All rights reserved.

TOP
Flash Sale! $49 All-Access 0 Days 11 Hours 31 Minutes 5 Seconds      $199 $49 Entire Library!
See Deal