Moving Elements in Photoshop Elements – Instructions
Create Moving Elements in Photoshop Elements: Video
This video lesson, titled “Learn How to Create Moving Elements in Adobe Photoshop Elements 2023: A Training Tutorial,” shows how to create moving elements in Photoshop Elements. This video lesson is from our complete Photoshop Elements tutorial, titled “Mastering Photoshop Elements Made Easy v.2023.”
Overview of How to Create Moving Elements in Photoshop Elements:
Moving elements in Photoshop Elements 2023 and later let you add animation to a selection in a photo. You can then export the animated photo as an MP4 or animated GIF. To create moving elements in Photoshop Elements, open the photo to which to add the moving element in the Photo Editor. Then select “Enhance| Moving Elements” from the Menu Bar to open the selected photo in the “Moving Elements” window.
You can use the “Zoom Tool” and the “Hand Tool” in the toolbar at the left side of the window to zoom and pan the preview image that appears, as needed. You can also zoom the image by using the “Zoom” slider towards the upper-right corner of the window. The selection and animation options appear in the pane at the right side of the window.
To select the elements of the photo to animate, click either the “Sky,” “Background,” or “Manual” button in the right pane. To make a custom selection if you click the “Manual” button or to refine the selection made if you click either the “Sky” or “Background” button, click to select the desired selection tool to use by clicking either the “Brush,” “Quick,” or “Auto” button.
Then choose either the “Add” or “Subtract” selection mode button, as needed. If needed, to set the size of your selection tool, use the “Size” slider. To show the selection as a mask, if desired, check the “Show Mask” checkbox. Then click and drag in the preview image to add or subtract from the selection, as needed.
After selecting the elements of the photo to animate, then click the button in the second section towards the bottom of the pane. Then click and drag in the area of the preview image to animate in the direction you want to move the selected pixels in that area of the photo. Then release the mouse button to add a directional arrow to the preview image. To change the speed of the selected arrow’s animation, if desired, use the “Speed” slider in the pane.
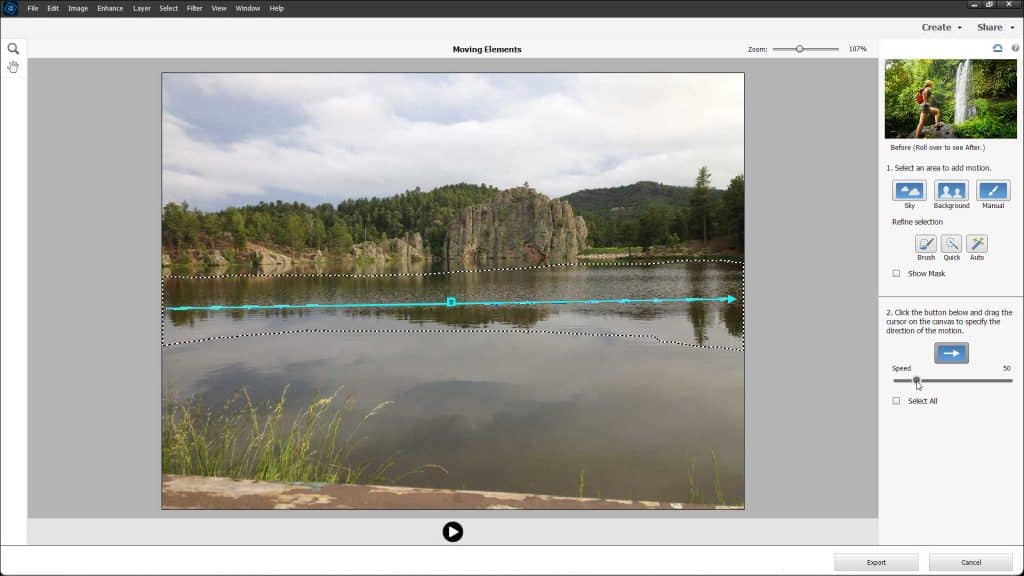
A picture that shows how to create moving elements in Photoshop Elements.
If desired, you can repeat this process to draw different arrows in different areas to make multiple areas move in different directions. To delete a directional arrow, if needed, click the button in the second section of the pane and then click to select the arrow to delete. Then click the small trash can icon that appears in the center of the arrow when it is selected. To select all directional arrows in the photo, if needed, check the “Select All” checkbox in the pane.
To preview the effect in the preview image, click the “Play” button below the preview image. If you want to pause the effect playback, click the “Pause” button that then replaces the “Play” button at the bottom of the window.
To cancel creating the moving elements photo, click the “Cancel” button in the lower-right corner of the window to cancel your changes and close the window. Alternatively, to export the results as an MP4 or animated GIF, click the “Export” button. Then, in the “Save As” dialog box that opens, choose the folder into which to save the animated file and type a name for it into the “File name” field. To select the file type, select either “MP4” or “GIF” from the “Save as type” drop-down. Optionally, to include it in the Elements Organizer, check the “Include in the Elements Organizer” checkbox. Then click the “Save” button to finish and export the animated file.
Instructions on How to Create Moving Elements in Photoshop Elements:
- To create moving elements in Photoshop Elements, open the photo to which to add the moving element in the Photo Editor.
- Then select “Enhance| Moving Elements” from the Menu Bar to open the selected photo in the “Moving Elements” window.
- If needed, to zoom and pan the preview image that appears, use the “Zoom Tool” and the “Hand Tool” in the toolbar at the left side of the window.
- Alternatively, to zoom the image, use the “Zoom” slider towards the upper-right corner of the window.
- The selection and animation options appear in the pane at the right side of the window.
- To select the elements of the photo to animate, click either the “Sky,” “Background,” or “Manual” button in the right pane.
- To make a custom selection if you choose the “Manual” button or to refine the selection made if you click either the “Sky” or “Background” button, click to select the desired selection tool to use by clicking either the “Brush,” “Quick,” or “Auto” button.
- Then choose either the “Add” or “Subtract” selection mode button, as needed.
- If needed, to set the size of your selection tool, use the “Size” slider.
- To show the selection as a mask, if desired, check the “Show Mask” checkbox.
- Then click and drag in the preview image to add or subtract from the selection, as needed.
- After selecting the elements of the photo to animate, then click the button in the second section towards the bottom of the pane.
- Then click and drag in the area of the preview image to animate in the direction you want to move the selected pixels in that area of the photo.
- Then release the mouse button to add a directional arrow to the preview image.
- To change the speed of the selected arrow’s animation, if desired, use the “Speed” slider in the pane.
- If desired, you can repeat this process to draw different arrows in different areas to make multiple areas move in different directions.
- To delete a directional arrow, if needed, click the button in the second section of the pane and then click to select the arrow to delete.
- Then click the small trash can icon that appears in the center of the arrow when it is selected.
- To select all directional arrows in the photo, if needed, check the “Select All” checkbox in the pane.
- To preview the effect in the preview image, click the “Play” button below the preview image.
- If you want to pause the effect playback, click the “Pause” button that then replaces the “Play” button at the bottom of the window.
- To cancel creating the moving elements photo, click the “Cancel” button in the lower-right corner of the window to cancel your changes and close the window.
- Alternatively, to export the results as an MP4 or animated GIF, click the “Export” button.
- Then, in the “Save As” dialog box that opens, choose the folder into which to save the animated file and type a name for it into the “File name” field.
- To select the file type, select either “MP4” or “GIF” from the “Save as type” drop-down.
- Optionally, to include it in the Elements Organizer, check the “Include in the Elements Organizer” checkbox.
- Then click the “Save” button to finish and export the animated file.

