Moving Overlays in Photoshop Elements – Instructions
How to Create Moving Overlays in Photoshop Elements: Video
This video lesson, titled “Moving Overlays,” shows how to create moving overlays in Photoshop Elements. This video lesson is from our complete Photoshop Elements tutorial, titled “Mastering Photoshop Elements Made Easy v.2022.”
Overview of How to Create Moving Overlays in Photoshop Elements:
Moving overlays in Photoshop Elements 2022 and later let you add an animated overlay, graphic, or frame to a photo. You can then export the animated photo as an MP4 or animated GIF. To create moving overlays in Photoshop Elements, open the photo to which to apply the moving overlay in the Photo Editor. Then select “Enhance| Moving Overlays” from the Menu Bar to open the selected photo in the “Moving Overlays” window.
You can use the “Zoom Tool” and the “Hand Tool” in the toolbar at the left side of the window to zoom and pan the preview image that appears, as needed. You can also zoom the image by using the “Zoom” slider towards the upper-right corner of the window. The animated effects to apply appear in the scrollable pane at the right side of the window. To switch effect categories, select the type of effect to apply from the drop-down at the top of the pane. The choices include “Overlays,” “Graphics,” and “Frames.” The selected effects then appear below the drop-down in the pane.
To apply an effect to the preview image, click the effect to apply in the pane. You may only apply one effect from the “Overlays” and “Frames” category to an image, but you can add as many “Graphics” as desired. To preview the effect on the preview image, click the “Play” button below the preview image. To pause the effect playback, click the “Pause” button that then replaces the “Play” button at the bottom of the window.
To select an effect in the picture, click the “Move Tool” in the toolbar at the left side of the window. Then click into the effect content to select it. To move a selected effect, click and drag it to the desired position and release it. To resize a selected effect, click and drag the desired resizing handles that appear at the corners and sides of the selected effect. If you resize the effect, then click the green checkmark in the lower-right corner of the effect to apply the resizing change or click the red cancel button to cancel it. To delete a selected effect, press the “Delete” or “Del” key on your keyboard. To reset all changes to a photo, click the “Reset Image” button that appears above the pane at the right side of the window.
To protect the subject of the photo from all effects, check the “Protect Subject” checkbox in the pane at the right side of the window. To set the opacity of a selected effect, use the “Opacity” slider to set the desired percentage.
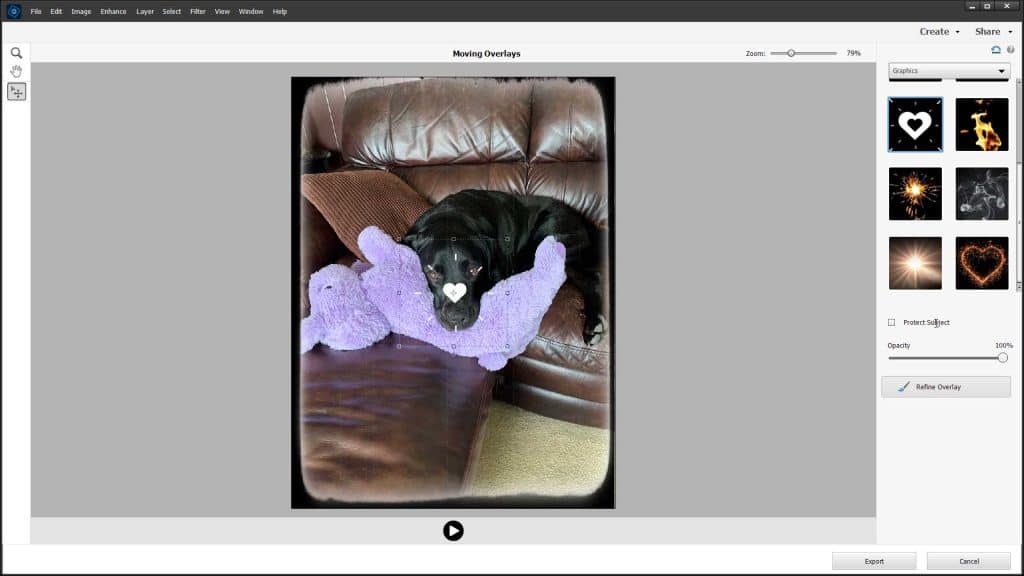
A picture that shows how to create moving overlays in Photoshop Elements.
To add or remove the overlay effect area using a brush, click the “Refine Overlay” button in the pane to expand its options. Then click either the “Subtract” or “Add” button to subtract from the effect area or add to it, as desired. Use the “Brush Size” slider to set the desired brush size. Then use the “Brush Opacity” slider to set the desired brush opacity. Then click and drag with the brush in the preview image to add or remove the effect, as desired. To show the selection area of the effect as a red mask, check the “Show Selection” checkbox.
To cancel creating the moving overlay photo, click the “Cancel” button in the lower-right corner of the window to cancel your changes and close the window. Alternatively, to export the results as an MP4 or animated GIF, click the “Export” button. Then, in the “Save As” dialog box that opens, choose the folder into which to save the animated GIF file and type a name for it into the “File name” field. To select the file type, select either “MP4” or “GIG” from the “Save as type” drop-down. Optionally, to include it in the Elements Organizer, check the “Include in the Elements Organizer” checkbox. Then click the “Save” button to finish and export the animated file.
Instructions on How to Make Moving Overlays in Photoshop Elements:
- To create moving overlays in Photoshop Elements, open the photo to which to apply the moving overlay in the Photo Editor.
- Then select “Enhance| Moving Overlays” from the Menu Bar to open the selected photo in the “Moving Overlays” window.
- To zoom and pan the preview image, use the “Zoom Tool” and the “Hand Tool” in the toolbar at the left side of the window.
- Alternatively, to zoom the image, use the “Zoom” slider towards the upper-right corner of the window.
- The animated effects to apply appear in the scrollable pane at the right side of the window.
- To switch effect categories, select the type of effect to apply from the drop-down at the top of the pane. The choices include “Overlays,” “Graphics,” and “Frames.”
- The selected effects then appear below the drop-down in the pane.
- To apply an effect to the preview image, click the effect to apply in the pane.
- You may only apply one effect from the “Overlays” and “Frames” category to an image, but you can add as many “Graphics” as desired.
- To preview the effect on the preview image, click the “Play” button below the preview image.
- To pause the effect playback, click the “Pause” button that then replaces the “Play” button at the bottom of the window.
- To select an effect in the picture, click the “Move Tool” in the toolbar at the left side of the window.
- Then click into the effect content to select it.
- To move a selected effect, click and drag it to the desired position and release it.
- To resize a selected effect, click and drag the desired resizing handles that appear at the corners and sides of the selected effect.
- If you resize the effect, then click the green checkmark in the lower-right corner of the effect to apply the resizing change or click the red cancel button to cancel it.
- To delete a selected effect, press the “Delete” or “Del” key on your keyboard.
- To reset all changes to a photo, click the “Reset Image” button that appears above the pane at the right side of the window.
- To protect the subject of the photo from all effects, check the “Protect Subject” checkbox in the pane at the right side of the window.
- To set the opacity of a selected effect, use the “Opacity” slider to set the desired percentage.
- To add or remove the overlay effect area using a brush, click the “Refine Overlay” button in the pane to expand its options.
- Then click either the “Subtract” or “Add” button to subtract from the effect area or add to it, as desired.
- Use the “Brush Size” slider to set the desired brush size.
- Then use the “Brush Opacity” slider to set the desired brush opacity.
- Then click and drag with the brush in the preview image to add or remove the effect, as desired.
- To show the selection area of the effect as a red mask, check the “Show Selection” checkbox.
- To cancel creating the moving overlay photo, click the “Cancel” button in the lower-right corner of the window to cancel your changes and close the window.
- Alternatively, to export the results as an MP4 or animated GIF, click the “Export” button.
- Then, in the “Save As” dialog box that opens, choose the folder into which to save the animated GIF file and type a name for it into the “File name” field.
- To select the file type, select either “MP4” or “GIG” from the “Save as type” drop-down.
- Optionally, to include it in the Elements Organizer, check the “Include in the Elements Organizer” checkbox.
- Then click the “Save” button to finish and export the animated file.

