OCR in Acrobat XI- Tutorial
OCR in Acrobat XI: Video Lesson
This video lesson, titled “Recognizing Text in a Scanned PDF,” to see how to apply OCR in Acrobat XI to scanned documents. This video lesson is from our complete Acrobat XI Pro training, titled “Mastering Acrobat Made Easy v.XI.”
OCR in Acrobat XI: Overview
After you scan a text document into Acrobat, you can choose to apply optical character recognition, or OCR, to the scanned document. Many times, you can run OCR in Acrobat when creating the scanned PDF. If you select “File| Create| PDF from Scanner” from the Menu Bar and then choose a standard “Document” preset, such as “Black & White Document” or “Color Document” from the side menu that appears, you will run OCR in Acrobat when you scan the document. You can then finish scanning the document as you normally would to create the PDF from the scan and also run OCR in Acrobat on the PDF.
You can manually configure OCR in Acrobat to run for a selected preset by opening the “Configure Presets” dialog box by selecting “File| Create| PDF from Scanner| Configure Preset…” from the Menu Bar. Use the “Presets” drop-down to select a preset. Then, under the “Document Settings” section, you can check the “Make Searchable (Run OCR)” checkbox to run OCR in Acrobat when you create the PDF from the scan, if needed. You can then click the “Save” button to save the preset. Then click the “Close” button to close the “Configure Presets” dialog box.
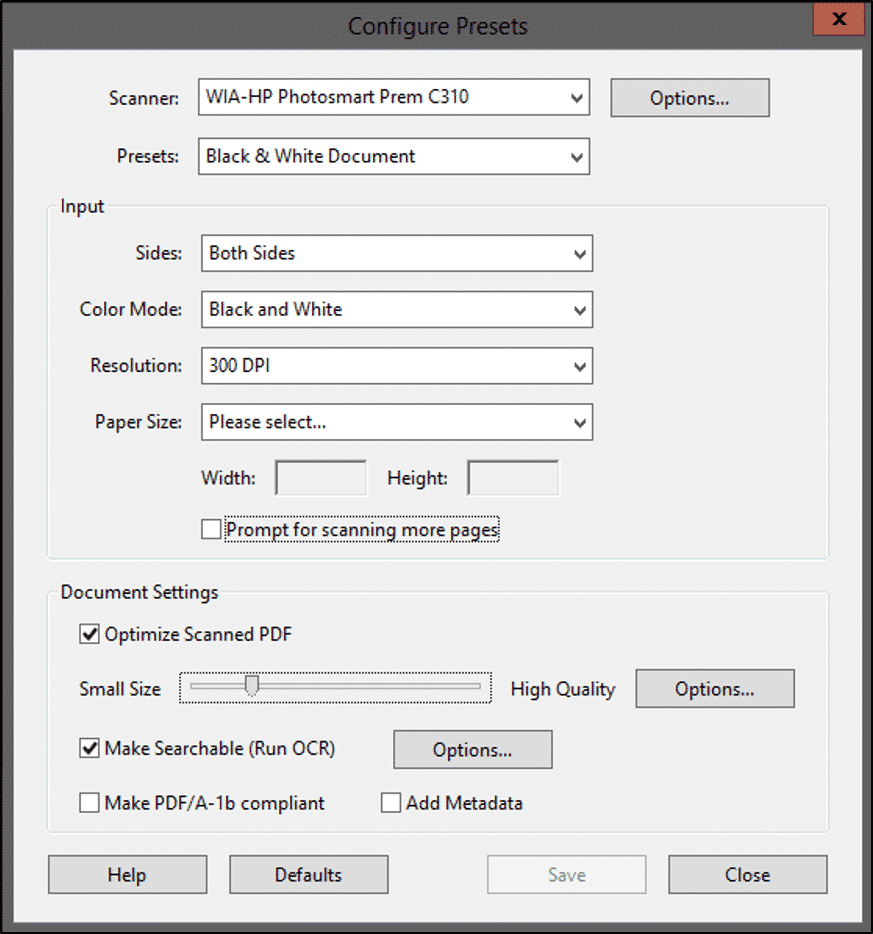
OCR in Acrobat XI- Tutorial: A picture of the “Configure Presets” dialog box in Adobe Acrobat XI Pro.
You can also run OCR in Acrobat after scanning a document, if you did not run OCR in Acrobat when creating the PDF. To do this, open the PDF created when you scanned the text document. You then need to display the Text Recognition panel within the Tools pane. You can show this panel by either clicking the “Show or hide panels” button in the upper-right corner of the Tools pane and then selecting “Text Recognition” from the drop-down menu or by selecting “View| Tools| Text Recognition” from the Menu Bar.
In the Text Recognition panel, choose the “In This File” tool to open the “Recognize Text” dialog box. By default, Acrobat will recognize all text in the file, but you can also choose to only recognize text on a single page or a range of pages by selecting the desired option button. When you have made your selection, click the “OK” button. Acrobat analyzes the document and replaces portions of the file, which the scanner had previously recognized as an image, with text.
OCR in Acrobat XI: Instructions
- To run OCR in Acrobat when creating the scanned PDF, select “File| Create| PDF from Scanner” from the Menu Bar and then choose a standard “Document” preset, such as “Black & White Document” or “Color Document” from the side menu that appears, to run OCR when you scan the document.
- You can then finish scanning the document as you normally would to create the PDF from the scan and also run OCR in Acrobat on the PDF.
- To manually configure OCR in Acrobat to run for a selected preset, open the “Configure Presets” dialog box by selecting “File| Create| PDF from Scanner| Configure Preset…” from the Menu Bar.
- Use the “Presets” drop-down to select a preset.
- Under the “Document Settings” section, check the “Make Searchable (Run OCR)” checkbox to run OCR in Acrobat when you create the PDF from the scan, if needed.
- Click the “Save” button to save the preset.
- Click the “Close” button to close the “Configure Presets” dialog box.
- To run OCR in Acrobat after scanning a document, open the PDF created when you scanned the text document.
- Display the Text Recognition panel within the Tools pane by either clicking the “Show or hide panels” button in the upper-right corner of the Tools pane and selecting “Text Recognition” from the drop-down menu or by selecting “View| Tools| Text Recognition” from the Menu Bar.
- In the Text Recognition panel, choose the “In This File” tool to open the “Recognize Text” dialog box.
- By default, Acrobat will recognize all text in the file, but you can also choose to only recognize text on a single page or a range of pages by selecting the desired option button.
- When you have made your selection, click the “OK” button.
