TeachUcomp, Inc.

 MY CART
  • VIDEO COURSES
    • All-Access Subscriptions
    • Business Licensing
    • Course List
      • Accounting
      • Adobe
        • Acrobat
        • Lightroom Classic
        • Photoshop
        • Photoshop Elements
      • Crystal Reports
      • Employment Skills
        • Interview Skills
        • Resume Skills
      • For Lawyers
        • Excel for Lawyers
        • Outlook for Lawyers
        • QuickBooks for Lawyers
        • Word for Lawyers
      • HTML
      • JavaScript
      • Microsoft Office
        • Access
        • Excel
        • Microsoft Office Suite
        • OneNote
        • Outlook
        • Outlook on the Web
        • PowerPoint
        • Publisher
        • Word
      • Microsoft Project
      • Microsoft Teams
      • QuickBooks Online
      • QuickBooks Pro
      • Sage
        • Peachtree
        • Sage 50
      • SQL
      • Windows
    • Video Course Options
  • SUBSCRIPTIONS
  • MANUALS
    • Adobe
      • Acrobat
      • Lightroom Classic
      • Photoshop
      • Photoshop Elements
    • Crystal Reports
    • For Lawyers
      • Excel for Lawyers
      • Outlook for Lawyers
      • QuickBooks for Lawyers
      • Word for Lawyers
    • HTML
    • JavaScript
    • Microsoft Office
      • Access
      • Excel
      • OneNote
      • Outlook
      • Outlook on the Web
      • PowerPoint
      • Publisher
      • Word
    • Microsoft Project
    • Microsoft Teams
    • QuickBooks Online
    • QuickBooks Pro
    • Sage
      • Peachtree
      • Sage 50
    • SQL
    • Windows
  • REFERENCE CARDS
    • Adobe
      • Acrobat
      • Lightroom Classic
      • Photoshop
      • Photoshop Elements 2023
      • Photoshop Elements 2022
      • Photoshop Elements 2021
      • Photoshop Elements 2020
      • Photoshop Elements 2019
      • Photoshop Elements 2018
      • Photoshop Elements 15
    • Google
      • Google Classroom for Teachers
      • Google Docs
      • Google Drive
      • Google Forms
      • Google Sheets
      • Google Slides
    • Mac OS
      • Mac OS Ventura-Mojave Keyboard Shortcuts
    • Microsoft Office
      • Microsoft Office 365
        • Access for Office 365
        • Excel for Office 365
        • Microsoft Office 365
        • Outlook for Office 365
        • PowerPoint for Office 365
        • Publisher for Office 365
        • Word for Office 365
      • Microsoft Office 2021
        • Access 2021
        • Excel 2021
        • Microsoft Office 2021
        • Outlook 2021
        • PowerPoint 2021
        • Publisher 2021
        • Word 2021
      • Microsoft Office 2019
        • Access 2019
        • Excel 2019
        • Microsoft Office 2019
        • Outlook 2019
        • PowerPoint 2019
        • Publisher 2019
        • Word 2019
      • Microsoft Office 2016
        • Access 2016
        • Excel 2016
        • Microsoft Office 2016
        • OneNote 2016
        • Outlook 2016
        • PowerPoint 2016
        • Publisher 2016
        • Word 2016
      • Microsoft Office 2013
        • Excel 2013
        • Microsoft Office 2013
        • OneNote 2013
        • Outlook 2013
        • PowerPoint 2013
        • Word 2013
      • Microsoft Office for iPad
        • Microsoft Office for iPad
    • Microsoft Teams
      • Microsoft Teams
    • QuickBooks Online
      • QuickBooks Online
    • QuickBooks Pro
      • QuickBooks Pro 2023
      • QuickBooks Pro 2022
      • QuickBooks Pro 2021
      • QuickBooks Pro 2020
      • QuickBooks Pro 2019
      • QuickBooks Pro 2018
      • QuickBooks Pro 2017
      • QuickBooks Pro 2016
      • QuickBooks Pro 2015
      • QuickBooks Pro 2014
    • Sage
      • Sage 50 2019
      • Sage 50 2018
    • SQL
      • SQL
    • Windows
      • Windows 11
      • Windows 11 and 10 Keyboard Shortcuts
      • Windows 10
  • STICKERS
    • Chrome OS
      • Chrome OS for Chromebooks
    • Mac OS
      • Mac OS Ventura
      • Mac OS Monterey-Mojave
    • Microsoft Office
      • Word and Excel (Mac) 2022
      • Word and Excel (PC/Windows) 2021-2016 and 365
    • QuickBooks Desktop
      • QuickBooks Desktop (PC/Windows) 2023
      • QuickBooks Desktop (PC/Windows) 2022-2015
    • Windows
      • Windows 11 and 10
  • SUPPORT
    • Company
      • About Us
      • Blog
      • Contact Us
      • Our History
      • Our Philosophy
        • Customer Service
        • Mission
      • Policies
      • Testimonials
    • Contact Us
    • FAQ
    • Help
    • Lost Password
    • Register a Product
  • LOGIN
    • Manage My Account
    • Member Login
    • My Courses
Shop Now

Pasting Links between Cells in Excel 2013

by Keeley Byrnes / Thursday, August 22 2013 / Published in Excel 2013, Latest

You can paste links between cells within Excel, so that the value of a cell within a workbook will simply be the value of another selected cell. For example, if you had a cell that added the cells above it within one worksheet and you wanted to paste a link to that cell into a cell within another worksheet so that the value shown in the second cell would always be a reflection of the value being calculated in the first cell. You can do this in Excel by using the “Paste Link” function to paste a link between two cells in a worksheet, a workbook, or even between two cells in two different workbooks! You can select to paste a link between two cells so that when the value in the copied cell is changed, the value displayed in the linked cell reflects the change. This is very handy when using the result of a formula as the basis for other formulas in linked workbooks or worksheets. For example, if you had a workbook that totaled sales per month on one worksheet, and another worksheet in the same workbook that totaled the monthly sales per quarter, you could copy and link the totals from the first worksheet into the second worksheet. That way, any changes made to the data in the first worksheet would be automatically reflected in the second sheet!

Slide1 Slide2


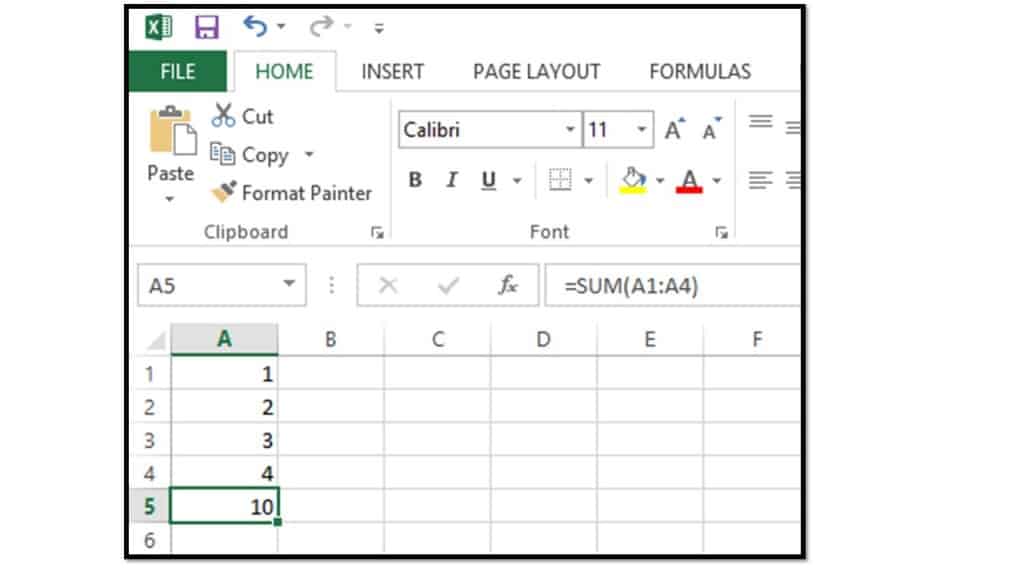
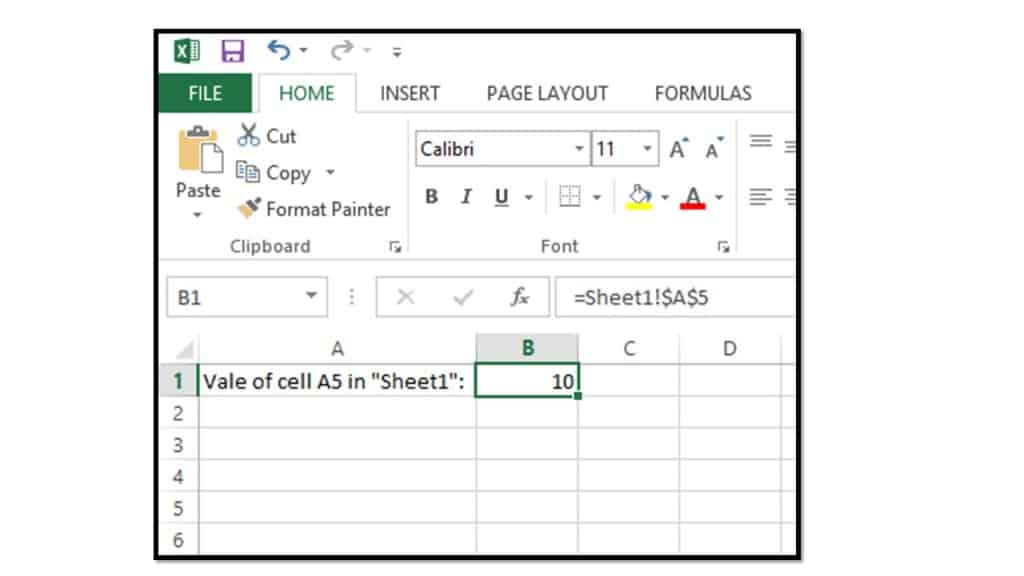
To copy a link between cells, first copy the cell that you want to link into another worksheet or workbook, and then select the destination cell to link. Then click the “Paste” button’s drop-down menu in the “Clipboard” group on the “Home” tab of the Ribbon to display the drop-down menu of choices. Select the “Paste Link” command to paste the link back to the original cell that you copied. If you are using the “Paste Special” dialog box, you can also click the “Paste Link” button that appears in the lower left corner of the dialog box to paste a link to the original cell that you copied. If you examine the contents of the linked cell, you will see that it is actually a formula. The formula simply states that the cell’s value is to be equal to the value displayed in the cell address shown. The cell address is the address of the cell that was copied.

If you use this feature to paste links between data in separate workbooks you should exercise care not to rename or move those workbooks. Doing so will break any links in the formula references created by the “Paste Link” button, forcing you to delete the links and recreate them again or edit the formula references within each linked cell. As long as you do not move or rename the workbooks, you should be able to change the value in the cell which you copied in one workbook and save your changes. The next time that you open the workbook that contains the linked cells, you may see a message appear onscreen telling you that the workbook contains links to data in other workbooks which has changed. To update the values in the linked cells to reflect the changes, click the “Update” or “Enable content” buttons in Excel to update the data in the linked worksheet, and be sure to save the changes made in this workbook as well.

Tagged under: 2013, cells, excel, help, how-to, links, microsoft, office, pasting, trianing, tutorial

About Keeley Byrnes

Keeley is our Director of Marketing and has been with TeachUcomp since 2010. Keeley manages all aspects of our Marketing Department, acts as liaison for our reseller and affiliate partners and also authors courses in software and taxation.

What you can read next

The Healing Brush Tool in Photoshop Elements- Instructions: A picture of a user correcting photo imperfections using the Healing Brush Tool in Photoshop Elements.
The Healing Brush Tool in Photoshop Elements – Instructions
A picture of a window in File Explorer in Windows 11.
File Explorer in Windows 11 – Instructions
A picture that shows how to create moving elements in Photoshop Elements.
Moving Elements in Photoshop Elements – Instructions


Recent Posts

  • A picture showing how to duplicate a layer in Photoshop Elements using the “Duplicate Layer” dialog box.

    Duplicate a Layer in Photoshop Elements – Instructions

    Overview of How to Duplicate a Layer in Photosh...
  • A picture of the “New Item” window when you create payment items in QuickBooks Desktop Pro.

    Create Payment Items in QuickBooks Desktop Pro – Instructions

    Overview of How to Create Payment Items in Quic...
  • Photoshop Cheat Sheet

    Photoshop Cheat Sheet Now Available            ...

Categories

Archives

  • GET SOCIAL

© 2001-2023 Copyright TeachUcomp, Inc. All rights reserved.

TOP
Sale! $49 All-Access 0 Days 9 Hours 29 Minutes 49 Seconds      $199 $49 Entire Library!
See Deal