Plan a Meeting in Outlook – Instructions and Video Lesson
Plan a Meeting in Outlook: Video Lesson
This video lesson, titled “Scheduling a Meeting,” shows how to plan a meeting in Outlook. This video lesson on how to plan a meeting in Outlook is from our complete Outlook tutorial, titled “Mastering Outlook Made Easy v.2016-2013.”
Plan a Meeting in Outlook: Overview
You can plan a meeting in Outlook by sending invitations to attendees. These are called “Meeting Request” items. The recipients of your meeting request receive an email message in which they must click a button to show if they are attending. The response they send is then recorded and saved by Outlook. In the future, you can open the meeting request in your Calendar to view their responses.
To plan a meeting in Outlook, open the Calendar folder. Then click the “New Meeting” button in the “New” group on the “Home” tab in the Ribbon. Then create the meeting request in the “Meeting” window that appears.
In the “Meeting” window, click the “To…” button to open the “Select Attendees and Resources” dialog box. Then use the “Address Book” drop-down to select the address book or Contacts folder that contains the email addresses of the people to invite to the meeting. The names of the people then appear within the large white list box.
Select a name from the list and click either the “Required,” “Optional,” or “Resources” button. “Required” means the selected attendee is required for the meeting. “Optional” means that the selected attendee has the option to attend but isn’t required. “Resources” is used to designate a specific resource needed for the meeting. This could be a particular room in your office, for example. It is important to note that the organizer of the meeting is always a “Required” attendee.
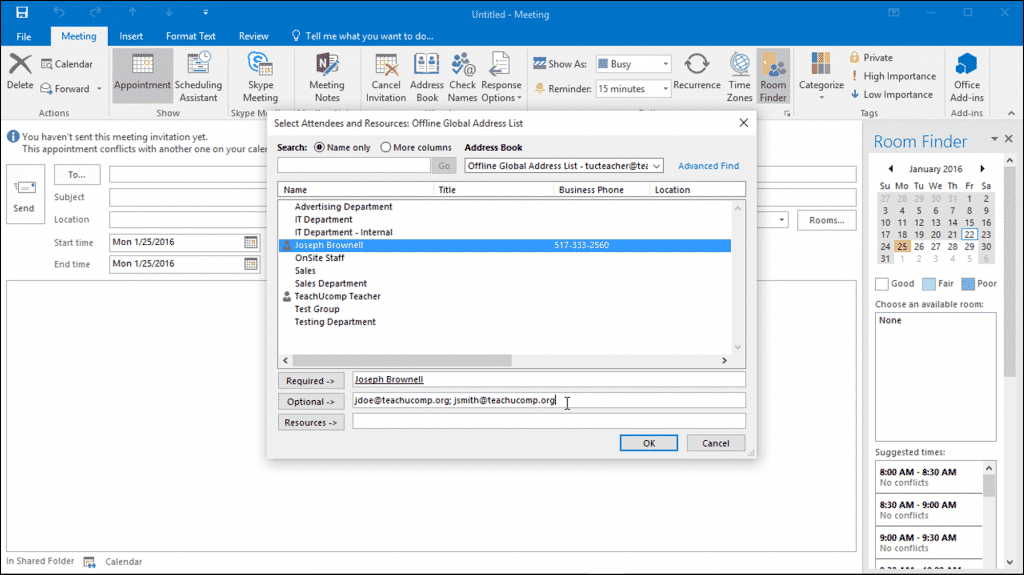
Plan a Meeting in Outlook – Instructions and Video Lesson: A picture of a user selecting meeting attendees in Outlook.
Repeat this process until you have invited all attendees and selected all resources. As you add people and resources to the lists, they are entered as email addresses separated by semicolons. You can also click directly into the “Required,” “Optional” or “Resources” fields and enter email addresses for individuals to invite that you have not saved in your address books, if needed. Just ensure you use semicolons to separate the email addresses that you enter into these fields. Click the “OK” button after inviting the meeting attendees to return to the “Meeting” window.
In the “Meeting” window, then type a short description of the meeting into the “Subject:” text box. Also, add a location for the meeting into the “Location:” text box. Feel free to enter any additional notes about the meeting in the lower half of the “Meeting” window.
To set a start time and end time for the meeting, click the calendar icon to the right of the “Start time:” label. Then select a date from the displayed calendar. Click the drop-down to the right of the date and select a start time for the meeting. Repeat this process to also set the “End time” for the meeting.
When setting meeting times, make sure the attendees you have invited are not busy during the time selected! To see how they have marked time in their calendars for the selected meeting time, click the “Scheduling Assistant” (“Scheduling” in Office 2013) button in the “Show” group on the “Meeting” tab in the Ribbon. Doing that then displays the calendars of the selected attendees. While you cannot see what they are actually doing, you can see how they indicated the time in their calendars. The legend that interprets the colored values appears at the bottom of this view.
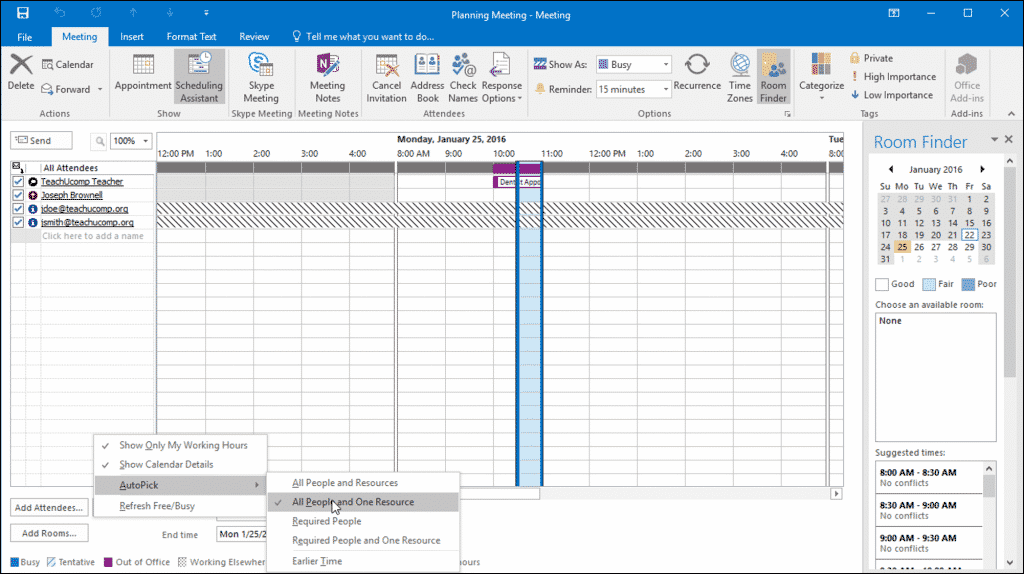
Plan a Meeting in Outlook – Instructions and Video Lesson: A picture of a user selecting a meeting time using the AutoPick feature in Outlook.
If they are busy, try to find the first free time available for the selected attendees. One way is to use the “AutoPick” function. To do this, click the “Options” button at the bottom of this window, hover over “AutoPick,” and choose the option that suits your needs. Outlook then tries to select the next available free period for the duration specified in which all attendees are available. To return to the default view of this window, click the “Appointment” button in the “Show” group on the “Home” tab in the Ribbon.
At this point, you only need to click the “Send” button in the “Meeting” window to send the meeting requests to the selected recipients.
Plan a Meeting in Outlook: Instructions
- To plan a meeting in Outlook, open the Calendar folder.
- Then click the “New Meeting” button in the “New” group on the “Home” tab in the Ribbon.
- To invite attendees and select resources, click the “To…” button in the “Meeting” window to open the “Select Attendees and Resources” dialog box.
- Use the “Address Book” drop-down in this dialog box to select the address book or Contacts folder that contains the email addresses of the people to invite to the meeting.
- Select a name from the list and click one of the following buttons: “Required,” “Optional” or “Resources.”
- Repeat this process until you have invited all attendees and selected all resources.
- Alternatively, click directly into the “Required,” “Optional” or “Resources” fields and enter email addresses for individuals to invite that you have not saved in your address books, if needed. Just ensure you use semicolons to separate the email addresses you enter into these fields.
- Click the “OK” button in the “Select Attendees and Resources” dialog box to return to the “Meeting” window.
- Type a short description of the meeting into the “Subject:” text box.
- Enter a location for the meeting into the “Location:” text box.
- Enter any additional notes about the meeting in the lower half of the “Meeting” window.
- To set a start time and end time for the meeting, click the calendar icon to the right of the “Start time:” label and select a date from the displayed calendar.
- Click the drop-down to the right of the date and select a start time for the meeting.
- Repeat this process to also set the “End time” for the meeting.
- To check if attendees are free and show their calendars,click the “Scheduling Assistant” (“Scheduling” in Office 2013) button in the “Show” group on the “Meeting” tab in the Ribbon.
- While you cannot see what they are actually doing, you can see how they indicated the time in their calendars.
- The legend that interprets the colored values appears at the bottom of this view.
- To find the first free time available for the selected attendees, click the “Options” button at the bottom of this window, hover over “AutoPick,” and choose the option that suits your needs.
- Outlook then tries to select the next available free period of the duration specified in which all attendees are available.
- To return to the default view of this window, click the “Appointment” button in the “Show” group on the “Home” tab in the Ribbon.
- Click the “Send” button in the “Meeting” window to send the meeting requests to the selected recipients.
