Power and Battery Settings in Windows 11- Instructions
How to Change the Power and Battery Settings in Windows 11: Video
This video lesson, titled “Power and Battery Settings in Windows 11,” shows how to change the power and battery settings in Windows 11. This video lesson is from our complete Windows 11 tutorial, titled “Mastering Windows Made Easy v.11.”
Overview of the Power and Battery Settings in Windows 11:
To change the power and battery settings in Windows 11, open the “Settings” window and click the “System” button at the left side of the screen to show the system settings for your device. Then click the “Power & battery” category in the pane at the right side of the window to show the power and battery settings for Windows 11 in the right pane. If your device has a battery, then its battery change level and battery usage graph appear at the top of the “Power & battery” settings at the right side of the “Settings” app window.
To set when to turn off your device’s screen and when to set the device to sleep in Windows 11, click the “Screen and sleep” setting to expand it. Then select when to turn off your screen and when to put the device to sleep from the drop-downs for the available settings. Devices with battery power need to select durations for turning off the screen and putting the device to sleep both when plugged in and when using battery power.
To set a power mode in Windows 11, select a choice from the “Power mode” drop-down in the “Power” settings of the “Settings” app window. Note that for desktop devices on the “High performance” power plan, this drop-down is unavailable. To change the power plan for desktops in Windows 11, open the “Control Panel” app, click “System and Security” if using the default “Category” view in the app, then click “Power Options.” In the “Power Options” screen, you can then select the desired desktop power plan.
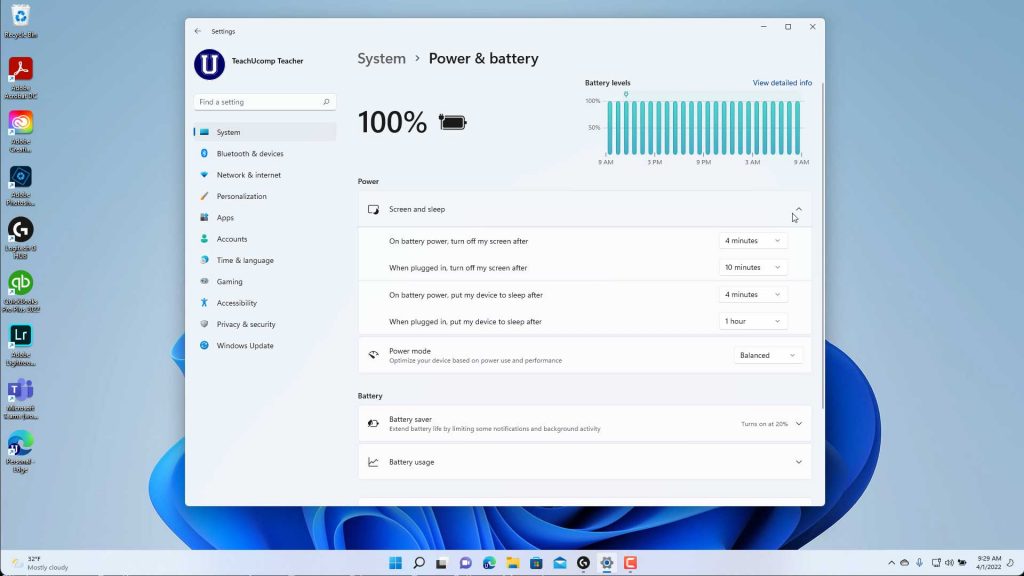
A picture of the Power and Battery settings in Windows 11.
For devices that have battery power, then back in the “Power” settings of the “System” settings in the “Settings” app window in Windows 11, the options in the “Battery” section let you manage battery usage. To manage the battery saver mode settings, which limits background activity when using battery power, click the “Battery saver” setting to expand it. To manually enable battery saver mode in Windows 11 when using battery power, click the “Turn on now” button for the “Battery saver” setting. If you want to turn battery saver mode off, click the same “Turn off now” button. Note that this button is inactive when the device is plugged in.
To set when to automatically enable battery saver mode in Windows 11, select a choice from the drop-down for the “Turn battery saver on automatically at” setting. To lower the built-in display’s brightness when battery saver is enabled, click the “Lower screen brightness when using battery saver” toggle switch to set it to the “On” position. If you want to disable it, toggle it to the “Off” position.
To view detailed battery usage data in Windows 11, click the “Battery usage” setting to expand it. You can then see a detailed battery usage graph appear. A listing of battery usage by app appears below the graph. To close the “Settings” app window, when finished, click the “X” button in its upper-right corner.
Instructions on How to Change the Power and Battery Settings in Windows 11:
- To change the power and battery settings in Windows 11, open the “Settings” window and click the “System” button at the left side of the screen.
- Then click the “Power & battery” category in the pane at the right side of the window to show the power and battery settings for Windows 11 in the right pane.
- If your device has a battery, then its battery change level and battery usage graph appear at the top of the “Power & battery” settings at the right side of the “Settings” app window.
- To set when to turn off your device’s screen and when to set the device to sleep in Windows 11, click the “Screen and sleep” setting to expand it.
- Then select when to turn off your screen and when to put the device to sleep from the drop-downs for the available settings.
- Devices with battery power need to select durations for turning off the screen and putting the device to sleep both when plugged in and when using battery power.
- To set a power mode in Windows 11, select a choice from the “Power mode” drop-down in the “Power” settings of the “Settings” app window. Note that for desktop devices on the “High performance” power plan, this drop-down is unavailable.
- To change the power plan for desktops in Windows 11, open the “Control Panel” app, click “System and Security” if using the default “Category” view in the app, then click “Power Options.”
- In the “Power Options” screen, you can then select the desired desktop power plan.
- For devices that have battery power, then back in the “Power” settings of the “System” settings in the “Settings” app window in Windows 11, the options in the “Battery” section let you manage battery usage.
- To manage the battery saver mode settings, which limits background activity when using battery power, click the “Battery saver” setting to expand it.
- To manually enable battery saver mode in Windows 11 when using battery power, click the “Turn on now” button for the “Battery saver” setting.
- If you want to turn battery saver mode off, click the same “Turn off now” button. Note that this button is inactive when the device is plugged in.
- To set when to automatically enable battery saver mode in Windows 11, select a choice from the drop-down for the “Turn battery saver on automatically at” setting.
- To lower the built-in display’s brightness when battery saver is enabled, click the “Lower screen brightness when using battery saver” toggle switch to set it to the “On” position.
- If you want to disable it, toggle it to the “Off” position.
- To view detailed battery usage data in Windows 11, click the “Battery usage” setting to expand it.
- You can then see a detailed battery usage graph appear.
- A listing of battery usage by app appears below the graph.
- To close the “Settings” app window, when finished, click the “X” button in its upper-right corner.