How to Use Presets in Camera Raw in Photoshop:
This video lesson, titled “Learn How to Use Presets in Camera Raw in Adobe Photoshop: A Training Tutorial,” shows how to use presets in camera raw in Photoshop. This video lesson is from our complete Photoshop tutorial, titled “Mastering Photoshop Made Easy.”
Overview:
How to Apply Presets in Camera Raw in Photoshop:
Presets in the “Camera Raw” dialog box in Photoshop are a saved set of camera raw edits and adjustments you can apply to images. You can edit a camera raw image and then save some or all its edits and adjustments as a new preset, if desired.
To apply a preset to an image, click the “Presets” button in the toolbar at the right side of the “Camera Raw” dialog box to show the Presets panel to its left. Then click the preset group that contains the preset to apply to expand it and see its presets in this pane, if needed. Then click the name of the preset to apply. Finally, adjust the amount of the preset to apply using the preset amount slider that appears above the list of presets and which shows the name of the applied preset.
To remove an applied preset, click its name in the list of presets again. You can apply multiple presets, if desired, but if the presets have conflicting adjustment settings, then the adjustment settings of the preset last applied overwrite the previously applied preset adjustment settings.
To mark or unmark a favorite preset, hover over it and click its star icon to toggle its favorite status on or off. Presets marked as favorites appear in the “Favorites” preset group at the top of the Presets panel.
How to Create a New Preset in Camera Raw in Photoshop:
To save a photo and some or all of its edits and adjustments as a new preset, first make the desired editing adjustments to save as a new preset to the current camera raw photo. Then click the click the “Create Preset” button at the top of the Presets panel. Alternatively, click the “More image settings” button in the toolbar at the right side of the “Camera Raw” dialog box and then select the “Create Preset…” command. Either way, the “Create Preset” dialog box then opens.
Type a name for your new preset into the “Name” field at the top of the “Create Preset” dialog box. Select the group to which to save the preset from the “Group” drop-down. To create a new preset group, if desired, select the “New Group…” command from this drop-down menu to open the “New Group” dialog box, type a name for the new group into the “Group” field, and then click the “OK” button.
How to Select the Adjustments to Add to the Preset:
The “Subset” section of the “Create Preset” dialog box lets you select which adjustments and/or adjustment groups to save as part of the preset. Checked preset adjustment groups and adjustments are included in the preset and unchecked ones are not included. To select a preset subset of adjustments to include in the preset, select a choice from the “Subset” drop-down. For example, to only include modified adjustment settings from the camera raw photo and disregard any unmodified adjustment settings, select the “Modified” choice from the “Subset” drop-down.
Alternatively, you can check or uncheck the individual adjustments to include from each adjustment group. You can click the arrow at the right side of an adjustment group to expand and collapse its settings. To check or uncheck all adjustment settings and groups, click the “Check All” or “Check None” buttons at the right side of the “Create Preset” dialog box.
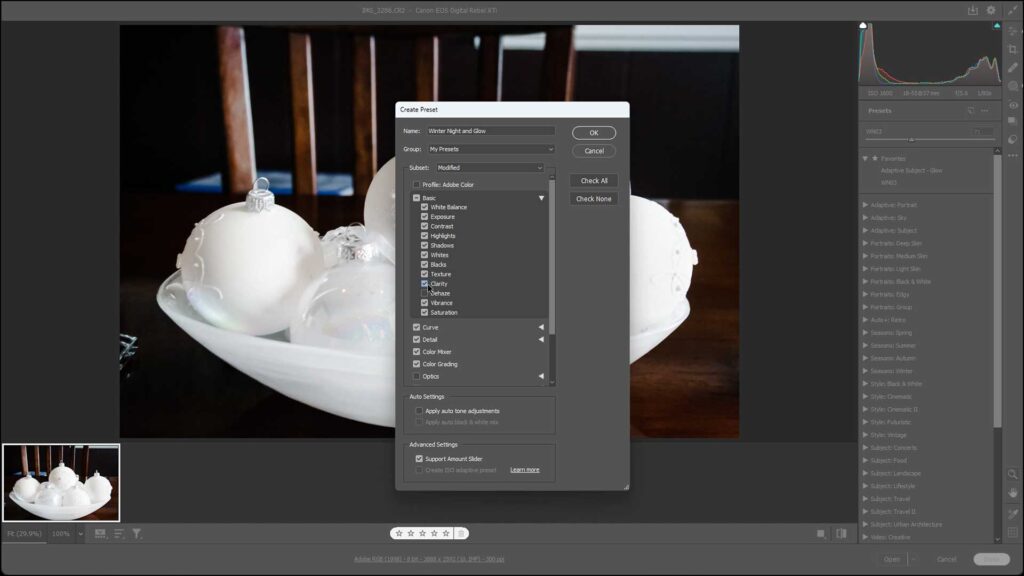
A picture of a user choosing the adjustments to add when creating new presets in Camera Raw in Photoshop.
Adjustment Settings in a Preset:
To apply auto tone adjustments, if selected in the photo, check the “Apply auto tone adjustments” checkbox in the “Auto Settings” section. If enabled, this setting then disables adding a preset “Amount” slider. To apply the auto black and white mix for black and white photos, check the “Apply auto black & white mix” checkbox.
Alternatively, to support an amount slider for your custom camera raw preset, check the “Support Amount Slider” checkbox in the “Advanced Settings” section. If checked, this adds an “Amount” preset slider for your custom camera raw preset to the top of the Presets panel that you can use to either amplify or reduce the intensity of all the selected camera raw adjustments of the preset in tandem, if desired.
To create an ISO adaptive preset, if desired and if available for the preset, check the “Create ISO adaptive preset” checkbox in the “Advanced Settings” section. To create the camera raw preset after choosing its settings, click the “OK” button in the “Create Preset” dialog box.
How to Delete a Custom Preset in Camera Raw in Photoshop:
Your custom presets appear within their designated group at the top of the Presets panel. To delete a custom preset in Photoshop, hover over its name in the Preset panel and then click the “Delete Preset” button that appears at its right end.