Print Tasks in Outlook – Instructions
Print Tasks in Outlook: Video Lesson
This video lesson, titled “Printing Tasks,” shows you how to print tasks in Outlook. This video lesson is from our complete Outlook tutorial, titled “Mastering Outlook Made Easy v.2019 and 365.”
Print Tasks in Outlook: Overview
To print tasks in Outlook or print your task list, open the Tasks folder. Then click the “File” tab in the Ribbon. Then click the “Print” command at the left side of the backstage view. To set the printing options, click the “Print Options” button that appears to the right to open the “Print” dialog box.
To print your entire task list, select “Table Style” under “Print Style” in the “Print” dialog box that appears. Alternatively, if you had selected a task in the tasks folder before printing, you can then also choose the “Memo Style” choice to print the details of the selected task. If your task list is longer than a single page and you only want to print selected pages, choose the “Pages” option under “Page Range” and then enter the pages to print into the adjacent text box.
If you selected the “Table Style,” you can also select a “Print range” of task rows to print. To print only selected rows, or tasks, you must first select them in the task list before opening the “Print” dialog box. If you have the “Memo Style” selected, you can check the “Print attached files. Attachments will print to the default printer only.” checkbox to print files attached to the task to your default printer. In the “Copies” section, enter the number of copies to print and check the “Collate copies” checkbox to ensure a collated printing.
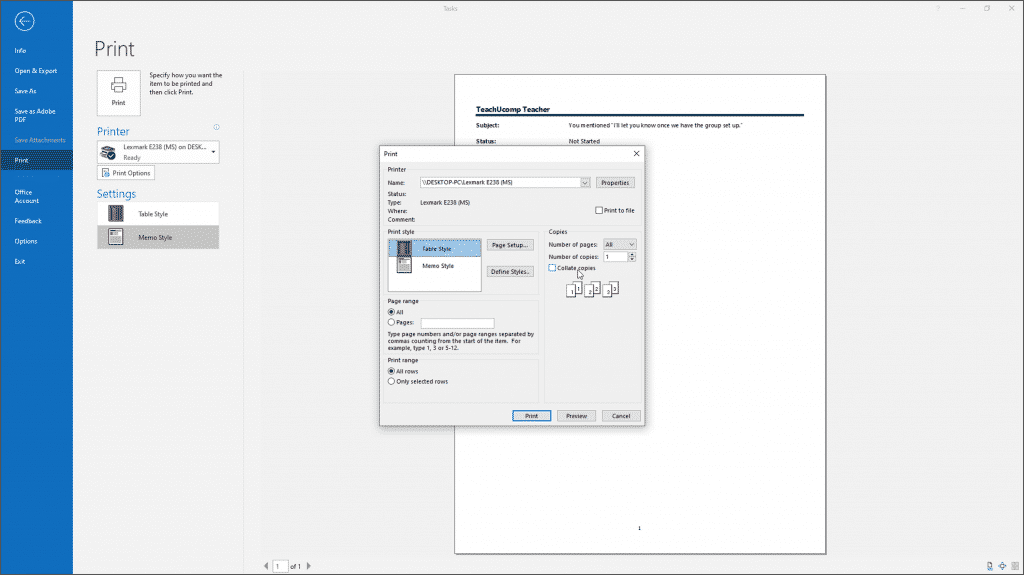
Print Tasks in Outlook – Instructions: A picture of a user setting printing options to print a task list in Outlook.
To print directly from the “Print” dialog box, click the “Print” button. Alternatively, click the “Preview” button to return to the backstage view to see a preview of your tasks list. Then click the “Print” button in the backstage view to print the task list.
Print Tasks in Outlook: Instructions
- To print tasks in Outlook, open the Tasks folder.
- Then click the “File” tab in the Ribbon.
- Then click the “Print” command at the left side of the backstage view.
- To set printing options, then click the “Print Options” button to the right to open the “Print” dialog box.
- Under “Print Style,” you can select “Table Style” to print your entire task list.
- Alternatively, if you had selected a task in the tasks folder before printing, you can then also choose the “Memo Style” choice to print the details of the selected task.
- If your tasks list is longer than a single page and you only want to print selected pages, choose the “Pages” option under “Page Range” and then enter the pages to print into the adjacent field.
- If you selected the “Table Style,” you can also select a “Print range” of task rows to print.
- To print only selected rows or tasks, select them in the task list before opening the “Print” dialog box.
- If you have the “Memo Style” selected, you can check the “Print attached files. Attachments will print to the default printer only.” checkbox to print files attached to the task to your default printer.
- In the “Copies” section, enter the number of copies to print and check the “Collate copies” checkbox to ensure a collated printing.
- To print directly from the “Print” dialog box, click the “Print” button.
- Alternatively, to preview it, click the “Preview” button to return to the backstage view to see a preview.
- Then click the “Print” button in the backstage view to print the task list.