Printing in OneNote- Instructions
Printing in OneNote: Video Lesson
This video lesson, titled “Previewing and Printing,” shows the different ways of printing in OneNote. This video lesson on printing in OneNote is from our complete OneNote training, titled “Mastering OneNote Made Easy v.2016-2013.”
Printing in OneNote: Overview
You have a couple of different options for printing in OneNote. One option is to print notebook page content directly, without previewing it. To do this, select a page or page group and click the “File” tab in the Ribbon. Doing this then opens the Backstage View. Then click “Print” in the menu at the left side of the screen. Then click the “Print” button that appears to the right.
At the top of the “Print” dialog box, choose a printer from the “Select Printer” list. Then click the “Preferences” button to open the “Preferences” dialog box for your specific printer. You can then make any printer-specific changes you want. Then click “OK” to return to the “Print” dialog box after making any changes.
Back in the “Page Range” section of the “Print” dialog box, you can select which pages to print. Choose “All” to print all pages. Choose “Selection” to print only information you have selected on a page. Alternatively, choose “Current Page” or “Pages” to print the pages specified by a page range you enter. Page ranges can be sequential, like “1-10” for example. They can also be non-sequential, like “1, 5, 10” for example. They can also be a combination of both, like “1-5, 10” for example. Separate sequential page ranges with a hyphen and non-sequential page ranges with a comma.
Then enter the number of copies to print into the “Number of copies” spinner box. If printing multiple copies of a multi-page notebook, check the “Collate” checkbox to print each set in order. After making your selections, click the “Print” button to finish printing in OneNote.
Alternatively, to preview the pages before printing them, use the “Print Preview” command in the “Print” section of the Backstage View, instead. To use “Print Preview,” click the “File” tab in the Ribbon and choose the “Print” command. Then click the “Print Preview” button that appears to the right. OneNote then launches the “Print Preview and Settings” dialog box.
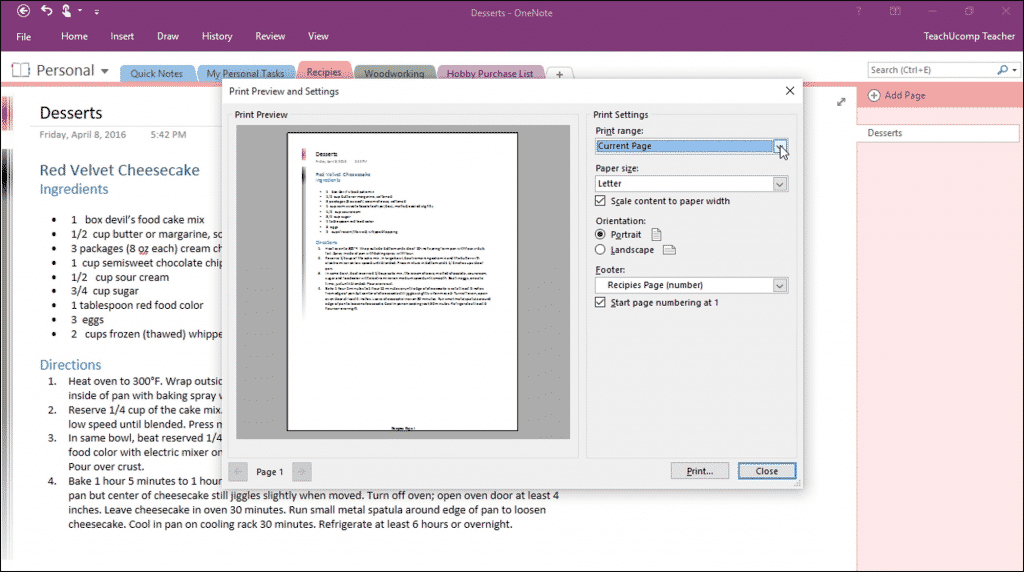
Printing in OneNote- Instructions: A picture of the “Print Preview and Settings” dialog box in OneNote.
A preview of the printed page appears in the “Print Preview” section to the right. In the “Print Settings” section, use the “Print Range” drop-down to select the pages to print. Select either the “Current Page;” the “Page Group,” which is a page and all its subpages; or the “Current Section” choice. If you choose “Page Group” or “Section,” you can use the navigation buttons at the bottom of the dialog box to preview the different pages in the group or section.
Use the “Paper Size” drop-down to select a new paper size, if you wish. By default, the “Scale content to paper width” checkbox is checked. This scales the page content so fits the selected page size. To change the page orientation, select either “Portrait” or “Landscape” from the “Orientation:” section.
The “Footer” drop-down lets you choose which page or section information appears in the page’s footer. By default, OneNote displays the name of the section and the page numbering. You can also choose to only print the page numbers, only the section name, or nothing at all.
When ready to print, click the “Print…” button to launch the “Print” dialog box. This time, any settings you applied in the “Print Preview and Settings” dialog box already appear. However, you can still access and change any of the available settings, if desired. To send the pages to your selected printer when finished, click the “Print” button.
Printing in OneNote: Instructions
- To print notebook page content directly, without previewing it, select a page or page group.
- Then click the “File” tab in the Ribbon to enter the Backstage View.
- Click “Print” in the menu at the left side of the screen.
- Then click the “Print” button that appears to the right.
- Select a printer from the “Select Printer” list.
- To change the printer’s preferences, click the “Preferences” button.
- Then make any changes and click “OK” to return to the “Print” dialog box.
- Select the range of pages to print in the “Page Range” section.
- If printing multiple copies, enter the number of copies to print into the “Number of copies” spinner box.
- Then click “Print” to send the pages to your chosen printer.
- To preview page content before printing, select a page or page group.
- Then click the “File” tab in the Ribbon.
- Click “Print” from the menu at the left side of the screen.
- Then click the “Print Preview” button that appears to the right.
- In the “Print Preview and Settings” dialog box that opens, a preview of the printed page appears in the “Print Preview” section to the right.
- In the “Print Settings” section, use the “Print Range” drop-down to select either the “Current Page,” the “Page Group,” or the “Current Section.”
- If you choose “Page Group” or “Section,” you can use the navigation buttons at the bottom of the dialog box to preview the different pages in the group or section.
- Use the “Paper Size” drop-down to select a new paper size, if you wish.
- If the “Scale content to paper width” checkbox is checked, OneNote scales the page content to fit the page size.
- Change the orientation of your page by selecting either “Portrait” or “Landscape” from the “Orientation:” section.
- Use the “Footer” drop-down to choose which page or section information appears in the page footer.
- When ready to print, click the “Print…” button to launch the “Print” dialog box.
- Any settings from the “Print Preview and Settings” dialog box already appear. However, you can still access and change any settings, if desired.
- To print the pages when you are finished, click the “Print” button.
