Ratings in Lightroom Classic CC- Instructions and Video Lesson
Ratings in Lightroom Classic CC: Video Lesson
This video lesson, titled “Using Ratings,” shows you how to apply, change, and remove ratings in Lightroom Classic CC’s Library module. This video is from our complete Lightroom Classic CC tutorial, titled “Mastering Lightroom Classic Made Easy v.CC.”
Ratings in Lightroom Classic CC: Overview
You assign ratings in Lightroom Classic CC to files through a “star” system. You can award a photo from zero to five stars. After assigning ratings in Lightroom Classic CC to photos, you can then use filtering and sorting to show only photos with a specific number of stars or with a minimum number of stars. You can set and display ratings in Lightroom Classic CC within any Library module view. There are many different ways to apply ratings in Lightroom Classic CC to photos.
Applying Ratings in Lightroom Classic CC Using the Menu Bar
To apply ratings in Lightroom Classic CC to a photo in the Library module’s Grid view, click to select the photo’s thumbnail. Then select “Photo| Set Rating” from the Menu Bar. Then click to select the appropriate rating from the submenu. You can also apply the same rating to multiple photos in the Grid view using this same method. To do this, just select multiple photos before setting the rating.
Rating stars appear on the thumbnail image matte. If you do not see your ratings on the thumbnail mattes, select “View| View Options…” from the Menu Bar. The “Library View Options” dialog box then opens. In the “Compact Cell Extras” area of the “Grid View” tab, check the “Bottom Label:” checkbox. Then select “Rating and Label” from the drop-down menu just to the right of the checkbox. Doing this then shows rating stars below thumbnail images in the thumbnail’s matte. Then click the “X” button in the upper-right corner of the dialog box.
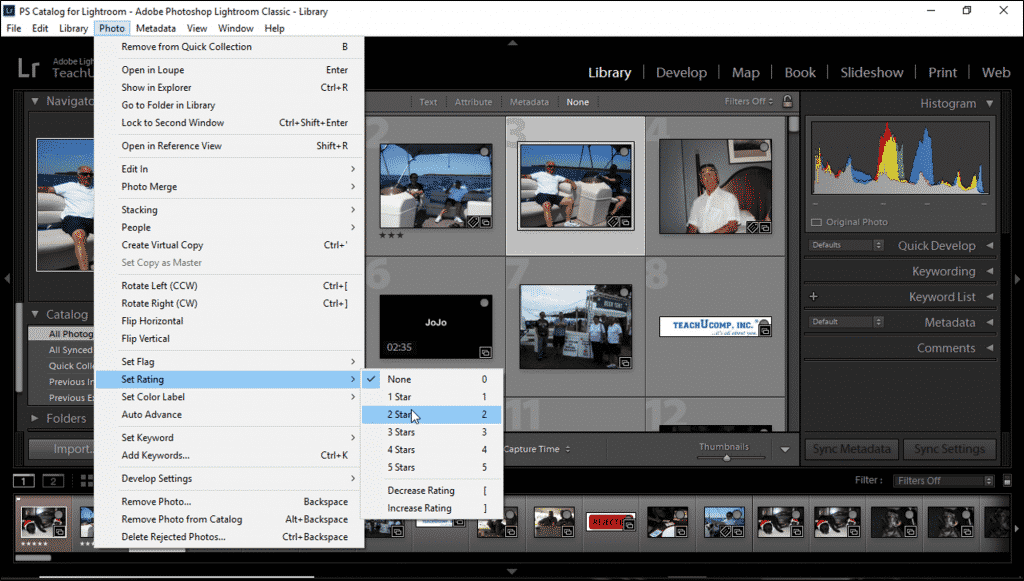
Ratings in Lightroom Classic CC- Instructions: A picture of a user applying ratings in Lightroom Classic CC using the Menu Bar.
Applying Ratings in Lightroom Classic CC’s Filmstrip
In the Library module, you can also set ratings in the Filmstrip. However, you must apply ratings one at a time in the Filmstrip. If you select multiple photos in the Filmstrip and then set a rating, the rating is only applied to the active photo. To set a rating in the Filmstrip, click to select a photo. Then select “Photo| Set Rating” from the Menu Bar. Then click to select the appropriate rating from the submenu.
Applying Ratings in Lightroom Classic CC Using a Keyboard
You can also set ratings using your keyboard in both the Grid and the Filmstrip. To do this, click to select a thumbnail in either the Grid or Filmstrip. Then press a number key from 1 through 5 on your keyboard. If you hold down the “Shift” key when you press the number key, you apply the rating and also select the next photo. Continue holding down the “Shift” key to quickly set ratings for a series of contiguous photos.
Applying Ratings in Lightroom Classic CC Using the Thumbnail Matte
Some Library module views show five dots below the image in a thumbnail matte. In the Grid view and the Survey view, you have to hover over an unrated thumbnail to see the dots. In the Compare view, dots appear beneath each photo. You can apply ratings in Lightroom Classic CC by clicking the dots under a photo. Clicking the first dot assigns one star, clicking the second dot assigns two stars, and so on.
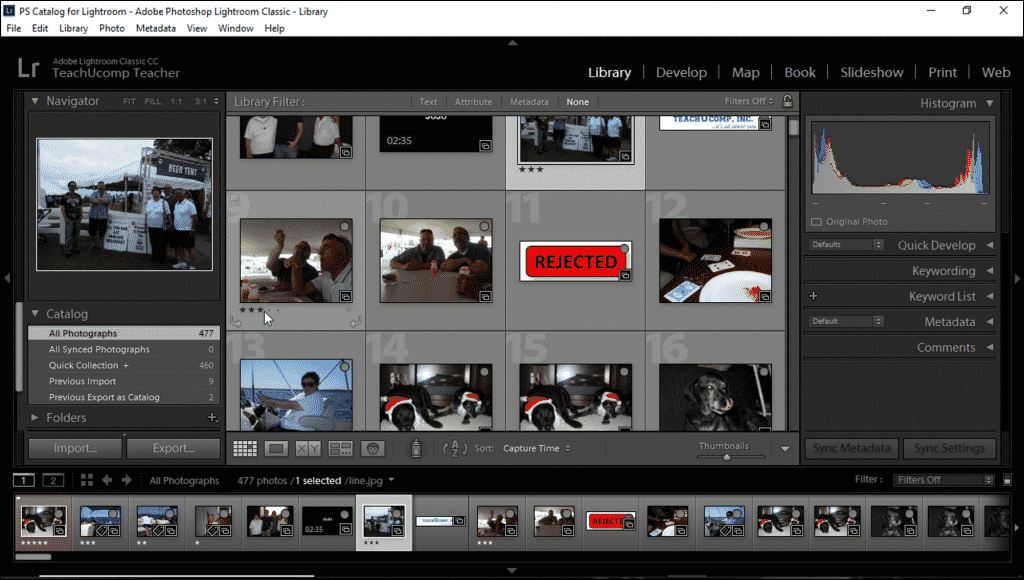
Ratings in Lightroom Classic CC- Instructions: A picture of a user applying ratings in Lightroom Classic CC using the image’s thumbnail matte in the Library module’s Grid view.
Applying Ratings in Lightroom Classic CC Using the Painter Tool
You can use the Painter tool to set ratings in Lightroom Classic CC’s Library module’s Grid view. To do this, select the Painter tool from the toolbar. The cursor changes to a paint tool. Then choose “Rating” from the “Paint:” menu in the toolbar. Then click within the toolbar to specify the number of stars to apply. When the correct rating appears in the toolbar, click to apply it to one or more photos in the Grid.
You can click to apply the rating one photo at a time or click and drag to apply the rating to multiple photos. You can also click into the toolbar and change the rating while the Painter tool is active. After applying ratings, click the circular “well” to the left of the “Paint:” menu to disable the Painter tool.
Applying Ratings in Lightroom Classic CC Using the Library Module’s Toolbar
You can also set ratings in Lightroom Classic CC using the Library module’s toolbar, if the rating stars are displayed. If you don’t see rating stars in the toolbar, select the “Ratings” option from the toolbar menu. To apply ratings in Lightroom Classic CC using the toolbar, click to select one or more photos in the Grid view. Then click a ratings star in the toolbar to assign a rating to the photo or photos.
You can also use this same method to assign ratings after clicking to select a photo in the Filmstrip. However, keep in mind that you can only rate one photo at a time within the Filmstrip. If you select multiple photos in the Filmstrip and then set a rating from the toolbar, you only apply the rating to the active photo.
Ratings in Lightroom Classic CC- Instructions: A picture of a user applying ratings in Lightroom Classic CC using the Library module’s toolbar.
Applying Ratings in Lightroom Classic CC Using the Metadata Panel
You can also set ratings in Lightroom Classic CC by using the Metadata panel. To do this, expand the Metadata panel. Then click to select a photo in either the Grid or Filmstrip. In the middle of the Metadata panel, is a “Rating” section. Click the appropriate number of stars in the “Rating” section to set the rating for the selected photo.
Changing or Removing Ratings in Lightroom Classic CC
You can also easily change or remove ratings in Lightroom Classic CC. To change a rating, click to select a photo in the Grid or Filmstrip. Then simply apply a new rating using any previously-mentioned method.
To remove a photo’s rating, click to select the photo. Then click just to the left of the first star in the toolbar if the “Rating” is displayed in the toolbar. Alternatively, select a photo and then select “Photo| Set Rating| None” from the Menu Bar. You can also remove the rating of a selected photo by pressing the “zero” key on your keyboard.
Ratings in Lightroom Classic CC: Instructions
Instructions on How to Set Ratings in Lightroom Classic CC Using the Menu Bar
- To set ratings in the Library module’s Grid view using the Menu Bar, click to select the photo thumbnails in the Grid.
- Then select “Photo| Set Rating” from the Menu Bar.
- Then click to select the appropriate rating from the submenu.
Instructions on How to Set Ratings in Lightroom Classic CC’s Filmstrip
- To set ratings in the Filmstrip using the Menu Bar, apply ratings to one photo at a time.
- Then click to select a photo thumbnail in the Filmstrip.
- Select “Photo| Set Rating” from the Menu Bar.
- Then click to select the appropriate rating from the submenu.
Instructions on How to Set Ratings in Lightroom Classic CC Using a Keyboard
- To set ratings using your keyboard in both the Grid and Filmstrip, click to select a thumbnail.
- Then press a number key from 1 through 5 on your keyboard.
- To quickly set ratings for a serious of contiguous photos using your keyboard, hold down the “Shift” key while pressing the first number rating for a photo.
- Lightroom Classic CC then applies the rating and selects the next photo.
- Continue holding the “Shift” key down while applying ratings to each selected photo.
Instructions on How to Set Ratings in Lightroom Classic CC Using the Thumbnail Matte
- To apply ratings within a thumbnail or preview image, use the five dots that appear under images within thumbnail mattes.
- For preview images, like in the Compare view or the Survey view, the dots appear under each preview image.
- Click the first dot on the far left to apply one star, the second dot to apply two stars, and so forth.
Instructions on How to Set Ratings in Lightroom Classic CC Using the Painter Tool
- To use the Painter tool to set ratings in the Grid view, select the Painter tool from the toolbar. The cursor then changes to a paint tool.
- Choose “Rating” from the “Paint:” menu in the toolbar.
- Then click within the toolbar to specify the number of stars to apply.
- Click to apply the rating to a photo in the Grid.
- To quickly apply the rating to multiple photos, click and drag with the Painter tool, instead.
- To change the rating while the Painter tool is active, click into the toolbar with the Painter tool.
- Then click the appropriate number of stars to apply.
- To disable the Painter tool after applying ratings, click the circular “well” to the left of the “Paint:” menu.
Instructions on How to Set Ratings in Lightroom Classic CC Using the Library Module’s Toolbar
- To apply ratings to Grid view thumbnails using the toolbar, click to select one or more photos in the Grid view.
- If needed, to display rating stars in the Library module’s toolbar, select the “Ratings” option from the toolbar’s drop-down menu at its right end.
- Then click a ratings star in the toolbar to assign a rating to the photo or photos.
- To apply ratings to Filmstrip thumbnails using the toolbar, click to select one photo from the Filmstrip.
- Then click a ratings star in the toolbar to assign a rating to the photo.
Instructions on How to Set Ratings in Lightroom Classic CC Using the Metadata Panel
- To set ratings within the Metadata panel, expand the panel.
- Then click to select a photo in either the Grid or Filmstrip.
- Click the appropriate number of stars in the “Rating” area of the Metadata panel.
Instructions on How to Change Ratings in Lightroom Classic CC
- To change a photo’s rating, click to select a photo in the Grid or Filmstrip.
- Then apply a new rating using any method shown above.
Instructions on How to Remove Ratings in Lightroom Classic CC
- To remove a photo’s rating, click to select the photo in either the Grid or the Filmstrip.
- Then click just to the left of the first star in the toolbar if the “Rating” is displayed.
- Alternatively, select “Photo| Set Rating| None” from the Menu Bar to remove the rating for a selected photo or press the “0” number key on your keyboard.
