Reconcile Accounts in Sage 50: Video Lesson
This video lesson, titled “How to Reconcile Bank Accounts in Sage 50 Accounting,” shows how to reconcile accounts in Sage 50 Accounting. This video lesson on how to reconcile accounts in Sage 50 is from our complete Sage 50 tutorial, titled “Mastering Sage 50 Made Easy”
Reconcile Accounts in Sage 50: Overview
You can reconcile accounts in Sage 50 using the “Account Reconciliation” window. Most often, users reconcile bank accounts, cash accounts, and credit card accounts. When you reconcile accounts in Sage 50, you ensure the transactions in the account within your company file match the transactions in the account’s statement from its financial institution. After receiving an account statement from a financial institution, you should reconcile the statement’s transactions to your company file’s transactions. This helps you detect bank errors, data entry errors, and fraud more quickly.
How to Reconcile an Account in Sage 50:
To reconcile accounts in Sage 50, select “Tasks| Account Reconciliation…” from the Menu Bar to open the “Account Reconciliation” window. Select the ID of the account to reconcile from the “Account to Reconcile” drop-down. Then enter the account’s statement date into the “Statement Date” field. If needed, you can reconcile information from prior accounting periods without leaving the current accounting period by selecting the prior period statement date within the desired prior period to reconcile from the “Statement Date” field. Next, enter the account’s balance as of the statement date into the “Statement Ending Balance” field.
At this point, all the selected account’s transactions appear in a list with deposits and bank credits shown first. To change which items appear in the transaction list, use the “Show” drop-down at the top of the window. Whatever choice you select shows those transactions for the account through the end of the selected accounting period.
You use this information to then reconcile the account transactions in Sage 50 with your bank account statement by marking the transactions that appear within the statement as “cleared” in Sage 50. As you clear the Sage 50 transactions, the “Unreconciled Difference” at the bottom of the window approaches zero. After marking all your cleared transactions, the difference should be zero.
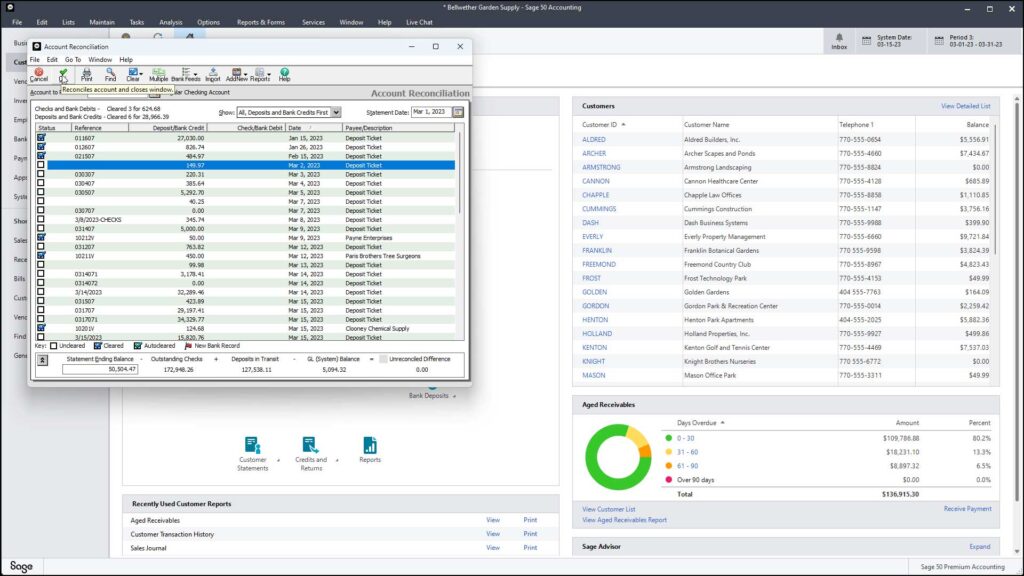
Reconcile Accounts in Sage 50 – Instructions: A picture of a user reconciling a bank account in Sage 50.
How to Enter Interest and Service Fees:
Additional transactions not typically recorded in Sage 50 until you receive the bank statement, like bank service charges, can be added while reconciling the account. You can input bank service fees and interest earned directly into the reconciliation window. To do this, click the “Expand” button in the lower-left corner of this window to expand the “Interest Earned/Service Charges” section, if needed.
Then enter any “Service Charges” or “Interest Income” into the fields of the same names in this section. Also enter the “Date” these transactions occurred, and the associated “Account” used to track their value, like a bank service fees expense account or an interest earned income account.
How to Clear Transactions:
To clear transactions shown within the account transaction list, check the checkbox at the left of any transaction to mark it as “cleared.” After a successful reconciliation, these cleared transactions are removed from the list when you move to the next accounting period.
Also, notice there are some unique buttons in the toolbar at the top of the “Account Reconciliation” window. If you click the “OK” button, you save your changes and close the “Account Reconciliation” window. You can return at any time to finish the reconciliation, if needed.
How to Clear Multiple Transactions:
You can click the “Multiple” button to open the “Clear Transactions” dialog box where you can select a range of transactions to clear. In this dialog box, select the types of transactions to clear from the “Type” drop-down. Then select whether to clear the transactions based on “Reference Number” or “Date Range.” Then enter a range of reference numbers or a date range within which to mark the selected type of transactions as “cleared.” Finally, click the “OK” button to clear the range of transactions.
How to Link a Bank Feed:
To link a bank feed to your account through Sage Bank Feeds, which is a separate service, click the “Bank Feeds” button in the toolbar and then select the “Connect to Bank Feed” command to open the “Sage Bank Feeds” window. Enter and confirm your email here and then accept the terms and conditions to continue. Then follow the steps in the “Sage Bank Feeds” wizard to authenticate yourself and access your bank’s online account feed.
How to Import a Bank Statement:
To import a local copy of a bank statement to match against the transactions, click the “Import” button in the toolbar to open the “Import Statement” window. To use this feature, you must have already downloaded a copy of the bank statement from your bank’s website. Then click the “Browse” button to open a dialog box that lets you select and open the saved statement file. To import the statement after selecting it, click the “Import” button to open a “Select Account” window where you can select the account from which to import.
How to Run Reconciliation Reports, Clear All Transactions, or Add New Transactions:
To select reconciliation reports, if needed, click the “Reports” button in the window’s toolbar and then select the report to open. You can also click the “Clear” drop-down in the toolbar to select either “(check) All,” which checks every transaction to mark them all as cleared, or “(uncheck) All,” which unchecks every transaction to mark them all as uncleared. To enter new transactions that affect the account reconciliation, click the “Add New” button to show a drop-down menu of task window choices you can open to enter additional transactions. You can select either “General Journal Entry,” “Write Check,” “Receipt,” or “Account Register” to open the task window and then enter the additional transactions, if needed.
How to Add Beginning Transactions:
If you are just beginning to use Sage 50, you may need to click the “Beginning Transactions” gray arrow button in the lower-right corner of the “Interest Earned/Service Charges” section when it is expanded to open the “Beginning Transactions” window. In this window, you can enter transactions that occurred before the Sage 50 company file’s start date. These transactions will not affect the General Ledger and they are only used for account reconciliation.
Reconcile Accounts in Sage 50: Instructions
- To reconcile accounts in Sage 50, select “Tasks| Account Reconciliation…” from the Menu Bar to open the “Account Reconciliation” window.
- Select the ID of the account to reconcile from the “Account to Reconcile” drop-down.
- Then enter the statement date from the account statement into the “Statement Date” field.
- If needed, to reconcile information from prior accounting periods without leaving the current accounting period, select the prior period statement date within the prior period to reconcile from the “Statement Date” field.
- Next, enter the account’s balance as of the statement date into the “Statement Ending Balance” field.
- At this point, all the selected account’s transactions appear in a list with deposits and bank credits shown first.
- To change which items appear in the transaction list, use the “Show” drop-down menu at the top of the window.
- You use this information to then reconcile the account transactions in Sage 50 with your bank account statement by marking the transactions that appear within the statement as “cleared” in Sage 50.
- As you clear the Sage 50 transactions, the “Unreconciled Difference” shown at the bottom of the window approaches zero. After marking all your cleared transactions, the difference should be zero.
- To enter bank service fees and interest, click the “Expand” button in the lower-left corner of this window to expand the “Interest Earned/Service Charges” section, if needed.
- Then enter any “Service Charges” or “Interest Income” into those fields in this section.
- Also enter the “Date” these transactions occurred, and the associated “Account” used to track their value.
- To clear transactions in the transaction list, check the checkbox at the left of any transaction.
- To save your changes and close the “Account Reconciliation” window, click the “OK” button in the window’s toolbar.
- You can return at any time to finish the reconciliation, if needed.
Instructions on How to Clear a Range of Transactions:
- To clear a range of transactions, click the “Multiple” button in the window’s toolbar.
- Doing this then opens the “Clear Transactions” dialog box.
- In this dialog box, select the types of transactions to clear from the “Type” drop-down.
- Then select whether to clear the transactions based on “Reference Number” or “Date Range.”
- Then enter a range of reference numbers or a date range within which to mark the selected type of transactions as “cleared.”
- Finally, click the “OK” button to clear the range of transactions.
Instructions on How to Link a Bank Feed:
- To link a bank feed to your account through Sage Bank Feeds, click the “Bank Feeds” button in the toolbar.
- Then select the “Connect to Bank Feed” command to open the “Sage Bank Feeds” window.
- Enter and confirm your email here and then accept the terms and conditions to continue.
- Then follow the steps in the “Sage Bank Feeds” wizard to authenticate yourself and access your bank’s online account feed.
How to Import a Copy of a Bank Statement:
- To import a local copy of a bank statement to match against transactions, click the “Import” button in the toolbar.
- Doing this then opens the “Import Statement” window.
- To use this feature, you must have already downloaded a copy of the bank statement from your bank’s website.
- Then click the “Browse” button to open a dialog box that lets you select and open the saved statement file.
- To import the statement after selecting it, click the “Import” button to open a “Select Account” window.
- In this window, select the account from which to import.
Instructions on How to Run Reconciliation Reports:
- To select reconciliation reports, if needed, click the “Reports” button in the window’s toolbar.
- Then select the report to open.
Instructions on How to Clear or Unclear All Transactions:
- To mark all transactions as cleared or uncleared, click the “Clear” drop-down in the toolbar.
- Then select either “(check) All,” which checks every transaction to mark them all as cleared, or “(uncheck) All,” which unchecks every transaction to mark them all as uncleared.
How to Enter New Transactions:
- To enter new transactions that affect the account reconciliation, click the “Add New” button to show a drop-down menu.
- Then select either “General Journal Entry,” “Write Check,” “Receipt,” or “Account Register” to open the related task window.
- Then enter the additional transactions, if needed.
Instructions on How to Enter Beginning Transactions:
- To enter beginning transactions if you are just starting to use Sage 50, click the “Beginning Transactions” gray arrow button in the lower-right corner of the “Interest Earned/Service Charges” section when it is expanded to open the “Beginning Transactions” window.
- In this window, enter transactions that occurred before the Sage 50 company file’s start date. These transactions do not affect the General Ledger and are only used for account reconciliation.