Reconcile an Account in QuickBooks Online- Instructions
Reconcile an Account in QuickBooks Online: Video Lesson
This video lesson, titled “How to Reconcile Accounts in QuickBooks Online,” shows you how to reconcile an account in QuickBooks Online. This video lesson is from our complete QuickBooks Online tutorial, titled “Mastering QuickBooks Online Made Easy.”
Overview:
You can reconcile an account in QuickBooks Online to match the transactions on your monthly bank statement with the transactions in QuickBooks Online. This helps you detect bank errors and prevent fraud. You can only reconcile balance sheet accounts in QuickBooks Online. To reconcile an account, click the “Settings” button in the QuickBooks Online toolbar and then click the “Reconcile” link under the “Tools” heading in the drop-down menu to open the “Reconcile” page.
Select the Account to Reconcile and Enter the Account’s Statement Information:
QuickBooks Online has introduced a new AI-powered account reconciliation experience for connected bank or credit card accounts, in addition to its classic account reconciliation experience. To switch between the two account reconciliation experiences for a connected bank or credit card account, click the “Try the new experience/Switch to previous experience” toggle button at the top of the “Reconcile” page and follow the onscreen prompts. To select the account to reconcile, choose it from the “Account” drop-down in the “Reconcile” page.
If Using the New Account Reconciliation Experience:
If using the new account reconciliation experience, then either drag and drop the bank account or credit card account statement onto the “Upload from this device” field or click in the field to upload the bank account statement using a system dialog box. QuickBooks Online then uploads the statement, extracts the transactions, and enters information it finds in the statement into the fields below, like “Statement ending balance” and “Statement ending date.” Verify this extracted information is correct and then click the “Start reconciling” button to continue.
Alternatively, if Using the Classic Account Reconciliation Experience:
Alternatively, if manually reconciling using the classic account reconciliation experience, then enter the account’s statement information into the “Add the following information” section. The account’s “Beginning balance” appears to the left. Enter the statement’s ending balance into the “Statement ending balance” field. Then enter the statement’s ending date into the “Statement ending date” field.
If needed, then enter any bank service fees or interest earned into the “Enter the service charge or interest earned, if necessary” section. Enter any bank service fees into the “Service charge” field and then select the date and the account used to track bank service fees from the adjacent “Date” and “Expense account” drop-downs.
To enter interest earned, type the amount of interest earned into the “Interest earned” field. Then select the date and the income account used to track interest income, from the adjacent “Date” and “Income account” drop-downs. To reconcile the account after entering the statement information, click the “Start reconciling” button at the bottom of the window.
Reconcile the Account by Marking Transactions as Cleared
In the next page that opens, the transactions for the account as of the statement ending date appear on the “Payments,” “Deposits/Charges,” and “All” tabs. You can click these tabs to filter the transactions in the list below to show only the associated types of account transactions. Clicking the “Payments” tab shows payments in the transaction list. Clicking the “Deposits” or “Charges” tab shows only deposits or charges in the transaction list. Clicking the “All” tab shows all account transactions.
The information you entered from the account statement appears at the top of the page. The purpose of this page is to click the small circles or checkboxes at the right end of the transaction rows that appear in the account’s statement to mark them as “cleared” by placing a checkmark in them. The classic experience shows circles, and the new experience shows checkboxes.
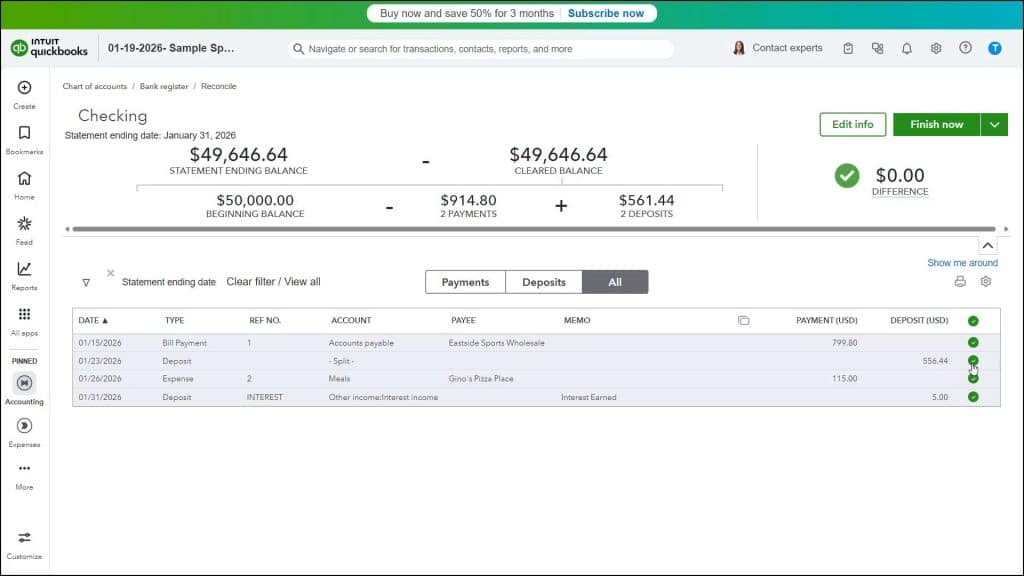
After all transactions are found and marked as cleared, the “Difference” shown in the upper-right corner of the window should be zero. This means every account transaction in the statement is matched to a transaction in QuickBooks Online and, therefore, the transactions in both versions of the account are reconciled. Also note that if you are reconciling a connected bank account, the transaction information is imported from the connected financial institution, and so, for some accounts, the accounts may appear already balanced.
How to Apply Optional, Additional Filters to the Reconciliation Transactions:
If needed, to apply filters to the transaction list, click the “Filters” button above the transaction list to select from filtering choices in the drop-down menu. Then click the “Apply” button in the drop-down menu to apply the filters you selected. You can remove applied filters by clicking the “X” button next to the applied filter’s name.
How to Change the Statement Information, if Needed:
If needed, to change the account statement’s information you entered, click the “Edit info” button in the upper-right corner of this page to open an “Edit the information from your statement” pane at the right side of the window. Change the account statement information, as needed, and then click the “Save” button in the lower-right corner of this pane to return to the transaction list page. Click the “Cancel” button in this pane to leave without saving any changes.
How to Finish the Account Reconciliation:
The information at the top of the page shows the statement ending balance minus the cleared QuickBooks balance, which should produce a “Difference” of zero after completing the account reconciliation. The account’s “Beginning Balance” minus the total “Payments” and “Deposits” selected in the transaction list also appear here.
The drop-down button in the upper-right corner of the page lets you manage the account reconciliation. After successfully reconciling an account, click or select the “Finish now” command from this drop-down button to save it and close the page.
Alternatively, How to Save to Finish Reconciling Later:
To save your work if you want to finish reconciling an account later or to leave to investigate an account discrepancy, select the “Save for later” command from this drop-down button to save your work and close the page. To return to finish the account reconciliation later, click the “Settings” button and then click the “Reconcile” link under the “Tools” heading in the drop-down menu again. Then select the same account again and click the adjacent “Resume reconciling” button to continue from where you left.
Alternatively, How to Close the Account Reconciliation to Remove All Changes:
To remove all your changes and close the reconciliation, select the “Close without saving” command from this drop-down button to open a “We’ll remove all of your changes” confirmation prompt window. Then click the “Close without saving” button in this window to confirm. Alternatively, to return to the reconciliation, click the “Go back” button in the prompt window.
How to View Reconciliation Reports
After completing an account reconciliation, a reconciliation report becomes available. In the “You reconciled this account” window that appears, you can click the “View reconciliation report” link to view the report. Otherwise, click the “Done” button in this window to close it.
Alternatively, to view an account reconciliation report later, click the “Settings” button. Then click the “Reconcile” link under the “Tools” heading in the drop-down menu to open the initial “Reconcile” page again. Then click the “History by account” button in the upper-right corner of that window to open a “History by account” page. Use the “Account” drop-down at the top of this page to select the account for which to view the previous reconciliation report.
The account’s previous reconciliation reports then appear in list below. For the desired period, click the “View report” link under the “Action” column to open the report. Then click the “Print” button in the upper-right corner of the report to print it, if needed.
To instead view a reconciliation summary page, click the “Summary” button in the upper-right corner of the “Reconcile” window. To return to the “Reconcile” page from the “Summary” or “History by account” page, click the “Reconcile” button in the upper-right corner of the window.


