Record a Macro in Excel – Instructions and Video Lesson
How to Record a Macro in Excel: Video
This video lesson, titled “Recording Macros,” shows how to record a macro in Excel. This video lesson is from our complete Excel tutorial, titled “Mastering Excel Made Easy v.2019 and 365.”
Overview of How to Record a Macro in Excel:
You can easily record a macro in Excel. Macros are small programs that record your actions as you perform a task in Excel. The actions are then saved as a Visual Basic Module, which is a type of program. When you run the macro later, it repeats your keystrokes and thus repeats your actions. This is why macros are great for automating repetitive tasks.
For example, assume you wanted to place your name and your company’s information in the upper-left cell of a worksheet. You could record a macro in Excel to save your keystrokes as you create it once and then run the macro in the future to repeat the exact same keystrokes you entered. This lets you instantaneously repeat the same process again.
While you can see advanced options for creating macros on the “Developer” tab in the Ribbon if it is enabled, you can also use the “Macros” button group on the “View” tab in the Ribbon to record a macro in Excel and playback basic macros. In this lesson, we will examine how to record a macro in Excel using the commands found within this button group in the Ribbon.
How to Record a Macro in Excel:
To record a macro in Excel, click the “View” tab in the Ribbon. Then click the “Macros” drop-down button in the “Macros” button group. From the drop-down menu that appears, select the “Record Macro…” command to open the “Record Macro” dialog box. In the “Record Macro” dialog box, enter a name for the new macro into the “Macro name” text box. Macro names cannot contain spaces. Its first character must also be a letter.
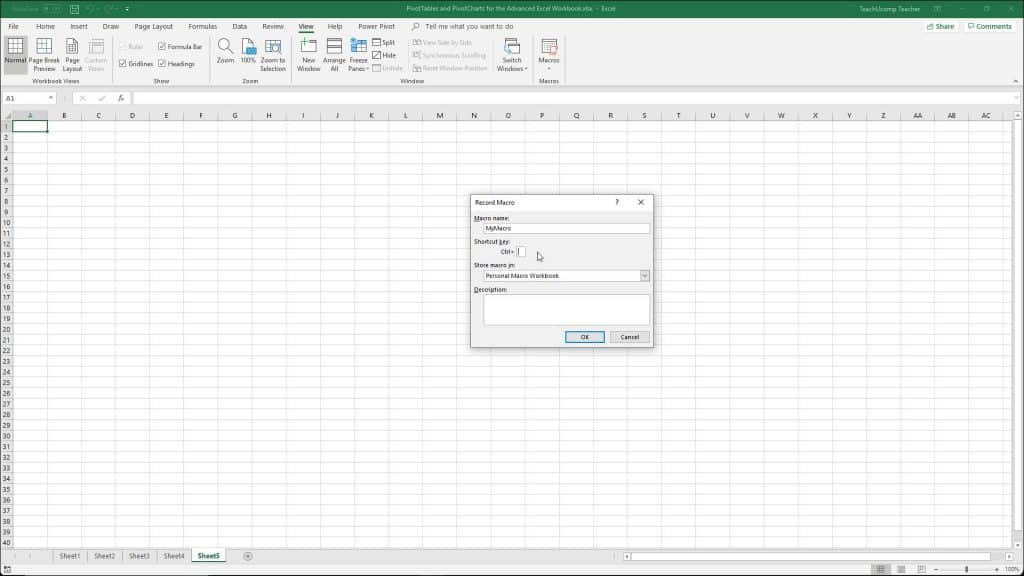
A picture that shows how to record a macro in Excel using the “Record Macro” dialog box.
Next, select the name of the workbook to which to attach the macro by selecting its name from the “Store macro in:” drop-down. If you do not change it, it defaults to saving the macro into the current workbook. This is important because a macro can only be run if it is attached to an open workbook or stored in the “Personal Macro Workbook,” which is a hidden workbook that opens by default in Excel.
To create a custom keyboard shortcut for the macro to use in conjunction with the “Ctrl” key, type the desired shortcut key letter into the text box next to the “Ctrl +” label. If you do this, ensure you don’t overwrite an existing shortcut! For example, the shortcut character of “p” is a bad choice because “Ctrl + P” is already a keyboard shortcut for the “Print” command. If you aren’t familiar with the keyboard shortcuts, it may be better if you don’t assign one. To start recording your macro’s actions, click “OK.”
How to Use Relative References When You Record a Macro in Excel:
You can adjust the types of cell references you make when you record a macro in Excel. For example, assume that when you began recording your macro, your “active cell” was cell A1. From there, you clicked into cell D1. When Excel records you doing that, it can either record that action as a relative reference or an absolute reference. That action, if recorded using relative references, would make the “active cell” move four cells to the right of whatever cell it was in when you started to play the macro. If you recorded it in absolute terms, it would always move to cell D1 from wherever cell you had selected as the “active cell” when you started to play the macro.
To enable relative cell referencing when recording a macro, click the “Macros” drop-down button in the “Macros” button group. Then select the “Use Relative References” command to turn it on. By default, Excel macros use absolute cell references. To switch back to absolute cell referencing when recording a macro, click the “Macros” drop-down button in the “Macros” group. Then select the “Use Relative References” command again to turn it off.
How to Stop Recording a Macro in Excel:
After you record a macro in Excel, click the “View” tab in the Ribbon. Then click the “Macros” drop-down button in the “Macros” button group. Then select the “Stop Recording” command to stop recording the macro. Also, remember that if you want to save a workbook that contains macros in Excel, you need to select the “Excel Macro-Enabled Workbook” choice from the “File type:” drop-down in the “Save As” dialog box.
Instructions on How to Record a Macro in Excel:
- To record a macro in Excel, click the “View” tab in the Ribbon.
- Then click the “Macros” drop-down button in the “Macros” button group.
- Then select the “Record Macro…” command to open the “Record Macro” dialog box.
- In the “Record Macro” dialog box, enter a name for your new macro into the “Macro name” text box.
- To create a custom keyboard shortcut to use in conjunction with the “Ctrl” key, type the desired shortcut key letter into the text box next to the “Ctrl +” label. If you do this, make sure you don’t overwrite an existing shortcut!
- Select the name of the workbook to which to attach the macro from the “Store macro in:” drop-down.
- To then record your macro’s actions, click the “OK” button and then perform the actions to record.
- If needed, to use relative cell referencing when recording a macro, click the “Macros” drop-down button in the “Macros” group.
- Then select the “Use Relative References” command.
- If needed, to then switch back to absolute cell referencing when recording a macro, click the “Macros” drop-down button in the “Macros” group.
- Then select the “Use Relative References” command again to turn it off.
- To stop recording the macro, click the “View” tab in the Ribbon.
- Then click the “Macros” drop-down button in the “Macros” button group.
- Then select the “Stop Recording” command.

