Record a Macro in Word – Instructions and Video Lesson
Record a Macro in Word: Video Lesson
This video lesson, titled “Recording Macros,” shows you how to record a macro in Word. This video lesson is from our complete Word tutorial, titled “Mastering Word Made Easy v.2019 and 365.”
Record a Macro in Word: Overview
You can easily record a macro in Word. Macros are small programs that record your keystrokes as you perform a task. It then saves the actions you perform as a Visual Basic Module, which is a type of program file. When you run the macro later, it repeats your keystrokes, thus repeating your actions. This is why they are great for automating repetitive tasks.
For example, you could record a macro in Word that places your company’s name and address information in the upper-left corner of a document. To do this, you record a macro in Word as you enter the information once. You can then run the recorded macro later to do it again in future documents. It repeats the exact same keystrokes you entered, instantly repeating the process.
You can see advanced options for creating macros on the “Developer” tab in the Ribbon, if it is enabled. You can also use the “Macros” button group on the “View” tab in the Ribbon to both record and play recorded macros. This lesson shows you how to record a macro in Word using the commands in this button group in the Ribbon.
To record a macro in Word, click the “View” tab in the Ribbon. Then click the drop-down part of the “Macros” button in the “Macros” button group. Then select the “Record Macro…” command from the drop-down menu that appears to open the “Record Macro” dialog box. In the “Record Macro” dialog box, enter a name for your new macro into the “Macro name” text box. Note that macro names cannot contain spaces!
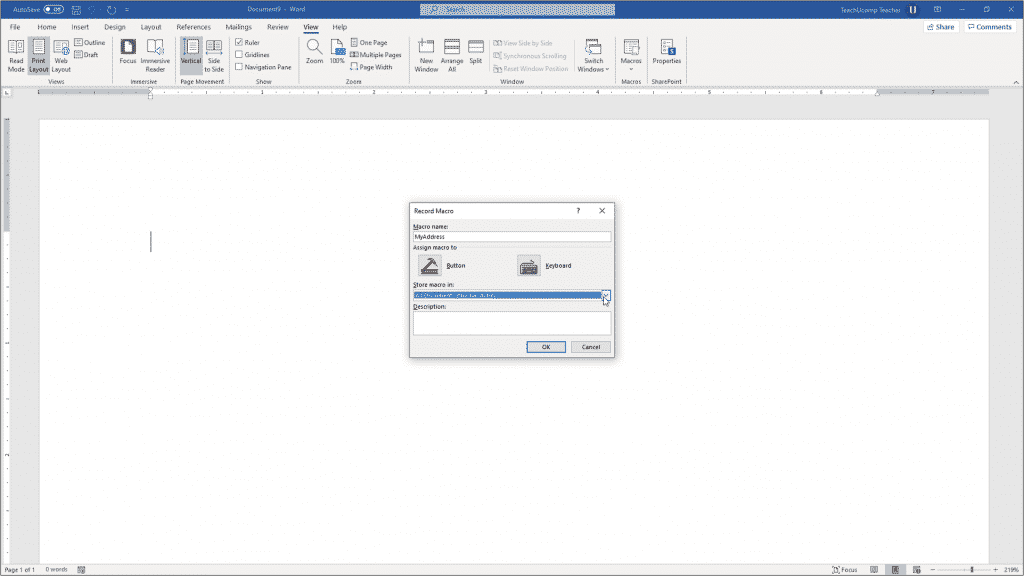
Record a Macro in Word – Instructions and Video Lesson: A picture of a user naming a new macro in the “Record Macro” dialog box.
Then select the template or document to which to attach the macro from the “Store macro in:” drop-down. It defaults to the “Normal” macro-compatible document template (.dotm), which is the document template upon which all new macro-enabled documents are based. A macro can only work if it is attached to the actual document in which it is used, or if it is attached to the document template from which the current document was produced. So, if the macro is one you want for all documents that use macros, then selecting the “All documents (Normal.dotm)” template choice is a good idea! Otherwise, just select the template or file to which to attach the macro. Then click the “OK” button to start recording.
When recording macros in Word, avoid clicking with your mouse into the document to do things like select items or move the insertion mark cursor to avoid creating unexpected results when you run the macro later. Instead, try to use the keyboard keys to do things like move the insertion mark cursor and select text as much as possible.
If necessary, to pause the macro while recording, click the “View” tab of the Ribbon. Then click the drop-down part of the “Macros” button in the “Macros” button group. Then choose the “Pause Recording” command from the button’s drop-down menu. To resume recording the macro when you are ready to continue, click the “View” tab of the Ribbon. Then click the drop-down part of the “Macros” button in the “Macros” button group. Then select the “Resume Recorder” command from the button’s drop-down menu.
To stop recording the macro, click the “View” tab of the Ribbon. Then click the drop-down part of the “Macros” button in the “Macros” button group. Then select the “Stop Recording” command from the button’s drop-down menu.
Record a Macro in Word: Instructions
- To record a macro in Word, click the “View” tab in the Ribbon.
- Then click the drop-down part of the “Macros” button in the “Macros” button group.
- Then select the “Record Macro…” command from the drop-down menu that appears to open the “Record Macro” dialog box.
- In the “Record Macro” dialog box, enter a macro name into the “Macro name” field. Macro names cannot contain spaces!
- Then select the template or document to which to attach the macro from the “Store macro in:” drop-down.
- To create a macro for all documents that can use macros, select the “All documents (Normal.dotm)” template choice.
- Alternatively, select the template or file to which to attach the macro.
- Then click the “OK” button to start recording.
- When recording macros in Word, avoid clicking your mouse into the document to do things like select items or move the insertion mark cursor to avoid unexpected results when you run the macro later. Instead, use the keyboard keys to do those things as much as possible.
- To pause the macro recording, click the “View” tab of the Ribbon.
- Then click the drop-down part of the “Macros” button in the “Macros” button group.
- Then choose the “Pause Recording” command from the button’s drop-down menu.
- To resume recording the macro, click the “View” tab of the Ribbon.
- Then click the drop-down part of the “Macros” button in the “Macros” button group.
- Then select the “Resume Recorder” command from the button’s drop-down menu.
- To stop recording the macro, click the “View” tab of the Ribbon.
- Then click the drop-down part of the “Macros” button in the “Macros” button group.
- Then select the “Stop Recording” command from the button’s drop-down menu.

