How to Record a Slide Show in PowerPoint: Video
This video lesson, titled “Record a Slide Show,” shows how to record a slide show in PowerPoint. This video lesson is from our complete PowerPoint tutorial, titled “Mastering PowerPoint Made Easy v.2019 and 365.”
Overview of How to Record a Slide Show in PowerPoint:
What to Know Before you Start Recording a Slide Show in PowerPoint:
Before you record a slide show in PowerPoint, you must have a computer with a sound card, speakers, and a microphone. To optionally record video, too, you must have a camera. These tools let you record your presentation, slide by slide, as you deliver it. When recording the slide show, PowerPoint records its narration, slide advancement timings, annotations, and any optional video you record.
PowerPoint saves this data on a per-slide basis, so you can easily reorganize the slides after recording without losing recorded content. This also lets you re-record only a selected slide if you need to correct a mistake during recording. However, PowerPoint doesn’t record audio or video during slide transitions, so do not speak during slide transitions or it will be lost. You should also give yourself a small buffer before and after a slide transition to ensure all your narration is recorded.
After you finish recording, you can play the recording in Slide Show view or save the presentation as a video file. This helps you deliver a presentation to others if you cannot deliver it in person.
How to Record a Slide Show in PowerPoint:
To record a slide show in PowerPoint, click the “Record Slide Show” drop-down button in the “Set Up” button group on the “Slide Show” tab of the Ribbon. Alternatively, if you have the “Recording” tab in the Ribbon enabled in your version of PowerPoint, you can click the same drop-down button which also appears in the “Record” button group there. To start recording from the first slide in the presentation, then select the “Record from Beginning…” command. Alternatively, to start recording from the currently active slide, choose the “Record from Current Slide…” command.
At that point, the presentation then opens in the Recording window, which is very similar to the Presenter View. The selected slide appears in the center of the window. To record, pause, or stop recording, click the desired button in the upper-left corner of the Recording window.
Optionally, to disable audio, video, or the video preview, click the desired button in the lower-right corner of the window. To change your camera or microphone, if needed, click the “Settings” button in the upper-right corner of the window, roll over the desired category, and then select your choice from the side menu that appears. To show speaker’s notes, click the “Notes” button at the top of the window.
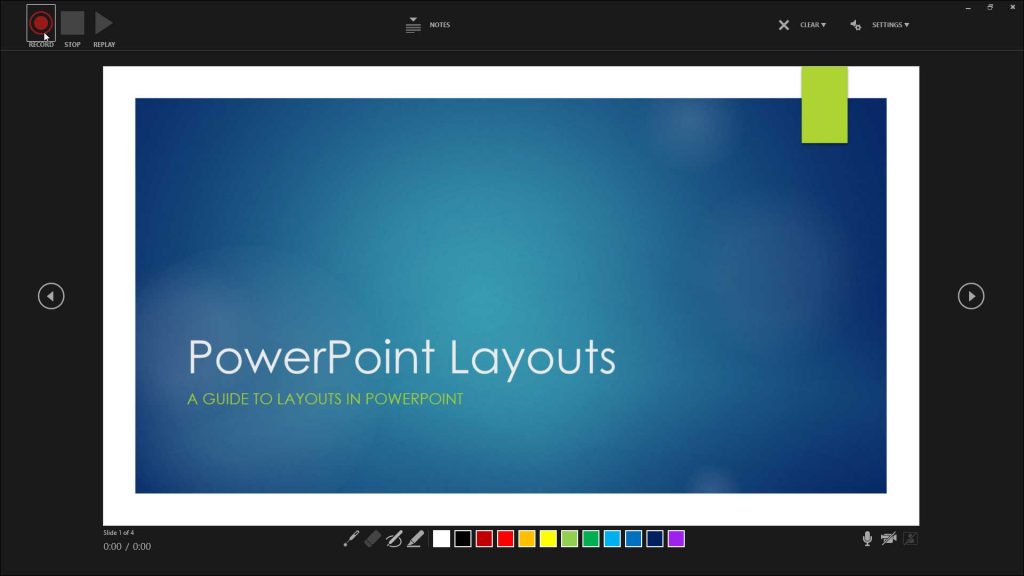
A picture showing how to record a slide show in PowerPoint using the Recording window in PowerPoint for Microsoft 365.
To start recording the slide show, click the “Record” button, which looks like a red circle. A three second countdown then starts, after which you can start delivering your presentation. To make annotations, click the desired tool at the bottom of the Recording window. Then select a color to the left, if needed. Then draw the annotation. Annotations are also recorded with the slide.
To pause the recording, if needed, click the “Pause” button in the upper-left corner of the Recording window after the recording starts. To stop the recording, when finished, click the “Stop” button in the upper-left corner of the Recording window.
How to Clear Slide Recordings, Replay Recordings, and Close the Recording Window:
To clear all recording from a slide when you are not recording, navigate to the slide in the Recording window. Then click the “Clear” drop-down button towards the upper-right corner of the window. Then select the “Clear Recordings on Current Slide” command from the drop-down menu that appears. You can then re-record the content for the slide. Alternatively, to delete all recordings from all slides, select the “Clear Recordings on All Slides” command from the drop-down menu, instead.
To play the recording from the current slide, if desired, click the “Replay” button in the upper-left corner of the Recording window. To return to Normal view after you finish recording, press the “Esc” key on your keyboard click the “X” button in the upper-right corner of the Recording window.
Playing a Recorded Slide Show and Clearing Slides in Normal View:
To play the recorded slide show in Slide Show view, just click the “From Beginning” or “From Current Slide” button in the “Start Slide Show” button group on the “Slide Show” tab of the Ribbon when in Normal view, as usual.
To clear either recorded slide timings or narrations (meaning audio, video, and annotations) from one or all slides in PowerPoint when using Normal view, first select the desired slide, if needed. Then click the “Record Slide Show” drop-down button on either the “Slide Show” or “Recording” tab of the Ribbon. Then roll over the “Clear” command in the drop-down menu. Finally, select the desired type of element to clear and from which slides to clear it from the four choices in the side menu that appears.
How to Manually Present a Recorded Slide Show:
After you record a slide show in PowerPoint, you may want to manually present it again without the recorded narrations or slide timings. You can toggle those settings off to accomplish this. If you want to disable recorded timings and/or narrations for a slide show, click the “Slide Show” tab in the Ribbon. To disable slide timings, uncheck the “Use timings” check box in the “Set Up” button group. To disable narrations, uncheck the “Play Narrations” checkbox in the “Set Up” button group.
Instructions on How to Record a Slide Show in PowerPoint:
Things to Know Before Recording a Slide Show in PowerPoint:
- Before you record a slide show in PowerPoint, you must have a computer with a sound card, speakers, and a microphone.
- To optionally record video, too, you must have a camera.
Instructions on Recording a Slide Show in PowerPoint:
- To record a slide show in PowerPoint, click the “Record Slide Show” drop-down button in the “Set Up” button group on the “Slide Show” tab of the Ribbon.
- Alternatively, if the “Recording” tab of the Ribbon is enabled in your version of PowerPoint, you can click the same drop-down button in the “Record” button group there.
- To start recording from the first presentation slide, select the “Record from Beginning…” command.
- Alternatively, to start recording from the currently active slide, choose the “Record from Current Slide…” command.
- The presentation then opens in the Recording window and the selected slide appears in the center of the window.
- To record, pause, or stop recording, click the desired button in the upper-left corner of the Recording window.
- Optionally, to disable audio, video, or the video preview, click the desired button in the lower-right corner of the window.
- To change your camera or microphone, if needed, click the “Settings” button in the upper-right corner of the window, roll over the desired category, and then select your choice from the side menu.
- If you want to show speaker’s notes, click the “Notes” button at the top of the window.
- To start recording the slide show, click the “Record” button, which looks like a red circle.
- A three second countdown then starts, after which you can start delivering your presentation.
- If you need to make annotations, click the desired tool at the bottom of the Recording window, select a color to the left, if needed, and then draw the annotation. Annotations are also recorded with the slide.
- To pause the recording, if needed, click the “Pause” button in the upper-left corner of the Recording window after the recording starts.
- To stop the recording, when finished, click the “Stop” button in the upper-left corner of the Recording window.
Instructions on How to Clear Slide Recordings, Replay the Recording, and Close the Recording Window:
- If you want to clear all recording from a slide when you are not recording, navigate to the slide in the Recording window.
- Then click the “Clear” drop-down button towards the upper-right corner of the window.
- Then select the “Clear Recordings on Current Slide” command from the drop-down menu that appears.
- You can then re-record the content for the slide.
- Alternatively, to delete all recordings from all slides, select the “Clear Recordings on All Slides” command from the drop-down menu, instead.
- To play the recording from the current slide, if desired, click the “Replay” button in the upper-left corner of the Recording window.
- To close the Recording window and return to Normal view after you finish recording, press the “Esc” key on your keyboard.
- Alternatively, click the “X” button in the upper-right corner of the Recording window.
Instructions on How to Play a Recorded Slide Show and Clearing Slides in Normal View:
- To play the recorded slide show in Slide Show view, just click the “From Beginning” or “From Current Slide” button in the “Start Slide Show” button group on the “Slide Show” tab of the Ribbon when in Normal view, as usual.
- To clear either recorded slide timings or narrations (meaning audio, video, and annotations) from one or all slides in PowerPoint when using Normal view, first select the desired slide, if needed.
- Then click the “Record Slide Show” drop-down button on either the “Slide Show” or “Recording” tab of the Ribbon.
- Then roll over the “Clear” command in the drop-down menu.
- Finally, select the desired type of element to clear and from which slides to clear it from the four choices in the side menu that appears.
Instructions on Manually Presenting a Recorded Slide Show:
- After you record a slide show in PowerPoint, you may want to manually deliver it again without the recorded narrations or slide timings. You can toggle those settings off to accomplish this.
- If you want to disable recorded timings and/or narrations for a slide show, click the “Slide Show” tab in the Ribbon.
- To disable slide timings, uncheck the “Use timings” check box in the “Set Up” button group.
- To disable narrations, uncheck the “Play Narrations” checkbox in the “Set Up” button group.