Save a PDF as an Image in Acrobat- Instructions
Save a PDF as an Image in Acrobat: Video Lessons
This video lesson, titled “Exporting Images,” shows how to save a PDF as an image in Acrobat DC Pro. This lesson is from our complete Acrobat tutorial, titled “Mastering Acrobat Made Easy v.Pro DC.”
Save a PDF as an Image in Acrobat: Overview
You can save a PDF as an image in Acrobat. You can also save a PDF as a series of images using Acrobat. This is helpful for viewing the PDF on a device without Adobe Reader installed. When you export images using Acrobat, each PDF page is saved as a separate image. Therefore, a PDF with one page is exported and saved as one image. A 25-page PDF is exported and saved as 25 different images. Acrobat can save images as either “JPEG,” “JPEG 2000,” “TIFF,” or “PNG” image files.
To save a PDF as an image in Acrobat, open the file to export in Acrobat. If using Acrobat DC Pro, then choose “File| Export To| Image” from the Menu Bar. If using Acrobat XI Pro, then choose “File| Save As Other| Image” from the Menu Bar, instead.
Then, for both versions, select the type of image file to which to export the PDF pages from the side menu that appears. Your choices include “JPEG,” “JPEG 2000,” “TIFF,” or “PNG.”
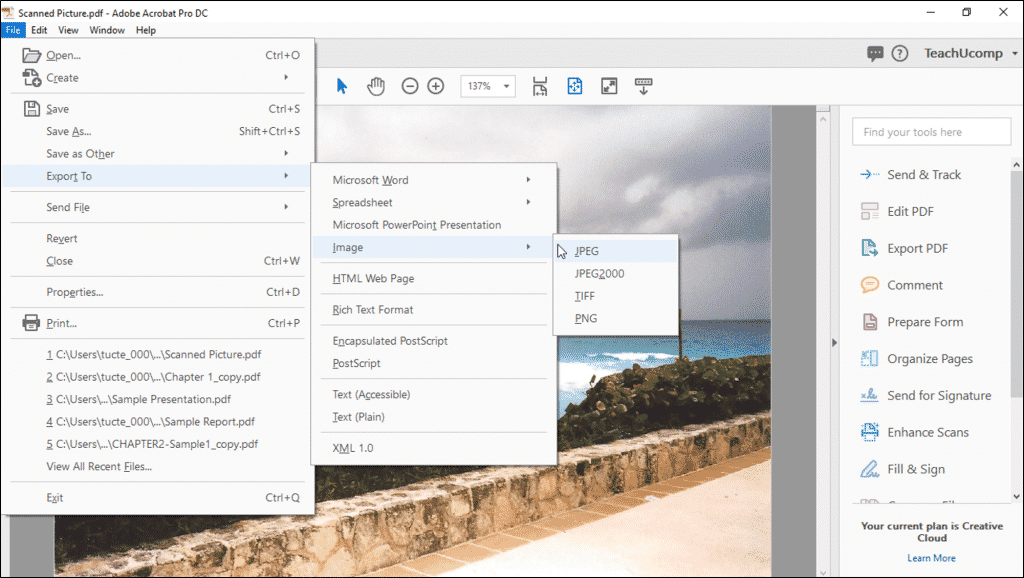
Save a PDF as an Image in Acrobat- Instructions: A picture of the Menu Bar command sequence to select in Adobe Acrobat DC Pro to save a PDF as an image or as a series of images.
In the dialog box that then opens, select the location to which to save the images. Also, enter a name into the “File name” field. If you click the “Settings” button in the dialog box, a new dialog box opens and shows advanced image settings. You can make any adjustments in this secondary dialog box, if needed, and then click the “OK” button to apply them. When finished, click the “Save” button in the first dialog box to create and save the new image files.
Save a PDF as an Image in Acrobat: Instructions
- To save a PDF as an image in Acrobat, open the file to export in Acrobat.
- If using Acrobat DC Pro, then choose “File| Export To| Image” from the Menu Bar.
- If using Acrobat XI Pro, then choose “File| Save As Other| Image” from the Menu Bar, instead.
- Then, for both versions, select the type of image file to which to export the PDF pages from the side menu that appears. Your choices include “JPEG,” “JPEG 2000,” “TIFF,” or “PNG.”
- In the dialog box that then opens, select the location to which to save the images. Also, enter a name into the “File name” field.
- Optionally, to apply advanced image settings, click the “Settings” button in the dialog box.
- A new, secondary dialog box then opens, where you can change your advanced image settings.
- Then click the “OK” button in the secondary dialog box to apply them.
- When finished, click the “Save” button in the first dialog box to create and save the new image files.
