Save a Word Document as a PDF File- Instructions
Save a Word Document as a PDF File: Video Lesson
This video lesson, titled “Saving as a PDF or XPS File,” shows you how to save a Word document as a PDF file or XPS file. This video lesson about how to save a Word document as a PDF file or XPS file is from our complete Word tutorial, titled “Mastering Word Made Easy v.2019 and 365.”
Save a Word Document as a PDF File: Overview
You may want to save a Word document as a PDF file. You can also save a Word document as an XPS file. Both file formats keep your document formatting but make it difficult for anyone else to change the file’s content. Both file formats also offer more security. In addition, anyone can easily download a free viewer for these file formats from the internet.
To save a Word document as a PDF file or XPS file, click the “File” tab in the Ribbon. Next, click the “Export” command at the left side of the Backstage view. Then click the “Create PDF/XPS Document” option to the right. Then click the “Create PDF/XPS” button to the right of that to open the “Publish as PDF or XPS” dialog box.
In this dialog box, navigate to the location in which to save the file. Then choose either “PDF” or “XPS Document” from the “Save as type:” drop-down, as desired. Change the name in the “File name:” text field, if necessary.
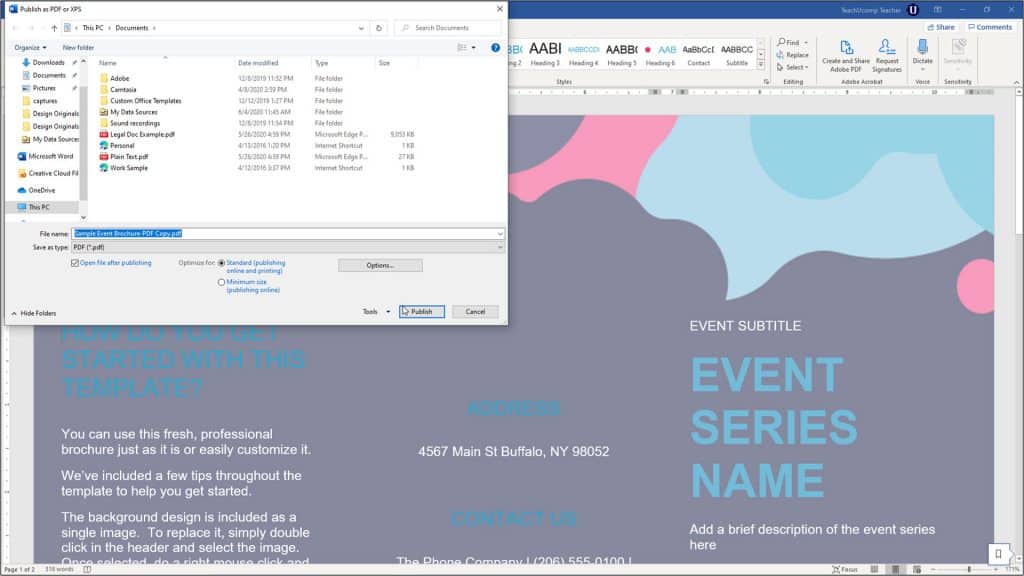
Save a Word Document as a PDF File- Instructions: A picture of a user saving a Word document as a PDF by using the “Publish as PDF or XPS” dialog box in Word.
You can also check or uncheck the “Open file after publishing” checkbox to enable or disable that option. You can also choose an option in the “Optimize for:” section, if desired. The default option is the “Standard (publishing online and printing)” choice. To finish saving the file, click the “Publish” button. The file then opens in your default PDF or XPS viewer if you chose to open the file after publishing it.
Save a Word Document as a PDF File: Instructions
- To save a Word document as a PDF file or XPS file, click the “File” tab in the Ribbon.
- Next, click the “Export” command at the left side of the application window.
- Then click the “Create PDF/XPS Document” option to the right.
- Then click the “Create PDF/XPS” button to the right of that to open the “Publish as PDF or XPS” dialog box.
- In this dialog box, navigate to the location where you want to save your new PDF or XPS file.
- To select the file type, choose “PDF” or “XPS Document” from the “Save as type:” drop-down.
- Change the “File name,” if needed.
- Optionally, to open the resultant file after publishing in your default PDF or XPS viewer, check the “Open file after publishing” checkbox.
- If desired, to set the quality and file size, choose an option in the “Optimize for:” section.
- Finally, click the “Publish” button to save your document in the selected file format.

